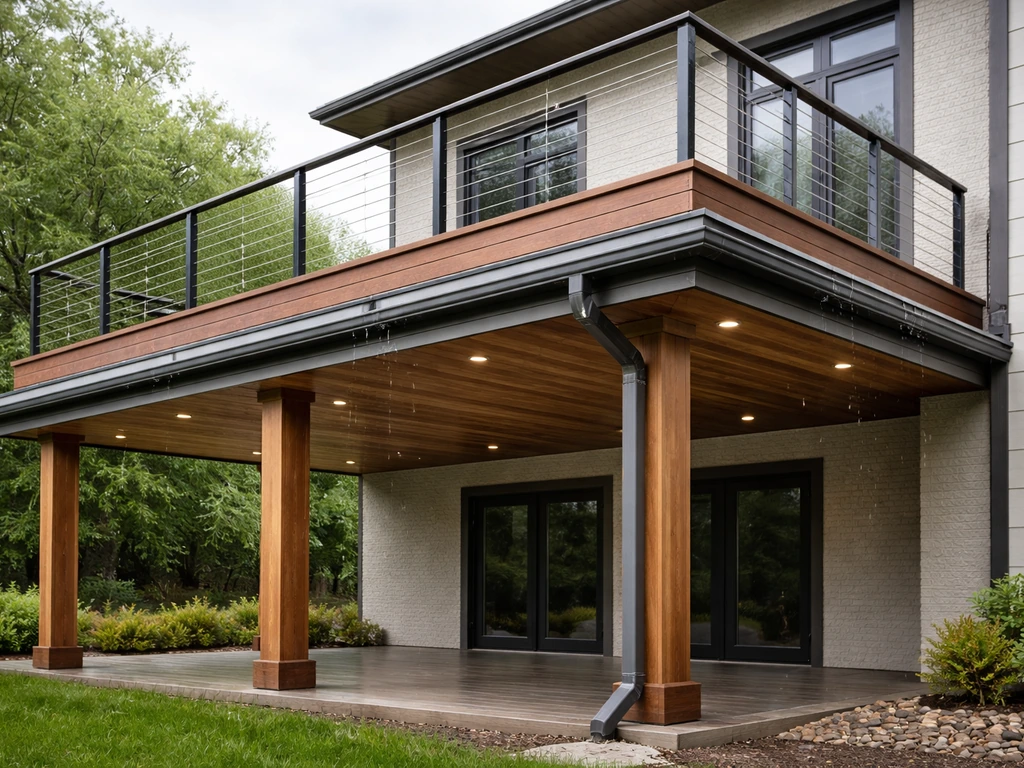
A patio cover with a deck on top is exactly what it sounds like: a covered patio at ground level with a full deck platform built above it, so you get two usable outdoor spaces stacked on top of each other. The covered patio stays shaded and dry underneath, while the upper deck gives you open-air space with views. It's one of the most functional outdoor setups you can build, but it's also one of the most complex because the deck surface is essentially a roof over the patio, and that means you have to get the waterproofing, structure, and drainage right before you nail down a single board.
Patio Cover With Deck on Top: Design, Cost, Code, Build Guide

Miles Hart
1 Jun 2026
What this structure actually is and how the layouts work

Most people searching for this are dealing with one of two situations: they want to build the whole thing from scratch, or they have an existing covered patio or deck and want to add the other piece. If you want examples of decks and patios that follow this same stacked layout concept, look for layouts that show both levels clearly and explain the roof or drainage approach below the upper deck. Either way, the core concept is the same. Posts and beams carry a structural deck platform above the patio. The patio below is covered, either by the deck framing itself (with a drainage system installed), or by a dedicated roof structure built as part of the patio cover before the deck goes on top.
Here are the most common layout configurations you'll see in practice:
- Deck over a covered concrete patio: The most straightforward version. A concrete slab patio already exists, and a freestanding or house-attached deck is framed above it on posts. The deck framing itself, once waterproofed, becomes the patio cover.
- Patio cover with deck platform above the roof: A traditional patio cover (pergola, solid-roof structure, or flat roof) is built first, then a deck platform is framed on top of the cover's structural members. This is common when the house has a second-story door or elevated grade.
- Multi-level attached deck with covered lower level: The deck attaches to the house at upper-floor level, steps down to a mid-level, and the covered space below the upper deck serves as the patio area. This is the most popular version for two-story homes.
- Freestanding stacked structure: No ledger board to the house at all. Posts and beams carry both levels independently. This is more expensive but avoids ledger flashing complications and is often required if the house siding or wall sheathing isn't suitable for attachment.
One thing to sort out early: is the patio below open on the sides, or is it a more enclosed covered room? If you're still deciding between the two, a covered deck vs covered patio comparison helps clarify which option fits your footprint and your drainage needs. Open sides are simpler from a code standpoint. Enclosed or screened-in lower spaces may trigger different occupancy classifications and energy code requirements depending on your jurisdiction. For most homeowners, the open-sided covered patio below a deck is the target, and that's what most of this guide covers.
Structural and design decisions that make or break the project
The biggest mistake people make with stacked patio-and-deck builds is underestimating the structural load. A typical residential deck has to carry 40 pounds per square foot (psf) live load and 10 psf dead load in most jurisdictions. When that deck sits over a covered patio, the posts holding it up are carrying the full deck load plus anything on it, which means your footing and post sizing has to reflect that. If you're in a snow zone, add snow load on top of that. This is the main reason a structural engineer or at least a licensed contractor needs to look at your plan before you break ground.
Footings and posts
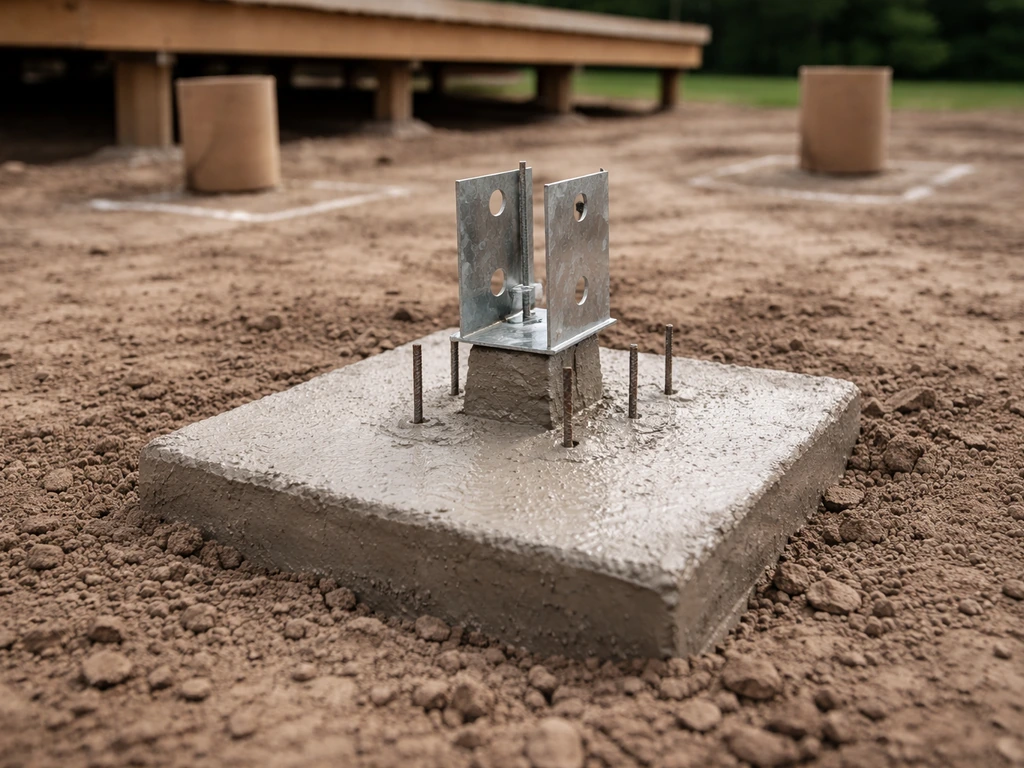
In most climates, footings need to go below the frost line, which can be anywhere from 12 inches in mild climates to 48 inches or more in northern states. The IBC does allow patio cover columns to bear on a concrete slab on grade without separate footings in frost-free areas, but only if the slab is at least 3.5 inches thick and no column carries more than 750 pounds. For a full deck above, that 750-pound threshold will often be exceeded, which means separate footings are required regardless of climate. Get this checked by your inspector or engineer before you pour anything.
Beam and joist sizing
Longer spans between posts mean bigger beams. A 16-foot beam span carrying a 12-foot-wide deck is a very different animal than an 8-foot span. Most span tables in the IRC will cover common residential situations, but for stacked structures where a single beam carries more tributary area than a standard deck, you may need to upsize. Using a structural LVL (laminated veneer lumber) beam instead of dimensional lumber is common in these builds. Your framing plan should also account for how stairs and railings tie into the structure, because those add point loads.
Ledger attachment (if attached to the house)
The ledger board connection to the house is statistically one of the most failure-prone junctions in residential deck construction. The attachment itself needs lag bolts or structural screws at code-specified spacing into the house rim joist, and the flashing over the ledger is non-negotiable. The correct layered approach uses a self-adhered membrane behind the ledger and Z-flashing installed so that water running down the siding above is directed away from the connection and drips off the lower leg of the flashing rather than wicking into the house framing. Skipping or rushing this step causes rot that can take years to show up but leads to catastrophic failure.
Decking material and deck surface choices
When the deck surface sits above a covered patio, the choice of decking material also affects how much water management you need below. Standard spaced deck boards (composite or pressure-treated wood) let rain through the gaps, which means you need a proper under-deck drainage system below. Solid surfaces like concrete pavers on pedestals, or poured concrete topping slabs, require full waterproofing membranes underneath because there's nowhere for water to escape through the surface. Pedestal-supported paver systems are popular for this application because they sit on top of the waterproofing membrane without puncturing it.
Railings, stairs, and access
Any deck surface more than 30 inches above the ground requires a guard rail at least 36 inches high (measured from the deck surface to the top of the rail), with openings no larger than a 4-inch sphere can pass through. Stair guards on open sides of stairs with more than 30 inches of total rise need to be at least 34 inches high. These are IRC minimums, and some jurisdictions require more. For a stacked structure, think carefully about where the stair lands: stairs from the upper deck ideally land on the patio below, not on the ground, which saves yard space but creates another design challenge for the patio ceiling clearance.
Permits, building code basics, and what inspections to expect
I'll be direct: a stacked patio-and-deck structure almost certainly requires a permit, no matter where you live. Some jurisdictions exempt very small accessory structures (one common threshold is under 200 square feet), but the moment you have a structure that's load-bearing, attached to the house, or involves electrical work, you're in permit territory. Don't skip it. Unpermitted structures create real problems when you sell, refinance, or need insurance to cover storm damage.
Here's what the typical permit and inspection sequence looks like for this type of project:
- Submit plans: You'll need a site plan showing setbacks, a framing plan with beam and joist sizes, and often a footing detail. Some municipalities require engineer-stamped drawings for structures of this complexity.
- Footing inspection: The inspector visits after you've dug your footing holes but before you pour concrete. This is the first and most critical inspection because footings are buried and can't be checked later.
- Framing inspection: The inspector checks the ledger attachment, post connections, beam sizing, and joist spacing before any decking or sheathing goes on. Framing and fastening are confirmed here.
- Waterproofing/rough inspection: If your jurisdiction requires it (more common in wetter climates), the waterproofing membrane gets inspected before the deck surface covers it.
- Final inspection: The completed structure including railings, stairs, and any electrical (outlets, lighting) gets a sign-off.
The IBC limits patio covers to one-story structures no more than 12 feet in height. If your design puts the upper deck platform or any part of the structure above 12 feet, you may move out of the simplified patio cover code provisions and into full commercial or residential structural code territory, which increases engineering requirements. Measure your heights carefully before finalizing your design.
Snow load and wind load requirements are locally determined. If you're in a heavy snow region (think 40 psf or more ground snow load), your beam and post sizing needs to account for that, and your inspector will check the plan against local tables. In coastal or high-wind areas, connection hardware like post bases and beam connectors have to meet wind uplift ratings. Use ICC-ES evaluated connectors and hardware from manufacturers like Simpson Strong-Tie or USP whenever possible, because those have published load ratings that satisfy plan checkers.
What this is going to cost you
Stacked patio-and-deck structures are more expensive per square foot than a standalone deck or a simple patio cover, because you're essentially paying for both plus the integration work between them. If you're trying to understand the roi patio vs deck tradeoff, focus on usable space value, maintenance, and how much of the work you can recover when you sell. Based on current 2026 data, blank" rel="noopener noreferrer">covered patios run roughly $50 to $150 per square foot depending on materials and complexity. Covering an existing deck or adding a cover structure to an existing space can run $2,000 to $12,000 on its own. A full build combining both levels will typically land between $25,000 and $65,000+ for a mid-size project (200 to 400 square feet of upper deck), depending heavily on your region, materials, and the specifics below.
The main cost drivers for stacked builds
| Cost Factor | Why It Matters for Stacked Structures | Rough Impact |
|---|---|---|
| Engineering and plans | Often required for load-bearing multi-level structures; needed for permit submission | $800 to $3,000+ |
| Footings and concrete | Deeper or larger footings needed for combined loads; more concrete than a standard deck | $1,500 to $6,000 |
| Heavier framing (beams, posts) | Larger LVL beams, larger post sizes, more hardware | $3,000 to $10,000 |
| Waterproofing membrane system | Required to keep patio dry; quality systems run $8 to $20+ per sq ft installed | $2,000 to $8,000 |
| Decking material (upper level) | Composite vs. wood vs. pavers on pedestals have a wide price spread | $3,000 to $15,000 |
| Railing and stairs | Code-compliant guards on upper deck; stair integration to lower patio | $2,000 to $8,000 |
| Gutters and drainage | Under-deck drainage channels, downspouts, patio slope for runoff | $500 to $3,000 |
| Labor premium | More complexity means more trade hours and coordination vs. a simple deck | 20 to 40% above standard deck labor |
DIY on portions of this can cut costs meaningfully, but the structural framing and waterproofing are not good candidates for inexperienced builders. Where you can save money is on decking installation, railing installation, and finishing work once the structural shell is done by a pro.
Waterproofing, drainage, and keeping the patio below actually dry
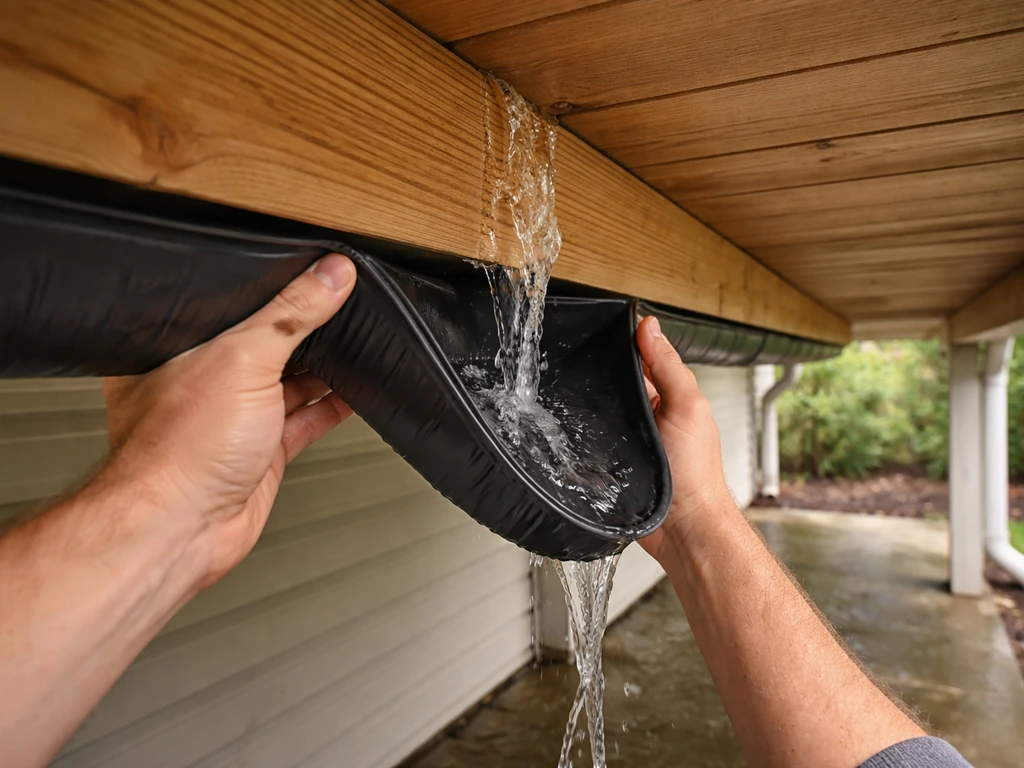
This is the part that separates a great stacked structure from a leaky disappointment. The deck above is functionally a roof over the patio below, and it needs to be treated that way. There are two fundamentally different approaches, and the right one depends on your decking surface choice.
Option 1: Under-deck drainage systems (for spaced deck boards)
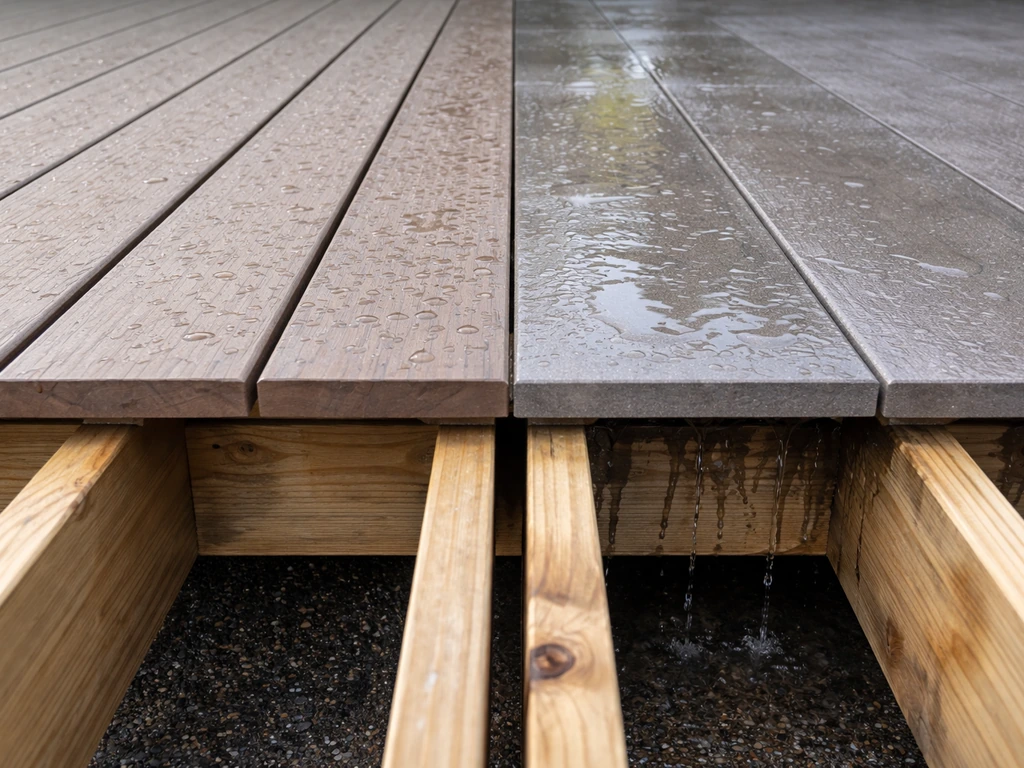
If you're using standard spaced composite or wood decking, rain passes through the gaps between boards. An under-deck drainage system catches that water and channels it to the outside edge before it can drip on the patio. If you are using standard spaced deck boards, an under-deck drainage system is often the best comparison point for keeping the patio below upper deck dry. These systems use a membrane (typically 45 mil rubber or similar material) or interlocking panels installed between the joists, sloped to a central channel or perimeter gutter. The water exits through downspouts at the outer edge of the deck. This approach is less expensive than full waterproofing but requires well-executed installation to prevent low spots where water pools and eventually seeps through.
Option 2: Full waterproofing membrane (for solid surfaces)
If you want pavers, tile, or a poured concrete surface on the upper deck, you need a continuous waterproofing membrane installed over the structural deck sheathing before anything goes on top. These traffic-bearing membrane systems (sometimes called pedestrian deck membranes or traffic coatings) are designed to handle foot traffic, freeze-thaw cycles, and UV exposure. Manufacturers like Sika, Mule-Hide, and others make systems specifically for this application. The key rules: install on an approved substrate, avoid trapping air under the membrane, and never puncture the membrane after installation. Pedestal-supported pavers are the cleanest solution because they sit on top of the membrane on adjustable supports, leaving the membrane undamaged and allowing drainage beneath the pavers to the perimeter.
Drainage design basics
Whether you use an under-deck system or a full membrane, the deck surface or drainage layer needs a minimum slope, typically 1/8 to 1/4 inch per foot toward the drain or outer edge. Water should have a fast, clear exit path. Drain inward to a central drain only if you have a reliable drain and a larger-diameter pipe to handle heavy rain events. Draining outward to the perimeter is simpler and less failure-prone for most residential projects. Make sure your downspouts from the upper level don't dump water onto the patio slab, and that the patio slab itself is sloped away from the house (typically 1/8 inch per foot minimum).
Ongoing maintenance checklist
- Inspect drainage channels or gutters under the deck every spring and fall; clear leaves and debris that block flow.
- Check the ledger flashing annually for separation, corrosion, or caulk failure at the house connection.
- Re-seal or re-stain wood decking surfaces every 2 to 3 years to slow moisture absorption and UV degradation.
- Inspect the waterproofing membrane surface (if applicable) for cracks, bubbles, or punctures; repair immediately because small breaches grow fast.
- Check post bases and hardware for rust, especially in coastal environments; replace corroded hardware before it fails structurally.
- Look for water stains on the patio ceiling or the underside of the deck framing after heavy rain events; stains are early warning signs of a drainage or membrane failure.
- Clear any debris from the patio slab surface after storms to ensure slope drainage isn't blocked.
What you can DIY and what to hand off to a pro
Be realistic here. Stacked structures involve load-bearing framing, waterproofing systems with zero tolerance for failure, and permit inspections where mistakes are expensive to fix after the fact. That said, there are real opportunities to save money by doing some of the work yourself.
| Task | DIY-Friendly? | Notes |
|---|---|---|
| Site measurement and layout | Yes | You can do all the measuring and planning; just have a pro or engineer verify load calculations |
| Permit application assembly | Yes | Most municipalities have online portals; you may need engineer-stamped drawings |
| Footing excavation | Possibly | Digging is DIY-able if you have time and the right tools; pouring concrete is trickier and mistakes are costly |
| Structural framing (posts, beams, joists) | No — hire a pro | This is the highest-consequence work; errors here are structural failures |
| Ledger installation and flashing | No — hire a pro | Improper flashing is the leading cause of rot and deck failure; not worth the risk |
| Waterproofing membrane installation | No — hire a pro | Manufacturer-specific installation sequences; bubbles, wrinkles, or missed overlaps cause leaks |
| Decking board installation (composite or wood) | Yes, with experience | Straightforward if framing is done and level; good DIY opportunity |
| Railing installation (pre-assembled systems) | Yes | Many composite railing systems are homeowner-installable with basic tools |
| Stair building | Possibly | Simple straight stairs are manageable; complex or wrapped stairs need a carpenter |
| Under-deck drainage system | Possibly | Some systems are designed for DIY; follow manufacturer instructions exactly |
| Painting, staining, and finishing | Yes | Great DIY opportunity to save money |
The short version: let professionals handle the structure and the waterproofing. Do the prep work, permit assembly, and finishing yourself. That split typically saves 15 to 25 percent of total project cost while keeping the high-risk work in experienced hands.
Questions to ask contractors and how to plan your next steps
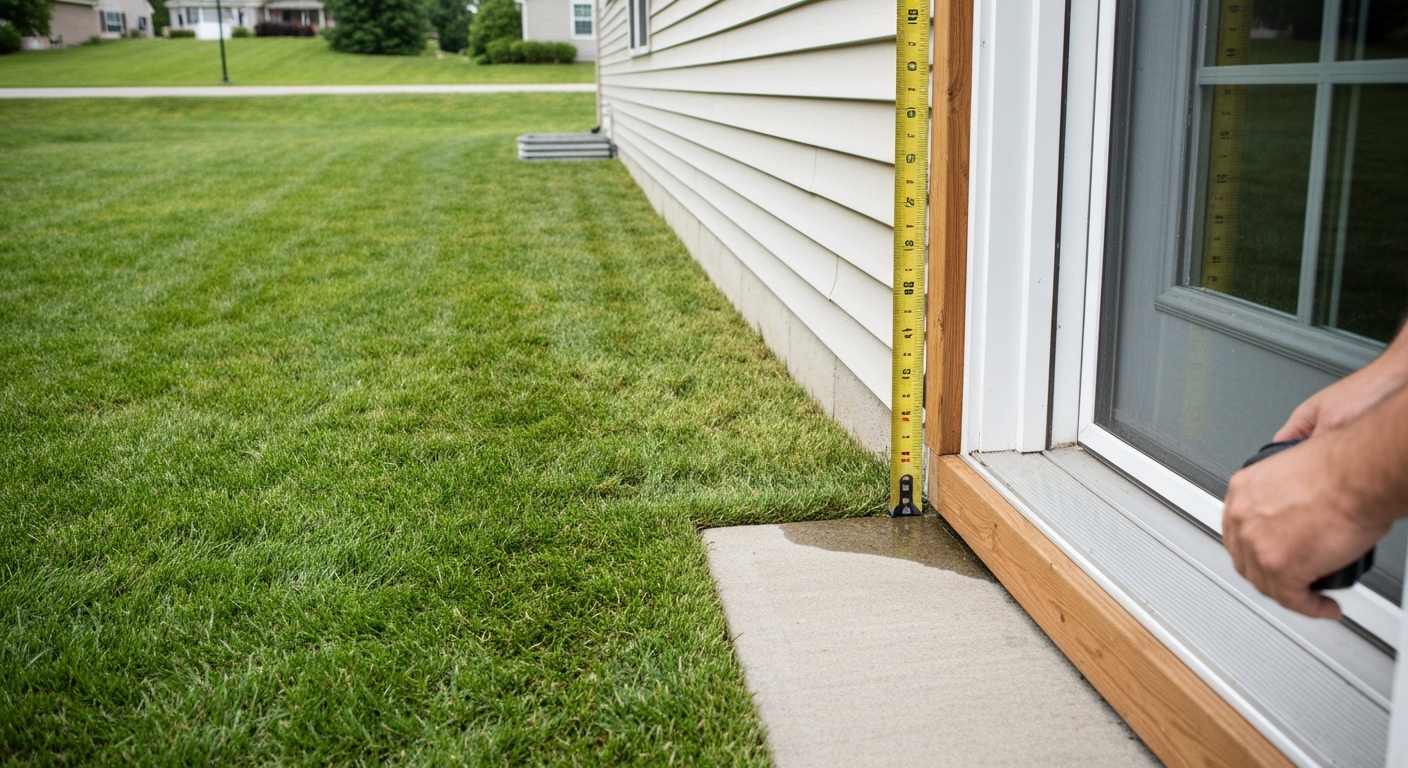
Before you call a single contractor, do this at home: measure the area you're working with (length and width of both levels), determine the height from your patio slab or ground to where the upper deck floor will be, note where the house door or access point is, and photograph the area from multiple angles including any existing slab, siding material, and grade slope. This information will save you a lot of time in contractor conversations and prevent early misquotes.
Questions to ask every contractor you consider
- Have you built stacked deck-over-patio structures before, and can you show me photos or references from similar projects?
- Will you pull the permits, or am I expected to do that? Who handles the engineer-stamped drawings if they're required?
- What waterproofing system do you use, and are you certified or trained by the manufacturer to install it?
- How do you detail the ledger flashing, and what membrane and Z-flashing product do you use at the house connection?
- What footing depth are you planning for my location, and how did you determine the sizing?
- What is your drainage plan for the upper deck surface, and where do the downspouts terminate?
- What happens if the inspector requires changes to the framing or waterproofing mid-project, and how is that handled in the contract?
- What warranty do you offer on the waterproofing installation specifically, separate from any material warranty?
- Are you licensed and insured for this type of structural work in my state and municipality?
Your planning next steps in order
- Measure your site and sketch a rough layout with dimensions, noting the height from ground to the desired upper deck surface.
- Call your local building department (or check their website) to understand permit requirements, setback rules, and whether engineer-stamped plans are required for your project size.
- Get at least three contractor bids; make sure each bid specifies the waterproofing system by name, the decking material, and the railing system so you're comparing apples to apples.
- Ask each contractor for their footing plan in writing, including depth and diameter, so you can confirm it meets local frost depth requirements.
- Decide on your decking surface early, because the choice between spaced boards (with an under-deck drainage system) versus solid pavers or tile (with a full membrane) affects the entire waterproofing design and budget.
- Factor in the home value question: a well-built, permitted, and waterproofed stacked structure adds usable outdoor living space that appraisers recognize, while an unpermitted or water-damaged one can actually reduce value at sale.
If you're still in the early planning phase and comparing this to simpler options, it helps to think through the difference between a covered deck and a covered patio as separate structures versus this combined approach. The stacked version costs more upfront but delivers two usable spaces in the same footprint, which is a meaningful advantage on smaller lots where yard space is limited. The tradeoff is real complexity in the waterproofing and structure, and a project that really does require professional framing help to do correctly. Go in with clear plans, good contractor questions, and realistic cost expectations, and this is a project that can hold up for 25 to 30 years with reasonable maintenance.
FAQ
Can I build an upper deck on top of an existing patio cover, or do I need a full structural redesign?
If the patio is already roofed and you plan to add an upper deck, the key question for contractors is what is carrying the deck loads. Ask them whether they will reuse existing columns, beams, and footings, or redesign to add new supports. Even if the existing patio cover looks solid, deck-level loads usually require new or upsized posts and footings.
What waterproofing approach should I use if I’m not sure whether my upper deck surface will be standard boards or a solid finish?
Deck boards are not automatically “waterproof.” For composite or wood boards with gaps, you need an under-deck drainage system installed with a continuous membrane or panels between joists, plus proper slope. For solid surfaces like pavers on pedestals or poured topping, you need a traffic-rated membrane over the structural deck sheathing, not just a basic underlayment.
How do I plan the upper-deck stairs so they do not create drainage or leaks on the patio below?
Treat stairs as a structural and drainage detail, not just a finish item. If stairs land on the patio ceiling area, they can block drainage pathways or create water re-deposition lines. A practical decision aid is to choose a stair landing that aligns with deck drains and downspouts, so roof runoff does not spill onto the first step or into corners where water stalls.
Can I mix an under-deck drainage system with a waterproof membrane approach on the upper deck, or do I need to pick one method end to end?
Yes, you can create a trapped-moisture condition if you mix systems. For example, installing pavers over a traffic membrane that is not continuous, or placing a drainage layer that punctures the membrane, increases leak risk. Ask your installer to show the build-up from substructure to finish, and confirm that the system’s required substrate, slope, and no-puncture rules are met.
Where should upper-deck water drain to if I want to prevent water from saturating the patio slab and framing?
Make sure you protect the patio cover framing from direct discharge. A common failure mode is downspouts from the upper deck that dump onto the patio slab or into gutters that overflow. Ask for a drainage plan that includes downspout locations, discharge point elevation, and confirmation that the patio slab has its own slope away from the house.
Do I need gutters on a patio cover with a deck on top, and can gutters conflict with under-deck drainage?
Because the deck acts like the roof of the patio, guttering decisions matter. If you add gutters, they must be routed so overflow cannot dump directly into the ledger area. Also confirm the gutters do not obstruct under-deck drainage exit channels if you’re using a membrane or panel system beneath joists.
What should I ask a builder to confirm about beam spans and post layout so the stacked loads are handled correctly?
Before design is finalized, ask for the tributary load assumptions and span selections for each beam line (not just a general “code meets”). The mismatch that causes problems is using typical deck span tables when a beam is carrying the full deck area above an enclosed or partially enclosed patio. A good sign is a written framing plan that ties beam sizes to the actual tributary widths and post layout.
If my project stays under 12 feet, do I automatically avoid a more complex permitting or structural review?
Not necessarily. Even if height is under the simplified limits, you can still trigger full review if the project is attached to the house, includes electrical, or changes egress and occupancy characteristics (such as enclosing spaces). Ask the permit office whether your design is treated as an accessory structure and whether any enclosure, screens, or partial walls change the classification.
Do guard rail requirements change if my upper deck has raised paver systems or a thicker topping layer?
You should assume you will need guard rails and stair guards, but the exact measurements can change if the deck surface includes raised elements like pedestals or a thicker topping system. Ask for the rail height check using the final finished deck height, not the bare framing height, so you don’t end up with rails that end up too low after construction.
What interface details are most important at the house where the upper deck attaches and the patio cover begins?
Coordination is critical. The ledger flashing and structural attachment details must integrate with any waterproofing transitions, and the patio cover underside should not be blocked by incompatible flashing. Ask for an “interface detail” drawing showing the ledger, membrane layers, flashing, and any under-deck drainage membrane termination so water cannot wick into the wall.
Where is the best place to DIY on this kind of stacked project without risking waterproofing or structural safety?
Some DIY tasks are safer than others. A common cost-saving approach is to let a pro install the structural framing, ledger connections, and waterproofing membrane systems, then have you handle demolition prep, site cleanup, railing painting or staining, and interior trim. Avoid DIY for any step that requires strict continuity or zero-tolerance waterproofing, like membrane laps, penetrations, and downspout tie-ins.
Next Article
Grass Is Higher Than Patio: Causes, Fixes & Deck vs Patio
Grass higher than patio? Causes, slope checks, repair options, lower lawn, raise patio, or build a deck, with costs & DIY