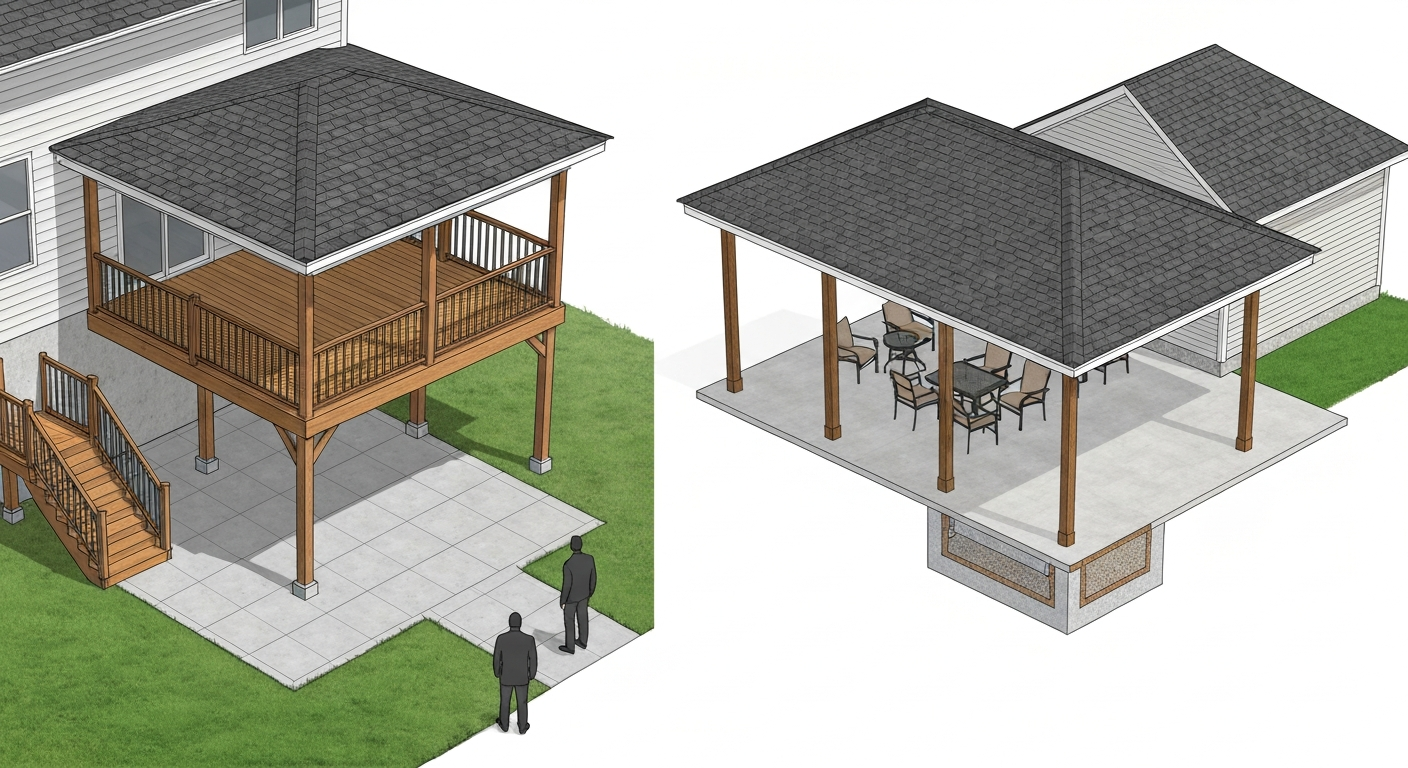
If your backyard is flat and you want the most affordable outdoor living space, a patio is almost always the better starting point. If your yard slopes, your house sits elevated, or you want a seamless transition from an interior floor level, a deck makes more sense. Neither is universally better. The right answer depends on your site, your budget, how you plan to use the space, and whether you want to tackle it yourself or hire a contractor.
Backyard Patio vs Deck: Costs, Pros, DIY & ROI Guide

Miles Hart
17 Jul 2026
Who this guide is for and how to use it
This guide is for homeowners who are staring at a blank backyard and trying to figure out which direction to go, or who already have an older patio or deck and are deciding whether to replace, upgrade, or convert it. It covers definitions, site requirements, materials, construction basics, covered and hybrid options (including deck-over-patio builds), realistic cost ranges for both DIY and hired-out projects, maintenance expectations, and the ROI question that almost always comes up. Work through it front to back if you're starting from scratch, or jump to the section that matches your current sticking point. See our gallery for examples of decks and patios to help visualize material and layout choices.
Patio vs deck at a glance
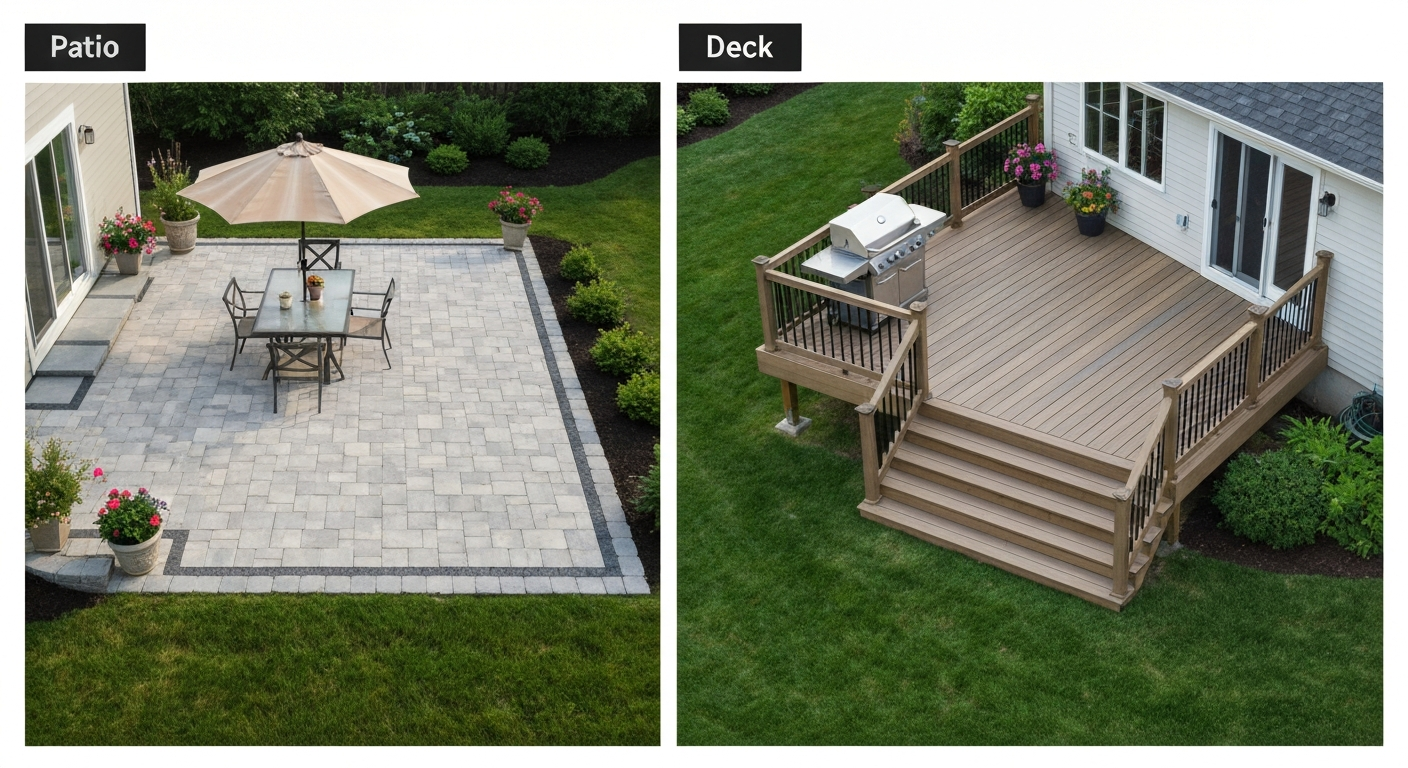
A patio is a ground-level hardscape surface, typically concrete, pavers, or stone, that sits on or just above grade and is not part of your home's framed structure. A deck is an elevated, framed platform, almost always wood or composite, that is either freestanding or attached to the house with a ledger board. Patios generally cost less to build, require a minimal foundation, and work best on flat or gently sloping terrain. Decks cost more upfront, require structural framing and footings, need permits in most jurisdictions when attached to the house or above 30 inches, and are the practical solution when your yard drops away from the house or when you want a flush transition from a sliding door or walkout level. For a concrete local example of permit thresholds and rules, see Seattle Department of Construction & Inspections (SDCI), deck permit thresholds (example) Seattle Department of Construction & Inspections (SDCI) — deck permit thresholds (example). Maintenance, lifespan, covered-structure options, and resale impact differ meaningfully between the two, and this guide walks through all of it.
Clear definitions: patios, decks, and everything in between
These terms get used loosely, so it helps to pin down exactly what each one means before comparing them.
Patio
A patio is a ground-level outdoor living area built on a prepared hardscape base. The surface material can be poured concrete, concrete pavers, natural stone (flagstone, bluestone, travertine), brick, or gravel. It is not a framed structural assembly and is not attached to your home's structure. Drainage is handled through surface slope: industry practice calls for a minimum of 1/8 inch per foot (about 1%) sloping away from the house, with 1/4 inch per foot (about 2%) preferred for poured concrete to prevent ponding. Because a patio sits at grade, it typically does not require a building permit in most U.S. jurisdictions, though adding a roof structure over it usually does.
Deck
The International Residential Code defines a deck as an elevated exterior platform designed for outdoor use, typically framed in wood or composite and supported by posts set in concrete footings. An attached deck is fastened to the house with a ledger board anchored into the band joist or rim board of the home's framing. A freestanding deck uses its own post-and-beam structure with no ledger connection. The IRC requires residential decks to be designed for a minimum live load of 40 pounds per square foot (psf), plus applicable snow loads, with a typical dead-load allowance of 10 psf used in the prescriptive span tables. The 2021 IRC prescriptive joist and beam span tables (R507.6 and R507.5) list maximum allowable spans by species, member size, and spacing for a 40 psf deck live load; contractors and designers should use those tables or AWC DCA‑6 guidance for prescriptive designs (IRC 2021, R507 deck joist and beam span tables) IRC 2021 — R507 deck joist and beam span tables. Guards (railings) are required when the deck surface is 30 inches or more above grade, and the IRC specifies a minimum guard height of 36 inches for residential use with openings sized to prevent a 4-inch sphere from passing through.
Platform deck
A platform deck is a low-profile, freestanding deck that sits just a few inches to about 30 inches above grade. Because it is freestanding and stays under the 30-inch elevation threshold, it often avoids the permit requirements that apply to higher attached decks, though you should always confirm with your local building department since local rules vary. Platform decks are a popular middle ground: you get the warmth and aesthetics of wood or composite without needing deep footings or complex framing. For a focused comparison of a platform deck vs patio, see our dedicated platform deck vs patio guide.
Covered patio and covered deck
A covered patio is a patio with a permanent or semi-permanent overhead structure, such as a pergola, shade sail, solid patio cover, or attached room addition. A covered deck is the same concept applied to an elevated framed deck. In both cases, adding a solid roof structure almost always triggers a building permit regardless of whether the base structure required one. The structural loads, post sizing, and attachment methods all change when you add a roof, so this is one place where engineering review or at minimum a careful read of your local permit requirements is worth the time.
Hybrid solutions: deck-over-patio and patio-with-deck-on-top
A deck-over-patio (sometimes called a deck-over-slab) is an elevated framed deck built above an existing concrete patio or slab. This approach makes sense when you want to level an uneven slab, bring a door threshold down to usable floor height, or create a dry space below a second-story deck. The challenge is waterproofing and drainage: without a drainage system between the deck framing and the concrete below, water collects under the structure and accelerates rot and slab deterioration. A patio-with-deck-on-top is the same concept described from the patio's perspective. See examples of a patio with deck on top for design variations and waterproofing details. Both terms describe the hybrid assembly and both require careful attention to the drainage layer between them, which is covered in the construction section below. See patio cover with deck on top for guidance on combining a covered patio and an elevated deck into a single hybrid solution.
Pros and cons side by side
| Factor | Patio | Deck |
|---|---|---|
| Cost (installed) | $6–$18/sq ft (concrete); $10–$30+ for pavers/stone | $15–$35/sq ft (pressure-treated); $25–$60+ (composite/hardwood) |
| Best terrain | Flat or gently sloping | Sloped, elevated, or level-transition needed |
| Permits (typical) | Usually not required at grade | Required when attached, >30 in. elevation, or >200 sq ft |
| DIY difficulty | Moderate (concrete) to low (pavers) | Moderate to high (framing, footings, ledger) |
| Lifespan | 30–50+ years (concrete); 20–30+ (pavers) | 15–25 years (PT wood); 25–30+ (composite) |
| Maintenance | Low to moderate | Moderate (wood) to low (composite) |
| Heat retention | Gets hot in direct sun (especially concrete) | Better airflow; cooler underfoot |
| Aesthetics | Clean, modern; wide material variety | Warm, natural feel; elevated sightlines |
| Resale value added | Roughly 50–70% cost recovery (varies) | Roughly 65–80% cost recovery (varies) |
| Accessibility | Easier for wheeled access at grade | Steps/ramp required unless flush with home level |
A few things worth adding to that table. Patio maintenance depends heavily on material: a plain concrete slab needs a sealer every few years and occasional crack repair, while natural stone needs periodic re-sanding of joints, checking for settlement, and sealing depending on the stone type. Composite decking (brands like Trex, TimberTech, Fiberon) is sold partly on low-maintenance grounds, and while it is genuinely easier to maintain than pressure-treated pine, it still needs cleaning, and the framing beneath it is still wood that can rot if drainage and ventilation are inadequate. Accessibility is a real consideration: a patio at grade is far easier to make ADA-compatible or wheelchair-accessible than any elevated deck, which requires a ramp or lift once you get past a step or two.
Site suitability and planning considerations
Before choosing between a patio and a deck, spend some time reading your site. These are the factors that will most directly constrain your options.
Slope and soil
A flat yard with stable, well-draining soil is ideal for a patio. If your yard slopes more than 1 to 2 feet across the planned area, a poured concrete patio will require retaining walls or significant fill, which adds cost and complexity. On sloped sites, a deck on footings is usually cheaper and faster than the cut-and-fill earthwork a patio would require. Soil type matters too: expansive clay soils cause concrete to heave and crack over freeze-thaw cycles, while well-draining sandy or loamy soils are far more forgiving. If you are in a freeze-thaw climate and your soil is heavy clay, factor in a proper gravel base (typically 4 to 6 inches of compacted gravel under concrete) and realistic expectations about long-term cracking.
Access and door thresholds
Look at where your exterior doors land relative to grade. If your walkout door opens to a landing that is 18 inches above grade, a ground-level patio will require steps, while a deck framed to that height creates a seamless transition. If you have a walkout basement where the door is at or near grade, a patio is the natural fit. This one factor alone settles the question for a lot of homeowners.
Sun, shade, and orientation
A south- or west-facing concrete patio in a hot climate can become unusable in the afternoon because dark concrete and stone surfaces absorb and radiate heat. A deck with gaps between boards allows air movement and stays noticeably cooler. If you are dealing with a hot exposure, lighter-colored pavers, a pergola, or shade trees can help a patio. On a deck, light-colored composite or wood with good airflow helps significantly.
Existing structures and utilities
Before digging any footings or breaking any ground, call 811 (in the U.S.) to have underground utilities located. Gas lines, electrical conduits, irrigation lines, and sewer laterals are more common than people expect in backyards, and hitting one is expensive and dangerous. Check for setback requirements from property lines, easements, and existing structures. If you have a septic system, your local health department will have setback rules for any hardscape or framed structure over the drain field.
Drainage and stormwater
Adding any impervious surface (poured concrete, solid pavers, non-permeable stone) increases stormwater runoff on your property. The EPA endorses permeable pavement options including pervious concrete, porous asphalt, and permeable interlocking pavers as a low-impact development best practice. In some jurisdictions, local stormwater ordinances require or incentivize permeable surfaces for new patio work. Even if it is not required, permeable pavers are worth considering on large patio areas or anywhere drainage is already a problem. For decks, the gaps between boards allow most rainfall to drain naturally, though you will want to manage where that water goes at grade.
Permit and site checklist
Use this as a starting point before you finalize your plan. Local rules vary, and this is not a substitute for checking with your building department directly.
- Call 811 at least 3 business days before any digging to mark underground utilities
- Check local zoning for setbacks from property lines, easements, and existing structures
- Confirm permit requirements: attached decks, decks over 30 inches above grade, or areas over 200 sq ft typically require a permit in most U.S. jurisdictions
- Confirm whether a covered roof structure (pergola, solid cover) requires a separate or upgraded permit
- Check for HOA restrictions on materials, colors, heights, and fence/railing requirements
- If you have a septic system, verify setback requirements from the drain field
- Confirm whether your jurisdiction requires permeable surfaces for new impervious area above a certain threshold
- Identify the inspection sequence if a permit is required: typically footing/anchor inspection, framing, ledger flashing, rough-in electrical (if any), and final
- Determine whether your soil type requires a geotechnical assessment for footings, particularly on steep slopes or in high-wind zones
- Check whether existing trees within the project area have protection ordinances
Materials: what you are actually choosing between
Material choice affects upfront cost, long-term maintenance, appearance, and how long the structure lasts. Here is a practical breakdown of the main options.
Patio surface materials
Poured concrete is the most common patio material. Installed cost typically runs $6 to $18 per square foot depending on thickness, reinforcement, finish (basic broom finish vs. stamped or exposed aggregate), and your region. Properly poured and sealed on a good gravel base, a concrete slab can last 30 to 50 years or more. The failure modes are cracking (from freeze-thaw cycles, settlement, or inadequate base), spalling in freeze-thaw climates when deicing salts are used, and efflorescence (white mineral deposits). Control joints cut into the slab every 8 to 10 feet direct cracking to predictable locations and are worth doing correctly upfront.
Concrete pavers (interlocking concrete pavers, or ICP) cost roughly $10 to $25 per square foot installed. They are stronger than poured slabs in compressive strength, easier to repair since individual units can be lifted and reset, and available in a wide range of shapes, colors, and textures. They require a compacted gravel base (typically 6 inches) and bedding sand layer. Polymeric sand in the joints reduces weeds and ant activity. Natural stone, including flagstone, bluestone, and travertine, runs $15 to $40 or more per square foot installed depending on stone type and region. It is the highest-end look but requires careful setting (especially irregular flagstone), periodic re-sanding, and sealing for porous stones.
Deck framing and surface materials
Pressure-treated (PT) lumber is the most common and lowest-cost deck framing material, and most decks use it for structural members (posts, beams, joists) regardless of what decking board is used on the surface. Current PT lumber uses alkaline copper quaternary (ACQ) or copper azole treatments and must be paired with stainless steel, hot-dipped galvanized, or specifically rated hardware since standard zinc fasteners corrode prematurely with modern treatments. PT pine decking on the surface costs roughly $2 to $4 per square foot for materials and needs to be cleaned, stained, or sealed every 2 to 3 years to prevent graying, checking, and rot. Cedar and redwood are naturally rot-resistant, visually warmer, and less prone to warping, but cost more (roughly $3 to $7 per square foot for materials) and still require periodic finishing.
Composite decking (wood-fiber/plastic composite or capped PVC) is the dominant premium choice. Brands like Trex, TimberTech, and Fiberon price materials at roughly $4 to $12 per square foot depending on product line. Capped composite (where a protective polymer shell wraps the board) resists staining, fading, and moisture far better than early-generation uncapped composite. It does not need staining or sealing, but it does need cleaning, and the subframe beneath it is still typically PT wood that needs ventilation and drainage to stay sound. Composite decking generally carries 25- to 30-year warranties against fading and staining, though warranty terms vary and the framing is not covered.
| Material | Installed Cost (approx.) | Lifespan | Maintenance | Best Use |
|---|---|---|---|---|
| Poured concrete | $6–$18/sq ft | 30–50+ years | Seal every 2–3 yrs; repair cracks | Flat sites, budget-focused, large areas |
| Concrete pavers | $10–$25/sq ft | 20–30+ years | Re-sand joints; reset settled units | Any grade, easier repair, design flexibility |
| Natural stone (flagstone/bluestone) | $15–$40+/sq ft | 25–40+ years | Re-sand, re-seat, seal porous stone | High-end aesthetics, irregular shapes |
| Pressure-treated pine (deck) | $2–$4/sq ft (material) | 15–25 years | Stain/seal every 2–3 yrs | Budget decks, framing for all decks |
| Cedar / redwood (deck) | $3–$7/sq ft (material) | 20–30 years | Finish every 2–3 yrs | Warmer look, less warping than PT pine |
| Composite decking (capped) | $4–$12/sq ft (material) | 25–30+ years | Annual cleaning only | Low-maintenance, long-term value |
| Metal (aluminum deck framing) | $10–$20+/sq ft (material) | 40+ years | Very low | Corrosive environments, long-span framing |
How these things actually get built
You do not need to be a contractor to understand how a patio or deck goes together. Knowing the basic sequence helps you evaluate bids, spot problems, and decide what you can tackle yourself.
Building a concrete patio
- Lay out and excavate the area to a depth of 6 to 8 inches (4 to 6 inches of compacted gravel base plus 4 inches of concrete slab thickness)
- Compact the subgrade and install the gravel base in lifts, compacting each layer
- Set form boards at the correct height and slope (minimum 1/4 inch per foot away from the house)
- Install wire mesh or rebar for reinforcement and set it on chairs to position it in the middle of the slab depth
- Pour concrete (typically 3,500 to 4,000 psi mix for exterior slabs), screed and float the surface
- Cut control joints at 8 to 10 foot intervals before the slab fully cures, or use a hand groover while concrete is plastic
- Apply finish (broom, stamped, or exposed aggregate) and allow to cure fully (minimum 28 days before heavy use)
- Seal the surface with a penetrating or topical sealer appropriate to the finish type
Building a platform deck
- Lay out footing locations using batter boards and string lines, then dig footing holes to below frost line depth for your climate (or to local code requirement)
- Pour concrete footings with a post base anchor set at the correct location and height
- Install posts and set beam(s) on top of the post bases, verifying height and level
- Hang joists from the beam using joist hangers rated for the load; follow IRC span tables (R507.6) for your joist size, species, and spacing
- Install blocking at midspan for longer joist runs to prevent rotation
- Fasten decking boards with appropriate fasteners (stainless or hot-dipped galvanized for PT lumber, hidden fasteners for composite)
- Install stairs, fascia, and any required guardrails (36-inch minimum height; openings must not allow a 4-inch sphere to pass through)
Building an attached elevated deck
The biggest difference with an attached deck is the ledger: a horizontal framing member bolted directly to the house's band joist (rim board) that carries half the deck load into the house structure. The IRC prescribes the fastener type, size, and spacing for ledger attachment (Table R507.9.1.3 in the 2021 IRC), and the AWC DCA-6 guide is widely used by inspectors and contractors as a companion reference. Critically, the ledger must be continuously flashed with a corrosion-resistant metal or flexible membrane flashing to prevent water from migrating behind it into the house framing. Improper ledger flashing is one of the most common and most damaging deck construction failures, leading to house wall rot and eventual structural failure. After the ledger is installed and inspected, the process follows the same beam, joist, and decking sequence as a platform deck.
Covered options and hybrid builds
Covered patios and covered decks
Adding a permanent roof or solid cover to either a patio or a deck changes the project category in most building departments from a simple hardscape or deck to a structure with roof loads, which means permits, post sizing, beam calculations, and connection requirements all get more involved. A basic pergola with open rafters (not a solid roof) may fall under a lighter review in some jurisdictions, but an attached solid cover is typically treated like a room addition from a structural standpoint. If you are comparing covered versions of both options, the covered deck vs covered patio decision often comes down to whether you want the elevated feel and wood aesthetic of a deck or the permanence and lower cost of a concrete-based covered patio. The covered structure costs are in addition to the base patio or deck cost and can range from $10 to $50 or more per square foot depending on the cover type, material, and whether it is freestanding or attached.
Deck-over-patio: the hybrid build
A deck-over-patio is one of the more interesting hybrid solutions because it solves two common problems at once: an existing concrete slab that is ugly, cracked, or at the wrong height, and the desire for the look and feel of a wood or composite deck. The structural approach is to frame a low deck on top of the existing slab using sleepers (horizontal framing members set directly on the concrete) or short posts on post bases anchored into the slab. For detailed guidance on decking on top of a patio, see our deck-over-patio guide for framing, load checks, and waterproofing considerations (decking on top of a patio). The critical engineering issue is whether the existing slab and footings can support the additional dead load of the framing and decking material.
The bigger practical issue is water management between the deck and the slab below. If you simply frame a deck over concrete without a drainage plane, water collects between the assemblies, promotes mold, and rots wood framing even if it is pressure-treated. There are two main approaches to handling this: a drainage membrane system and an under-deck drainage trough system.
Waterproofing and drainage systems for deck-over-slab
Liquid-applied and sheet waterproofing membranes (manufacturers include Tremco, Sika, and Grace) can be applied directly to an existing concrete slab before framing over it. These products are rated for pedestrian traffic or as a substrate beneath a framed assembly, but the technical data sheets are specific: the slab must be clean and properly prepared, the membrane must achieve specified thickness, seams must be lapped and sealed, and terminations must route water to an edge or drain. Products like TREMproof polyurethane membrane are designed for this use, but they are not forgiving of shortcuts.
For elevated decks where the goal is creating a dry, usable space beneath (and where the patio-below-upper-deck scenario is the question), over-joist or under-joist drainage trough systems are the industry standard product category. Systems like Trex RainEscape, TimberTech DrySpace, and Zip-UP UnderDeck use interlocking troughs installed between or below joists to capture water that falls through the deck boards above and route it to a perimeter gutter and downspout. Trex publishes material cost guidance in the range of $6 to $9 per square foot for materials alone, while fully installed systems with gutters, lighting, and finished ceilings typically run from $7 to $25 or more per square foot depending on scope. Consumer aggregators report ranges up to $60 per square foot for fully finished under-deck outdoor room systems. Trex's installation guidance notes that properly installed over-joist trough systems divert more than 95 percent of water from the lower space, but the manufacturer is explicit that correct slope toward the gutter, sealed seams, and debris management are required to achieve that performance. A system installed with improper slope or unsealed laps will leak.
Cost ranges and DIY vs pro guidance
Cost is where a lot of online comparisons go wrong because they either quote too-low DIY numbers that ignore material cost increases, or too-high contractor numbers from high-cost-of-living markets. Here is a realistic range breakdown as of mid-2026, with the understanding that regional labor rates, local material availability, and project complexity all move these numbers.
| Project Type | DIY Material Cost (approx.) | Contractor-Installed (approx.) | Notes |
|---|---|---|---|
| Basic concrete patio (400 sq ft) | $1,200–$2,500 | $2,400–$7,200 | Stamped/decorative adds $4–$8/sq ft to labor |
| Paver patio (400 sq ft) | $2,000–$4,000 | $4,000–$10,000 | Material cost varies widely by paver type |
| Natural stone patio (400 sq ft) | $3,500–$7,000+ | $6,000–$16,000+ | Irregular flagstone requires skilled setter |
| PT wood platform deck (200 sq ft) | $1,500–$2,500 | $3,000–$7,000 | Add $500–$1,500 for permit and footing work |
| Composite deck (200 sq ft) | $2,500–$5,000 | $5,000–$12,000+ | Capped composite on high end |
| Attached elevated deck (200 sq ft) | $2,000–$4,000 | $5,000–$14,000+ | Permit, footings, ledger flashing add cost |
| Under-deck drainage system | $350–$550 (materials) | $1,400–$5,000+ | Full finished system can reach $10,000+ |
| Covered patio (attached solid cover) | $3,000–$7,000 | $8,000–$25,000+ | Depends heavily on roof structure and finish |
On the DIY question: paver patios are genuinely within reach for a motivated homeowner with a rented plate compactor and a few weekends. Poured concrete is possible DIY but unforgiving, since a bad pour or poorly cut control joints can crack within the first winter and there is limited ability to fix it after the fact. Basic platform decks on flat ground are a solid intermediate DIY project. Attached elevated decks with ledger connections, deep footings, and required inspections are doable for experienced DIYers but are not a first project for someone who has never framed anything. The ledger flashing and connection details in particular are areas where errors cause serious structural and water damage problems that may not show up for years.
Maintenance and lifespan in the real world
The maintenance difference between patios and decks is real and worth factoring into your total cost of ownership. A concrete patio in a mild climate with good drainage might need a sealer reapplication every 3 to 5 years and crack repair as it ages, but it otherwise requires very little. In freeze-thaw climates with heavy deicing salt use, spalling and surface deterioration become genuine issues over 15 to 20 years. Paver patios are easier to maintain in freeze-thaw zones because individual pavers accommodate movement better than a monolithic slab, and heaved or cracked units can be replaced individually.
Pressure-treated wood decks need to be cleaned annually and stained or sealed every 2 to 3 years to look good and stay protected. Skip that maintenance for 5 years and you are looking at gray, checked, splintery boards that are also beginning to delaminate at the edges. Composite decking dramatically reduces that burden: most capped composite products need an annual cleaning with a deck wash and a soft brush, and that is essentially it for the surface boards. However, the PT framing under any deck still needs ventilation and drainage to achieve its rated lifespan, and under-deck moisture is the leading cause of premature framing failure on decks of all surface materials.
ROI and resale impact
Both patios and decks add value, but neither one returns 100 cents on the dollar in resale, and the ROI varies significantly by region, neighborhood, and how well the project is executed. Remodeling industry cost-vs-value data consistently shows wood decks recovering roughly 65 to 80 percent of project cost in resale value, with composite decks on the lower end of that range because the higher upfront cost does not scale proportionally with appraised value. Patios tend to recover roughly 50 to 70 percent of project cost, though a well-designed paver or stone patio in a neighborhood where outdoor living is valued can perform above that range.
The ROI question is really two questions: immediate enjoyment value (how much better does this make your life while you live there) versus resale contribution (how much does a buyer credit you for it). On the enjoyment question, both patios and decks deliver strong returns if they are sized right and suit how you actually use your outdoor space. On the resale question, a deck or patio that looks professionally finished, is properly permitted and inspected, and has been maintained well will contribute more than an unpermitted or poorly maintained version of the same project. Buyers and appraisers notice, and unpermitted structures can become a negotiating issue in a sale.
Decision checklist: how to choose
Use this checklist to narrow your decision. If most of your answers point one direction, that is likely the right starting point.
| Question | Points toward Patio | Points toward Deck |
|---|---|---|
| What is your yard slope? | Flat or slight grade | Significant slope away from house |
| Where does your exterior door land? | At or near grade | Elevated above grade |
| What is your budget per square foot? | Under $15–$20 installed | $20–$35+ installed |
| How important is low maintenance? | Concrete or pavers are lower long-term | Composite deck is low-maintenance surface |
| Do you want permeable drainage? | Permeable pavers available | Deck boards allow natural drainage |
| Is accessibility a priority? | Yes, grade-level is easiest | Less important, ramp/steps are workable |
| Do you want a dry space below? | Not applicable (at grade) | Under-deck drainage system needed |
| Is aesthetics/warmth a priority? | Stone or pavers give high-end look | Wood or composite gives warm feel |
| DIY or pro? | Pavers are the most DIY-friendly | Platform deck is moderate; elevated deck needs experience |
| Covered structure planned? | Covered patio works well | Covered deck works well; permits likely required either way |
If you are still on the fence after working through that table, the most common tiebreaker is this: look at where your back door opens, how much your yard drops away from the house, and what your neighbors have done. Those three factors alone will usually point clearly at one option. If you are considering a covered version of either, or a hybrid deck-over-patio build, those are worth treating as separate planning decisions that build on whichever base structure you choose first.
FAQ
What exactly is the difference between a backyard patio and a deck?
A patio is a ground‑level hardscape—poured concrete, pavers, natural stone or permeable pavers—lying directly on compacted base material and not part of the home's framed structure. A deck is an elevated, framed platform attached to or freestanding from the house, normally wood or composite decking over joists and supported by posts and footings. Covered patios/decks simply add a roof or overhead structure. Hybrid solutions include a deck over a patio (framed deck built above an existing slab) or a patio with a deck built on top.
What building codes and structural loads apply to residential decks?
Most U.S. jurisdictions follow the IRC prescriptive requirements for decks. Residential decks are typically designed for a minimum live load of 40 psf (plus applicable snow loads) with prescriptive joist and beam span tables (IRC R507). Guard height and openings follow IRC/IBC rules—residential guards are usually minimum 36 in. high and must prevent a 4‑inch sphere passing through openings. Ledger connections, fastener schedules and flashing are covered in IRC tables and AWC/manufacturer guidance—proper attachment is critical for safety.
How do site suitability and structural needs differ for patios vs decks?
Patios require reasonably well‑draining, compactable soil, positive grading away from the house, and a stable base (gravel/subbase) for the slab or pavers. They are limited by low‑lying wet sites unless drainage or retaining is installed. Decks are suitable for sloped sites or where grade is unstable because they are elevated on footings; they do need properly sized footings to reach frost depth and resist uplift. Both need attention to soil bearing capacity, underground utilities, trees/roots and local setback requirements.
What materials are commonly used and how do they compare (durability, maintenance)?
Common patio materials: poured concrete ($6–$18/ft² installed), concrete pavers, natural stone, and permeable pavers. Lifespan 30–50+ years for concrete with proper base and drainage; maintenance includes sealing, joint sand replacement and crack repair. Common deck materials: pressure‑treated lumber (lower upfront cost, regular maintenance, 15–25+ years), cedar/redwood (better rot resistance), tropical hardwoods (longer life, higher cost), and capped or uncapped composite (lower maintenance, 25+ years). Composite resists rot and staining but can fade and may cost more initially. Metal or PVC decking options exist for specialty use. Choose materials by budget, look, maintenance tolerance and climate.
What are realistic cost ranges for patios and decks (DIY vs professional)?
Typical installed patio costs: basic poured concrete $6–$10/ft²; decorative stamped/dyed concrete or high‑end natural stone $12–$30+/ft². Paver patios commonly $10–$25/ft² depending on material and design. Deck installed costs: pressure‑treated wood decks commonly $15–$30/ft²; composite decks $25–$50+/ft². DIY labor can reduce cost by 30–60% depending on skill—DIY concrete/paver patios are feasible for experienced homeowners; decks are commonly DIY for simple, low‑height builds but require competence with framing, ledger attachment and footings. These are national ballpark ranges—local labor/material costs vary widely.
What is the ROI/resale impact for patios vs decks?
Both patios and decks can improve usable outdoor living space and curb/market appeal. On average, a simple patio tends to cost less and can pay back a meaningful portion of the investment in resale markets; decks (especially higher‑end composite or multi‑level covered decks) can add higher perceived value but also higher cost. Nationally, midrange outdoor projects often recoup 50–80% of cost at resale depending on market, design quality and fit with the home; local market conditions and neighborhood expectations strongly affect ROI. Choose the solution consistent with neighborhood standards and buyer expectations.
Next Article
Covered Deck vs Covered Patio: Cost, Pros, and Decision Guide
Covered deck vs covered patio: compare costs, pros/cons, waterproofing, permits, and a decision checklist for homeowners