Yes, you should almost always leave some kind of gap or expansion joint between your patio and your house. How big that gap needs to be, and exactly what you fill it with, depends on your patio material, how the patio connects to the house, and your local climate. A concrete slab poured tight against a foundation wall without any separation will crack, heave, or push against the structure as it moves with temperature and moisture changes. But leaving a raw open gap is just as bad, because water will funnel right into it and work its way under the slab or behind your siding. The goal is a deliberate, properly sealed joint that lets the two structures move independently without becoming a water entry point.
Should There Be a Gap Between Patio and House?

Miles Hart
20 Jun 2026
Why the answer changes based on how you're building
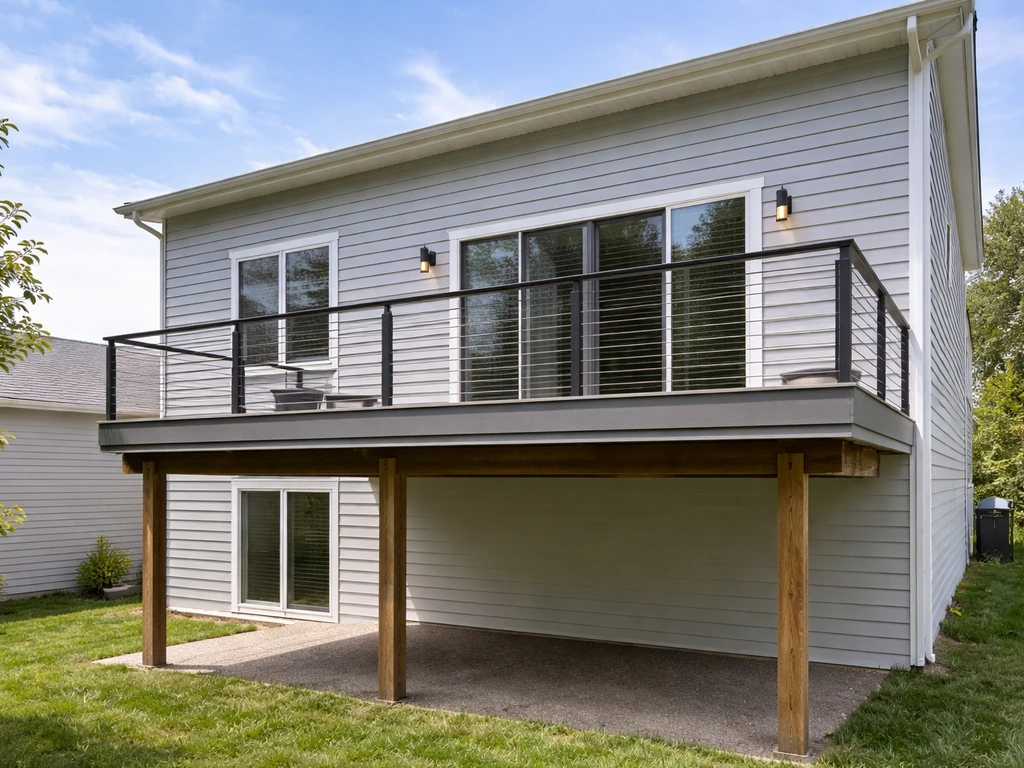
The gap question looks different depending on whether your patio is free-standing or physically attached to the house. If you are wondering whether a patio can be on the second floor, the same gap and connection principles can apply, but the structural attachment details matter even more free-standing or physically attached. A free-standing concrete slab, paver patio, or gravel surface that simply sits near the house but isn't bolted or ledgered to it needs an isolation joint at the house line: a full-depth separation that keeps the slab from transferring stress directly to your foundation. A patio that's mechanically attached via a ledger board (common with raised deck-style patios or covered porch floors tied into the house framing) has a completely different set of concerns, because now you're penetrating the wall assembly and the flashing and waterproofing details become even more critical than the gap width.
Climate is the other big variable. In freeze-thaw climates (most of the northern US and Canada, high-elevation regions), concrete and pavers can move a quarter inch or more seasonally. That movement has to go somewhere. If you've tied the slab tightly to the house, it goes into your foundation wall, your siding, or your door threshold, none of which are designed to absorb that stress. In mild climates the movement is smaller, but water management at the house connection is still the primary concern even if expansion is less dramatic.
Paver patios are a slightly different case. Because individual pavers are set in sand or over a compacted gravel base, they have inherent flexibility. The patio can shift slightly without cracking, which reduces the structural urgency of the gap. But you still need a defined edge detail at the house wall to keep sand and water from migrating behind the siding or into the foundation. Whether your patio goes right up to the house or stops short with a gap is closely related to the drainage slope question, and it's worth thinking about both together when you're planning the layout.
Standard spacing ranges to know before you build
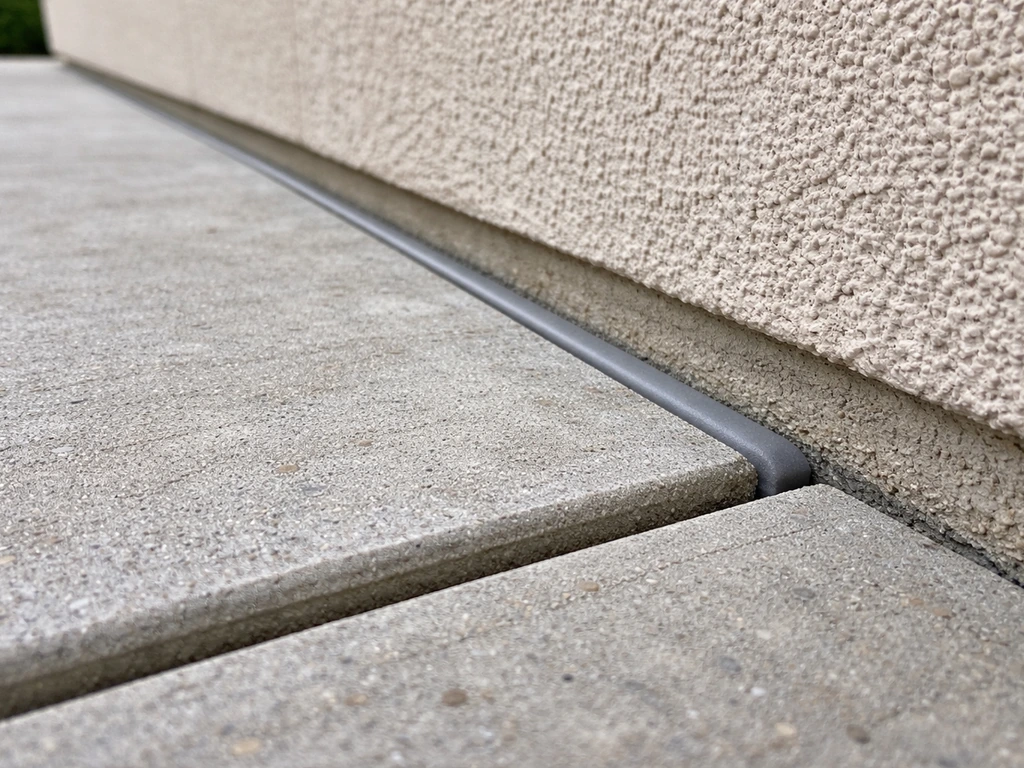
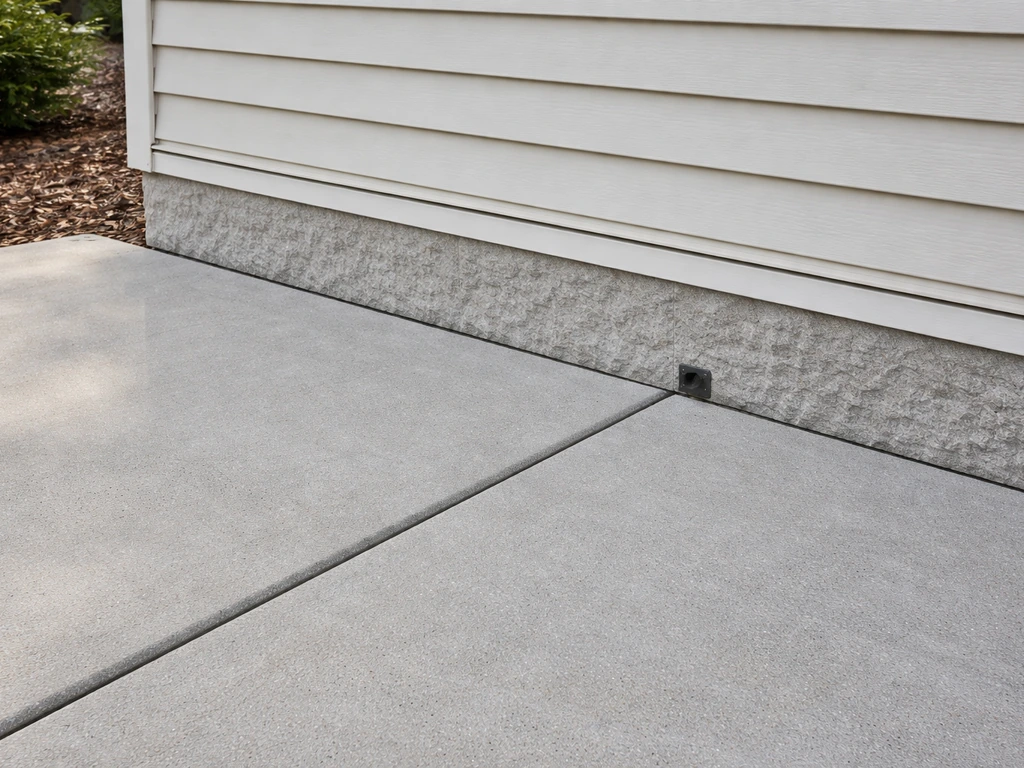
For concrete slabs, the standard practice is a full-depth isolation joint directly where the slab meets the house. This isn't just a surface score line. The isolation joint material runs through the entire thickness of the slab, from top to bottom, so the concrete is completely separated from the foundation. Most contractors use a preformed expansion joint filler (typically 1/2 inch thick, sometimes up to 3/4 inch in high freeze-thaw areas) to create this separation during the pour. After the concrete cures, the top inch or so of that filler is removed and replaced with a flexible polyurethane or silicone sealant backed by a foam backer rod, which gives you a weathertight surface joint that can still compress and expand.
For paver patios, there isn't a rigid gap requirement the same way there is for concrete, but most installers leave at least 1/2 to 1 inch of clearance between the last paver and the house wall or foundation, then fill that space with polymeric sand or a flexible joint compound. Some installations use a small gravel strip or a thin drainage channel at the house line instead. The exact detail matters less than the outcome: water should not be able to pool or wick into that junction.
| Patio Type | Recommended Gap at House | Joint Material | Key Risk Without Gap |
|---|---|---|---|
| Poured concrete slab | 1/2" to 3/4" full-depth isolation joint | Preformed joint filler + polyurethane sealant over backer rod | Cracking, slab heave, foundation stress |
| Paver patio (sand-set) | 1/2" to 1" clearance at wall | Polymeric sand, gravel strip, or flexible joint compound | Sand migration, water pooling, siding rot |
| Stamped or decorative concrete | 1/2" to 3/4" full-depth isolation joint | Color-matched polyurethane sealant | Cracking through decorative surface, difficult to repair |
| Raised deck/porch (ledgered) | No gap in same sense; flashing gap above ledger required | IRC-compliant flashing system + WRB integration | Water intrusion into wall cavity, structural rot |
| Concrete pavers on concrete base | 1/2" isolation joint at wall | Preformed filler + flexible sealant | Bond failure, cracking at house edge |
Keeping water out at the house connection
Water management is the part most DIYers underestimate. Yolanda can use these same guidelines to plan an isolation joint and proper drainage at the house connection while building her patio in her backyard Yolanda is building a patio in her backyard. The gap you leave doesn't protect the house if water runs into it. You need to think about this in two layers: surface drainage slope and joint sealing.
On drainage slope: your patio surface should always slope away from the house, not toward it. The commonly cited minimum is 1/8 inch per foot, but 1/4 inch per foot is better and what most contractors shoot for. If the patio slopes toward the house, no amount of caulking at the joint will stop chronic water problems. If you want to reduce the chance of water getting into the joint, keep your patio sloped away from the house instead of allowing it to slope toward it patio slopes toward the house. The joint is a secondary defense, not the first one. This is true whether you're building a concrete slab, a paver patio, or a covered porch floor.
For the joint itself on a concrete slab: once the isolation joint filler is in place and the concrete has cured, the exposed top portion of the joint should be tooled out to a depth of about 1 inch and cleaned thoroughly. Then you install a closed-cell foam backer rod (like a polyethylene foam rope) at the correct depth to control how deep your sealant goes. The backer rod matters because sealant that's too deep becomes rigid and loses its ability to flex. After the backer rod is set, you apply a flexible polyurethane or silicone caulk over the top and tool it smooth. This creates a joint that can compress and expand with seasonal movement while shedding water rather than collecting it.
At the siding line specifically, you also need to think about the gap between the patio surface and the bottom of your siding or sheathing. Most building codes and best practices call for at least 6 inches of clearance between finished grade or a hard surface and wood siding or sheathing. Concrete or pavers run tight against wood siding create a perfect environment for moisture wicking, insect infiltration, and rot, regardless of how good your joint seal is. If your siding comes closer than that, it may need to be trimmed back or protected with flashing before you pour or set the patio.
How settling and movement cause cracks (and what prevents them)
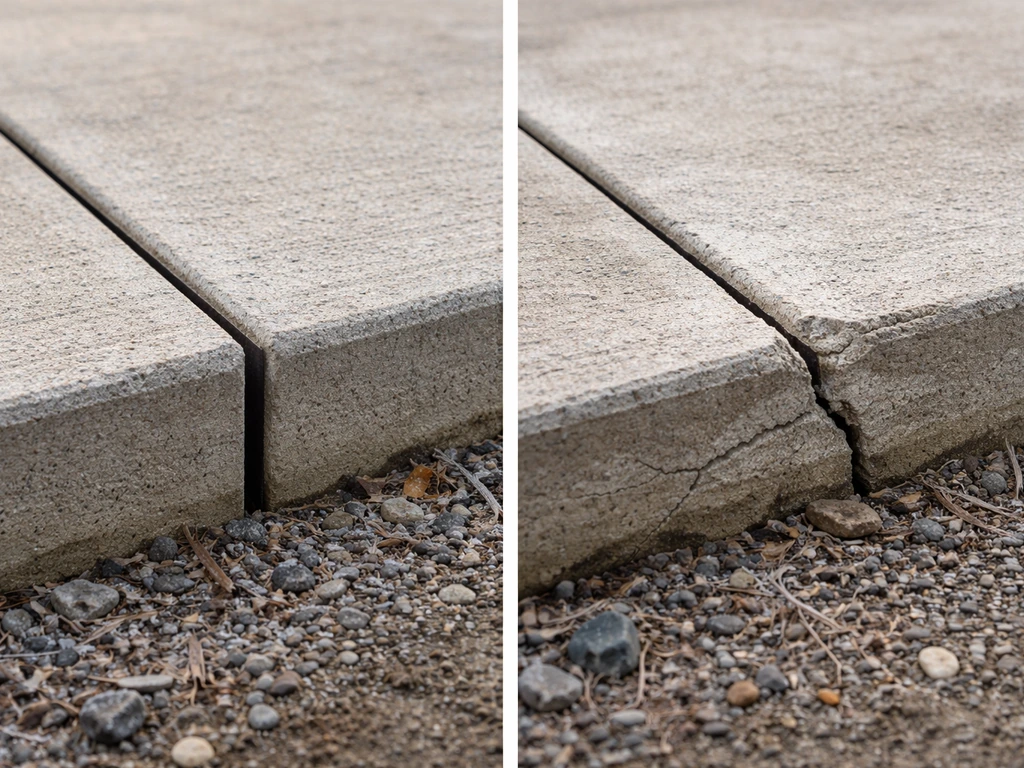
Concrete and masonry move. In summer, concrete expands. In winter, it contracts. In freeze-thaw climates, the soil beneath the slab also heaves when moisture freezes. If your slab is cast tight against the house foundation with no separation, all that movement transfers into one of three places: random cracks through the slab, pressure against the foundation wall, or uplift at the house edge where the slab tries to ride up. None of those outcomes are good, and all of them are preventable with a proper isolation joint.
The reason the isolation joint has to be full-depth is that a surface-only score line doesn't actually separate the two structures. If the bottom of the slab is still bonded to or resting against the foundation, it will transmit stress regardless of what's happening at the top. Full-depth separation means the slab can rise, fall, or shift slightly without dragging the foundation or the house wall with it. Think of it as two pieces of bread next to each other rather than fused at the crust.
Settling is a related but slightly different problem. New concrete slabs settle as the subbase compresses under load. Improperly compacted fill is the most common culprit. If the house foundation is on undisturbed soil and your slab is on fill that wasn't compacted well, the slab will settle more than the foundation, creating a step or a lip at the house edge. A proper isolation joint allows this differential movement without cracking the slab. Without it, the slab either cracks at the house line or lifts the foundation edge when it heaves back up.
The finish details that make or break the connection
For concrete slabs
The surface joint at the house line should be clean, uniform in width (typically 1/2 to 3/4 inch), and filled with a two-part system: backer rod at depth, flexible sealant at the surface. The sealant should be slightly concave (tooled inward), not convex or flush, so water sheds away from the center of the joint rather than pooling. Reapply sealant every 5 to 10 years depending on your climate and sun exposure, because UV breaks down even good sealants over time.
For ledgered structures (decks and covered porches)
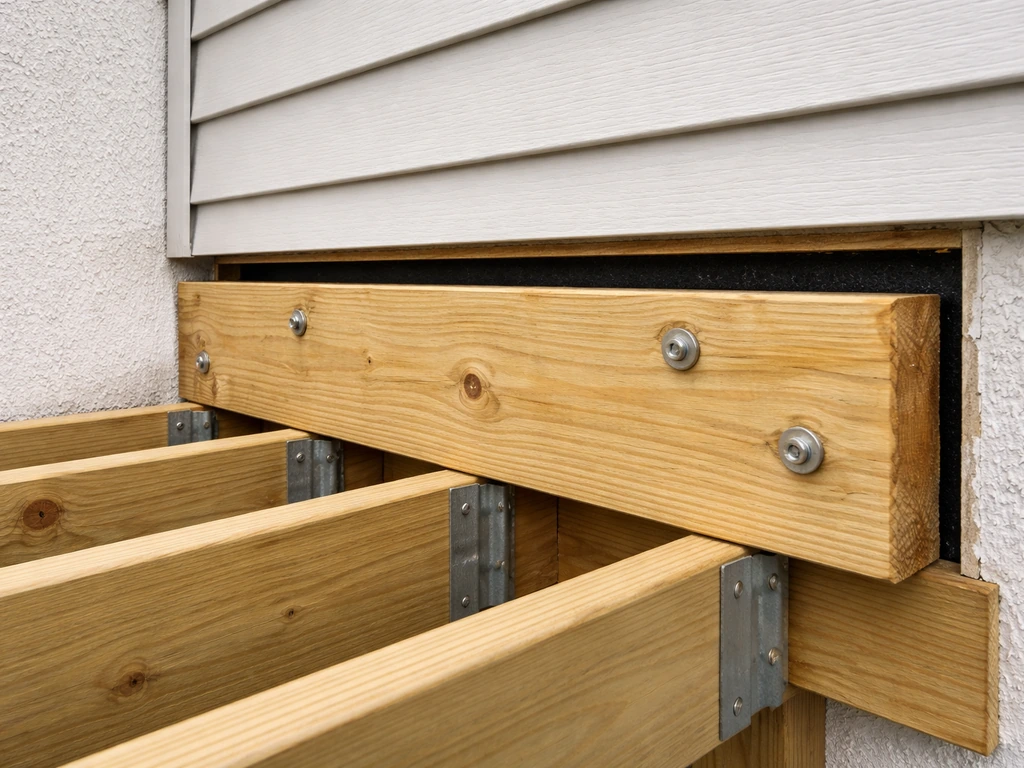
If your patio structure is attached to the house via a ledger board, the gap concept shifts entirely. For example, a carport with a patio on top usually becomes a ledgered connection that needs properly integrated flashing at the house wall If your patio structure is attached to the house via a ledger board. Here the IRC (2024 R507.9.1.5) requires corrosion-resistant flashing installed above the ledger board wherever it attaches to wood-frame construction. InspectAPedia’s deck flashing best-practices similarly emphasize waterproofing details at deck-to-wall connections and caution that improper flashing leads to leaks and rot blank" rel="noopener noreferrer">corrosion-resistant flashing. This flashing must be integrated with the house's water-resistive barrier (housewrap or felt paper) in the correct sequence: flashing over the top of the ledger, lapped by the WRB above, so any water that gets behind the siding is directed outward and away from the wall cavity. It's not just a strip of aluminum tucked under the siding. It's a layered system, and the sequence of installation matters. Getting this wrong is one of the most common causes of hidden rot in decks and covered porches, sometimes not discovered for years.
The ledger itself should also not be in direct contact with the siding. In most cases the siding is cut back and the ledger attaches to the sheathing or rim joist directly, with flashing bridging the gap between ledger and wall. The hardware used (bolts, screws, joist hangers) must be rated for the specific combination of treated lumber and metal to prevent galvanic corrosion, which is a common code issue inspectors flag on DIY ledger installations.
Keep-out clearances worth remembering
- Minimum 6 inches between hard patio surface and wood siding or sheathing (many codes require this, and it's a good practice even where it isn't explicitly required)
- Minimum 2 inches between hard surface and the bottom of any wood trim, door sill, or threshold that isn't pressure-treated or otherwise protected
- Flashing above ledger boards must be continuous and extend at least 3 inches up behind the siding, per standard best practice
- Sealant joint depth-to-width ratio should be approximately 1: 1 or slightly less deep than wide, with a backer rod controlling the depth
- Concrete slab top surface should sit at or below the bottom of the door threshold, not above it, to prevent water entry at the door
DIY or hire a pro: how to decide
A free-standing paver patio that doesn't attach to the house and stays below the siding line is a reasonable DIY project. You're not touching the structure, you're not penetrating the wall assembly, and the gap detail at the house is straightforward: leave a small clearance, fill it with polymeric sand or a gravel strip, and make sure the slope is right. Many homeowners handle this successfully with a weekend and a rented plate compactor.
A poured concrete slab is more technical. You can DIY a small slab (say, a 10x10 foot pad) if you're comfortable with formwork and concrete finishing, but the isolation joint detail has to be done correctly during the pour, not after. Once the concrete is down, you can't go back and create a full-depth separation. If you're pouring a large slab adjacent to the foundation, or if the existing grade around your house is already problematic for drainage, it's worth getting a contractor to at least consult on the layout before you pour.
A ledgered deck or covered porch attached to the house almost always requires a permit, and for good reason. The ledger connection is structural and the flashing detail directly protects your wall assembly from moisture damage that can cost tens of thousands of dollars to remediate. Most jurisdictions require inspections at the ledger stage specifically because this is where DIY installations most often go wrong. Even experienced DIYers often benefit from having a contractor install the ledger and flashing while they handle the rest of the deck framing and decking themselves.
When in doubt about permits: if the patio is attached to the house in any structural way, or if it's large enough to require a building permit in your municipality (often anything over 200 square feet, though this varies widely), pull the permit. Unpermitted work that's discovered during a home sale can delay or kill the transaction, and insurance claims related to unpermitted structures are routinely denied.
Your next steps before you build or repair
If you have an existing patio and are worried about the current condition at the house line, start by walking the perimeter and looking for these warning signs: cracks running parallel to the house wall within the first foot of the slab, soil or sand washing out from under the edge, gaps where you can see daylight under the slab, sealant that's cracked or missing, efflorescence (white mineral deposits) on the foundation wall near the patio, or soft/discolored siding just above where the patio meets the house. Any of these warrant closer inspection before they turn into bigger problems.
- Decide whether your patio will be free-standing or attached. This single decision determines most of the gap, flashing, and permit requirements.
- Check your local slope. Confirm your patio will drain away from the house at a minimum of 1/8 inch per foot, ideally 1/4 inch per foot, before you finalize the layout.
- Choose your joint detail based on material. Concrete needs a full-depth isolation joint with backer rod and flexible sealant. Pavers need a defined clearance at the wall with a stable, drainable edge material.
- Check siding clearance. Measure from your planned patio surface to the bottom of your wood siding or sheathing. If it's less than 6 inches, plan for flashing or a siding adjustment before you build.
- Confirm permit requirements with your local building department. A quick phone call or online lookup can save you significant headaches later, especially for any structure attached to or close to the house.
- If you're attaching to the house, plan the ledger flashing in detail before you start. Review the IRC flashing requirements and, if you're not confident in the sequencing, hire a contractor for that one phase of the project.
Getting the patio-to-house connection right is mostly about doing a handful of things correctly upfront rather than doing anything complicated. A garage with patio on top needs the same kind of patio-to-house gap and sealing details to prevent water entry and stress transfer. The gap itself is small. The stakes for getting the water and movement details wrong are large. Take the extra time to set the joint filler during the pour, seal it properly after, and keep the siding clear of the surface, and you'll have a patio that performs well for decades without causing problems to the house it sits next to.
FAQ
How can I tell if my patio-to-house gap is actually doing its job?
For concrete, a surface crack you can see does not mean the joint separation worked. If water is infiltrating or movement is transferring, you will usually see damage on the house side (efflorescence on the foundation, damp sheathing, or stained siding) even when the top caulk looks intact. A proper check is to look for cracked or missing sealant, soil or sand erosion right at the edge, and signs of water wicking up the foundation near the joint line.
Is there a point where the gap is too large to be helpful?
Yes, you can make the gap “too big,” but the bigger risk is doing it without control at the junction. Too much clearance can allow debris and water to collect, and it can reduce the stability of pavers near the edge. Keep the gap within typical ranges, then manage water with the right slope and a filled, sealed junction detail (backer rod plus sealant for concrete, polymeric sand or a flexible joint for pavers).
What’s the most common mistake when filling the patio-to-house joint on concrete?
Do not treat the joint like a paintable caulk line. The sealant needs a backer rod (for concrete) and a specific joint geometry so it stays flexible. If you skip the backer rod and fill the joint deep, the sealant can cure too rigidly, then tear as the concrete expands and contracts.
What should I do if my patio’s drainage slopes toward the house?
If the patio slopes toward the house, the joint seal is constantly being challenged because water is being delivered to the junction. In that scenario, you should prioritize regrading or drainage corrections (changing slope, adding subdrainage, or adjusting the base) rather than relying on caulk to stop the problem.
Do paver patios really not need an isolation gap?
For pavers, you generally still need an edge detail, even if there is some flexibility. If the gap is left open or filled with material that washes out, sand and water can migrate behind siding. Use polymeric sand or the specified joint compound for the system, and keep a defined clearance at the house line so water cannot pool or wick into that boundary.
Can I set concrete or pavers directly against wood siding if the joint is sealed?
If the patio runs close to wood siding, you need clearance and protection, not just a seal at the slab surface. Many best practices call for at least 6 inches between grade or a hard surface and wood siding or sheathing. If your patio comes closer, you may need to trim siding back and add flashing or a protective barrier before installing concrete or pavers.
How does the gap advice change for a ledgered deck or covered porch?
On a ledgered or bolted connection (covered porch, carport with a deck above, or a ledger board on wood framing), the gap depends on how the flashing and the water-resistive barrier are layered. The key decision is whether your attachment creates a penetration of the wall assembly. If it does, prioritize correct flashing sequence and integration with the WRB, because water can reach concealed framing even if the visible gap looks fine.
Why might my patio joint sealant fail within a year or two?
Yes. When sealant fails early, it’s often due to prep problems, wrong material, or joint exposure. Common causes are dirt or moisture left in the joint before caulking, using sealant that is not rated for concrete movement, or sealing after the joint has already started to open and settle. Rework typically means cleaning, removing failing material, resetting backer rod if needed, and then resealing with the correct flexible product.
What’s a safe first step if my existing patio seems to be causing moisture problems?
If you discover warning signs under an existing patio, start with targeted inspection: look for daylight under edges, cracked sealant, sand loss, and efflorescence on the foundation. If you have structural attachment (ledgered connection) or large settlement, do not assume re-caulking fixes it. Consider getting a contractor to confirm whether the separation is full-depth and whether drainage needs correction.
When should I check for a permit for a patio near the house?
Yes, permits are more likely when the work is structurally attached to the house (ledger board or any connection to framing) or when the patio is large. A practical approach is to call your local building department and describe the exact connection type and approximate square footage, then follow their requirement for inspections at the ledger or waterproofing stages.
What should I verify about the patio height when rebuilding near the house?
If you’re replacing an existing patio, the joint detail can get “lost” during demo and re-pour, especially if the new slab or base is built up higher than before. Confirm the final patio height relative to siding clearance and the bottom of siding or sheathing before you pour or set pavers, then set the expansion joint plan based on the new thickness and slope.
Next Article
Can a Patio Be on the Second Floor? Requirements, Costs
Learn if a second-floor patio is feasible, plus structural, code, waterproofing, drainage, costs, and next-step checklis