You can screen in an apartment patio, but the path looks different than a typical house project. Before you buy a single roll of mesh or a single frame kit, you need landlord or HOA sign-off, a quick permit check with your local building department, and a clear plan for what you actually want the screen to do: block bugs, add privacy, cut wind and dust, or some combination. Once those boxes are checked, most apartment patios can be screened with removable panels, retractable roll-down systems, or lightweight fixed frames in a weekend or two, with costs ranging from under $200 for a basic DIY mesh panel setup to $3,000 or more for a professional retractable system.
How to Screen in an Apartment Patio: DIY Steps

Miles Hart
5 Jun 2026
Reality check first: rules, permits, and who actually owns your patio

This is the step most people skip, and it's the one that can get your project torn down or cost you your security deposit. In a multifamily or condo setting, your patio is almost always classified as an "exclusive-use common area," which means you use it but the HOA or building still controls what gets attached to it. Multiple HOAs (Axis, Franklin Pointe, Phillips Pointe, and others) explicitly list screened patios and enclosures as exterior changes requiring Architectural Review Committee approval before any work starts. The approval form is typically something you fill out as the homeowner or tenant, not the contractor.
If you're a renter (not an owner), you need written landlord permission on top of any HOA rules. Get it in writing. Even if your landlord says yes verbally, a written email confirmation protects you. Document the current condition of the patio with photos before you start anything, both for your own protection and because some HOAs require that as part of the approval submission.
On the permit side, screen enclosures are regulated construction in many jurisdictions. Cities like Tampa have dedicated permit applications and ordinance sections specifically for residential screen enclosures. The International Residential Code (IRC) covers patio covers and enclosure walls in Appendix BF, and it includes requirements about open area percentages and emergency egress from sleeping rooms. A screen that blocks a required egress window is a code violation, full stop. Call your local building department before you plan anything structural, because even a permit check phone call takes 10 minutes and can save you from a very expensive problem later.
One useful nuance: many jurisdictions treat replacing worn screen mesh on an existing frame as a repair rather than an alteration, meaning no permit is required. But installing a new frame, posts, or any structural component almost always triggers a permit requirement. When in doubt, ask.
- Contact your HOA or property manager in writing before purchasing materials
- Submit an Architectural Review application if required (you fill it out, not the contractor)
- Get written landlord permission if you're renting
- Call your local building department to confirm whether a permit is needed for your specific project scope
- Photograph the existing patio condition before starting any work
- Check that no screens will block required egress windows or emergency exit paths
Picking the right type of screening for your patio
"Screening in" a patio can mean very different things, and getting clear on which problem you're solving makes every subsequent decision easier. An apartment patio usually falls into one of four screening scenarios: you want to keep bugs out, you want more privacy from neighbors, you want to cut wind and dust, or you want all three. The system you choose should match that goal, your patio's configuration, and what your HOA or landlord will actually approve.
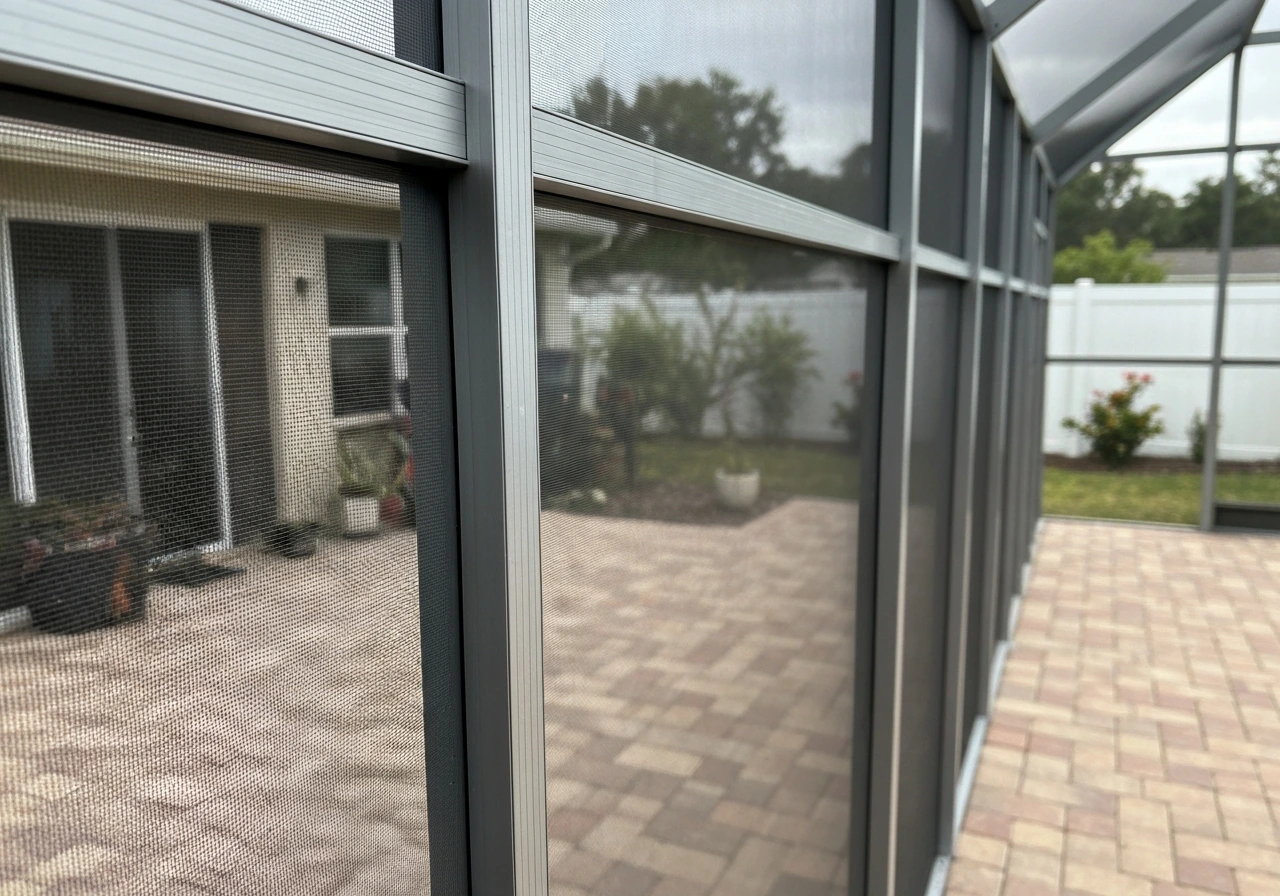
Fixed mesh panel frames
These are the most familiar approach: aluminum or vinyl frames with insect screening stretched across them, attached to existing railing posts or walls. They're relatively affordable, DIY-friendly, and look clean. The limitation is that they're fixed, so if you want the patio to feel open on nice days, you're working around them. They're best for bug control and work well on three-sided patios with an existing overhead structure. If your patio also has a roof or overhead structure, plan the screen layout around the cover so you maintain clearance and proper attachment points screen additions to pergolas or existing railing systems.
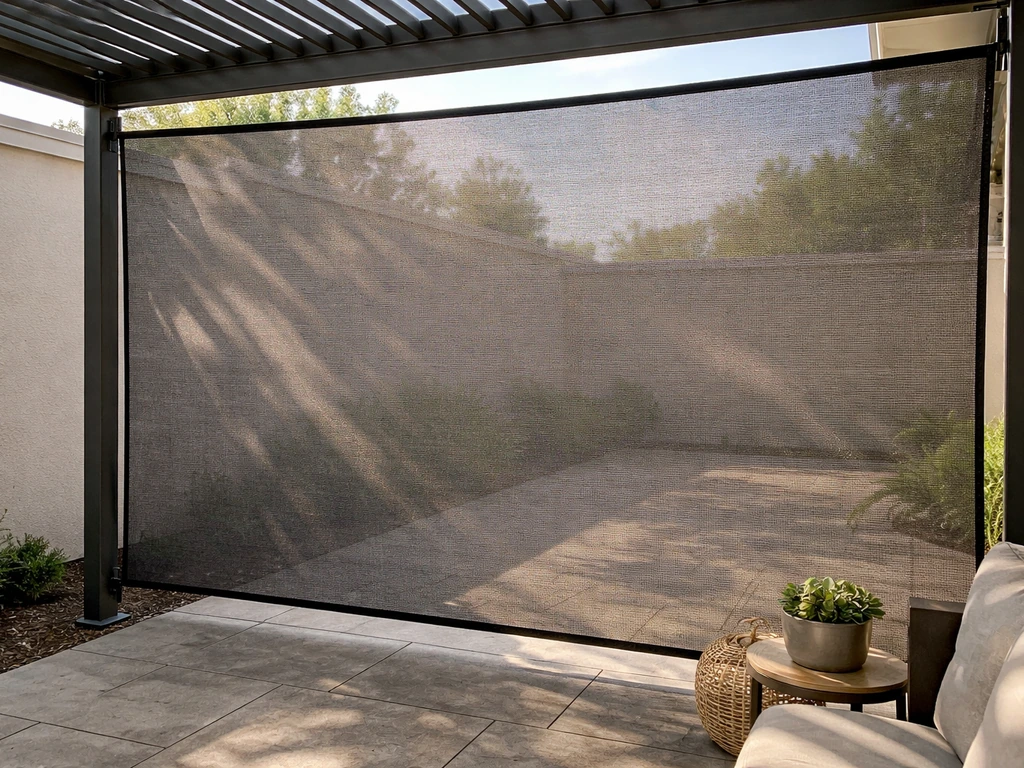
Retractable or roll-down screens
Retractable systems mount above the opening and roll down when needed. Some are manually operated with a pull cord; others are motorized. They're flexible, they disappear when not in use, and they tend to be HOA-friendly because they don't look like a permanent structural change. The tradeoff is cost: a quality retractable system for a single opening runs $400 to $1,200 or more installed, versus $50 to $200 for a fixed panel of comparable size. Motorized systems can run $1,500 or higher per opening.
Privacy panels and shade screens
Privacy screens use a denser mesh (lower openness factor) that limits the view from outside without fully blocking airflow. The "openness factor" is the percentage of the screen's surface that is open: a 1% openness screen is nearly opaque, a 10% openness screen lets in much more light and airflow. A good privacy screen for a patio typically lands in the 3% to 5% openness range, which gives reasonable privacy while still allowing air circulation. The tradeoff is that lower openness means more heat buildup on the interior side.
Screen additions to pergolas or existing railing systems
If your patio already has a pergola, pergola-style posts, or a railing system, you can attach screen panels or curtain-style screen panels directly to those structures using track systems or tension cables. This is one of the most apartment-friendly approaches because you're not drilling into the building structure, you're using existing anchor points. It also makes removal straightforward if you move or if the HOA asks you to restore the original configuration.
Measuring your patio and planning access, airflow, and sightlines
Before ordering anything, measure every opening you plan to screen, twice. Measure width at the top, middle, and bottom of each opening, because patio frames and railing systems are often not perfectly plumb. Use the smallest measurement for your frame sizing so panels fit without forcing. For height, measure from the floor (or top of the railing if panels will sit on top of it) to the overhead structure.
Plan your door or access opening before finalizing panel placement. Building codes and basic safety both require that egress paths stay clear, and practically speaking you need at least a 32-inch-wide doorway to move in and out comfortably. If your patio has one main opening, position your screen door there. If your patio has multiple open sides, decide which one gets the door and which sides get fixed panels.
Airflow planning matters more than most people expect. Screens reduce airflow somewhat, and privacy/solar screens reduce it more significantly than standard insect screens. To preserve cross-ventilation, try to position openings on opposite or adjacent sides rather than all on one side. If your patio shares a wall with the building on two sides, you're limited, but even having a screened door that opens versus a fixed panel makes a real difference in how the space breathes on warm days.
Sightlines are worth thinking through before you install, not after. Stand at your outdoor furniture positions and figure out which views you want to preserve and which you want to block. A privacy screen on one side might be exactly right; putting one on all four sides can make the patio feel like a cage. A mix of insect screening (high openness, low visual obstruction) on some sides and privacy screening on the neighbor-facing side is a common and effective combination.
Materials and screen options side by side
There are two separate material decisions here: the frame material and the mesh material. They have different durability, cost, and maintenance profiles, and the right choice depends on your climate and how permanent the installation will be.
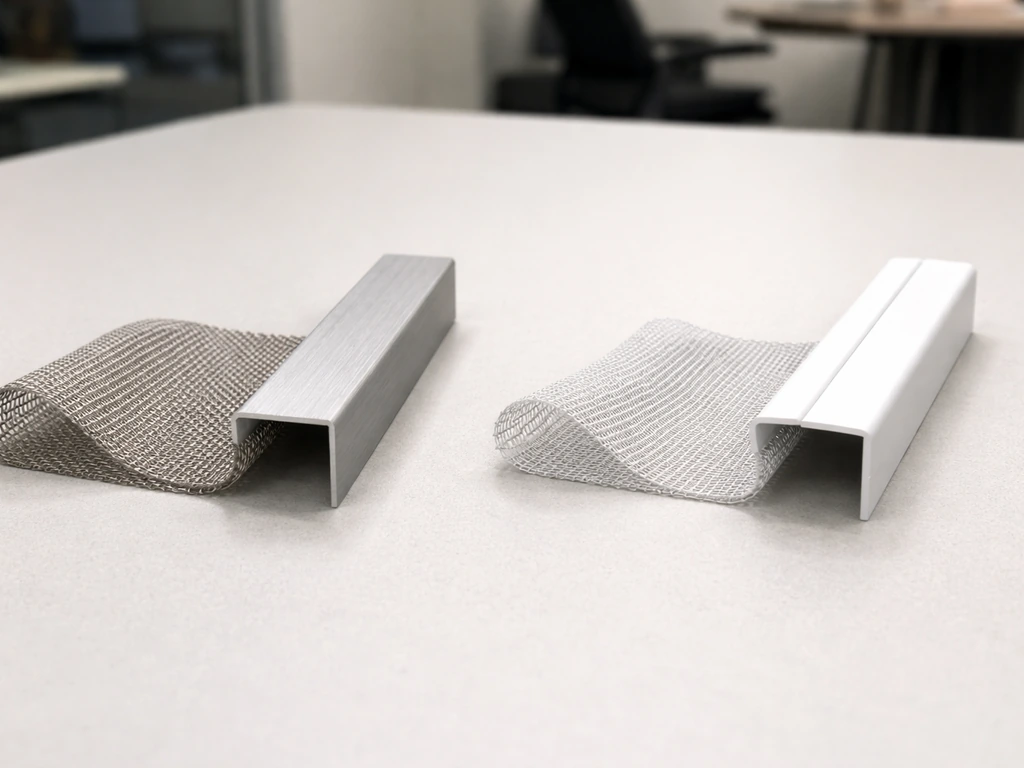
Frame materials
| Frame Material | Pros | Cons | Best For |
|---|---|---|---|
| Aluminum | Lightweight, corrosion-resistant, low maintenance, widely available in screen kits | Can dent, coastal saltwater can cause pitting over time | Most apartment patios; best all-around choice |
| Vinyl/PVC | Low cost, no rust, easy to cut and work with, DIY-friendly | Expands and contracts with temperature, less rigid than aluminum | Budget builds, mild climates, removable setups |
| Wood | Attractive, easy to customize, paintable | Requires sealing, can rot or warp with moisture, heavy | Covered patios in dry climates; not ideal for humid or rainy areas |
| Steel | Very strong, handles high wind loads well | Heavy, must be powder-coated or treated against rust | High-wind regions; usually contractor-installed |
Mesh/screen materials
| Mesh Material | Typical Lifespan | Pros | Cons |
|---|---|---|---|
| Fiberglass | 10–15 years (moderate climate) | Flexible, won't crease easily, inexpensive, DIY-friendly | UV exposure degrades it over time; tears more easily than metal mesh |
| Aluminum mesh | 20–25 years | More durable than fiberglass, holds shape, good airflow | Can oxidize in coastal/salt environments; harder to work with by hand |
| Stainless steel mesh | 30+ years (significantly longer than fiberglass or aluminum) | Extremely durable, superior corrosion resistance | Expensive, heavier, typically requires professional installation |
| Solar/privacy screen fabric | 10–15 years | Reduces UV, adds privacy, available in various openness factors | Reduces airflow more than standard insect screen; higher cost than basic mesh |
For most apartment patios, aluminum frames with fiberglass mesh is the practical starting point: it's affordable, widely available in kit form, and easy to cut and install yourself. Upgrade to aluminum mesh if you're in a humid climate or want the screen to last significantly longer without replacement. Solar screen fabric makes sense on the side facing direct sun or neighbors, paired with standard insect mesh elsewhere.
DIY vs hiring a contractor: costs, time, and honest skill requirements
The honest answer is that basic fixed panel screening is very doable as a DIY project over a weekend, while a full perimeter enclosure with a proper screen door, sealed corners, and a polished look is harder than it looks and benefits from a contractor's experience. Here's how the two paths compare in practice.
| Factor | DIY Fixed Panels | DIY Retractable System | Hired Contractor (Full Enclosure) |
|---|---|---|---|
| Typical cost range | $100–$500 depending on patio size and materials | $400–$1,500 per opening (hardware cost) | $5–$15 per square foot; $2,000–$8,000+ for a typical apartment patio |
| Time required | 1–2 weekends | 1 day per opening once hardware arrives | 1–3 days professional labor |
| Tools needed | Measuring tape, miter saw or hacksaw, spline roller, utility knife, drill | Drill, level, measuring tape (most kits are designed for DIY) | Contractor supplies all tools |
| Skill level | Beginner to intermediate | Intermediate (following manufacturer instructions carefully) | Not applicable |
| Permit handling | Your responsibility | Your responsibility | Good contractors pull their own permits |
A useful middle ground: many people do the planning, permitting, and HOA approval themselves, buy the materials, and hire a handyperson or screen installer for a day to do the actual installation. This keeps costs lower than a full contractor bid while avoiding the most common DIY errors (which usually happen at corners, door hardware, and frame attachment points).
If your patio is larger than about 200 square feet, has an irregular shape, shares walls that need to be drilled into for attachment, or if your HOA requires a licensed contractor as part of the approval process, go with a professional. The $5 to $15 per square foot range cited for screen enclosures is a reasonable benchmark to budget against, with simple attached structures at the low end and custom freestanding or high-wind-rated enclosures at the high end.
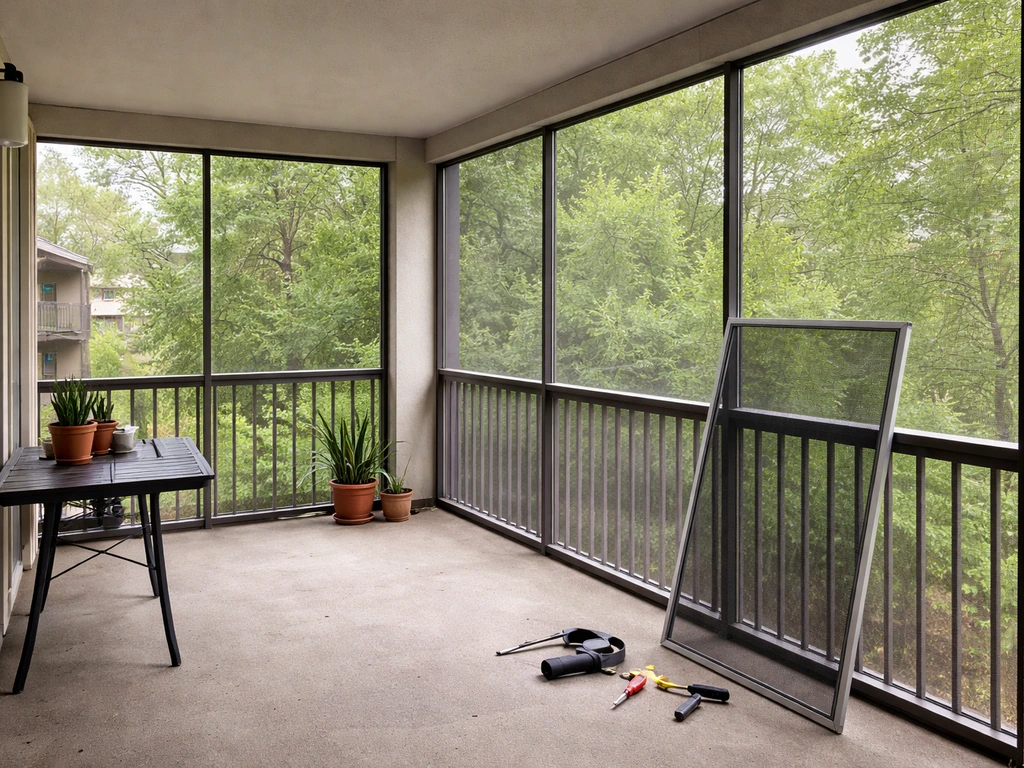
How to install patio screening: a practical walkthrough
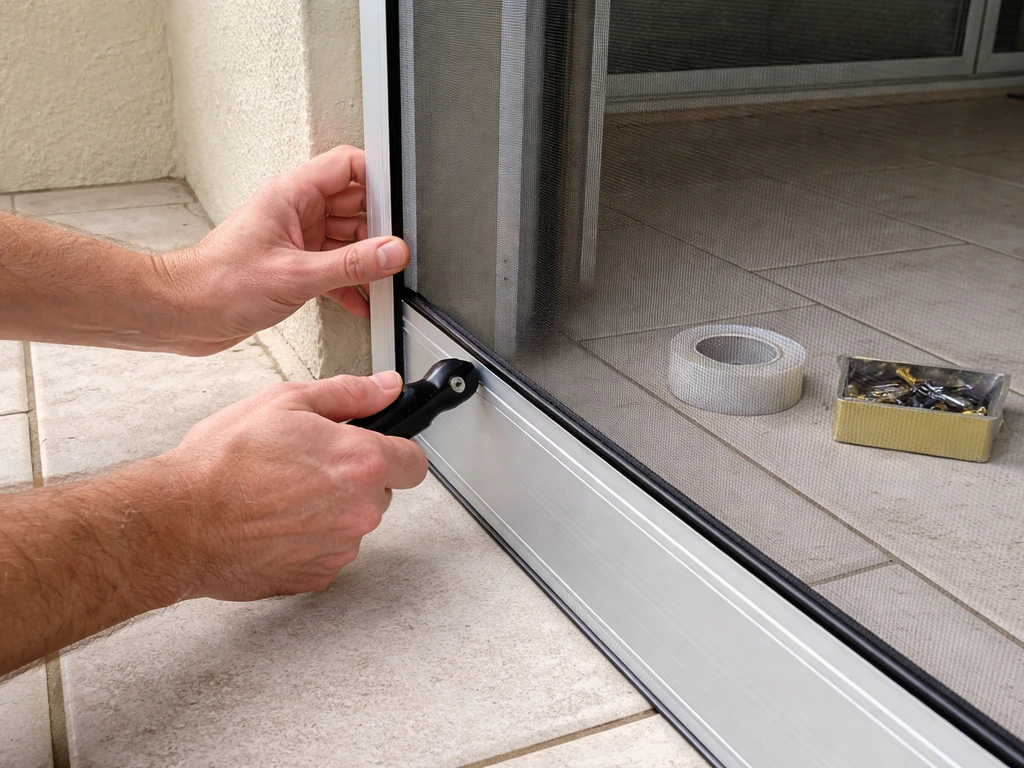
This walkthrough covers the most common apartment patio scenario: installing aluminum-framed screen panels on a patio with an existing railing system and overhead structure, with one screen door for access. Adjust steps as needed for retractable systems or pergola-attached panels.
- Confirm approval and permits are in hand before ordering materials.
- Measure all openings (width at top, middle, and bottom; height at left, center, and right). Record the smallest measurement for each dimension.
- Order or cut frames to size. For aluminum, a miter saw with a non-ferrous metal blade makes clean cuts. For vinyl, a fine-tooth hacksaw works fine.
- Dry-fit all frames in place before attaching anything. Check for level and plumb. Shim if needed.
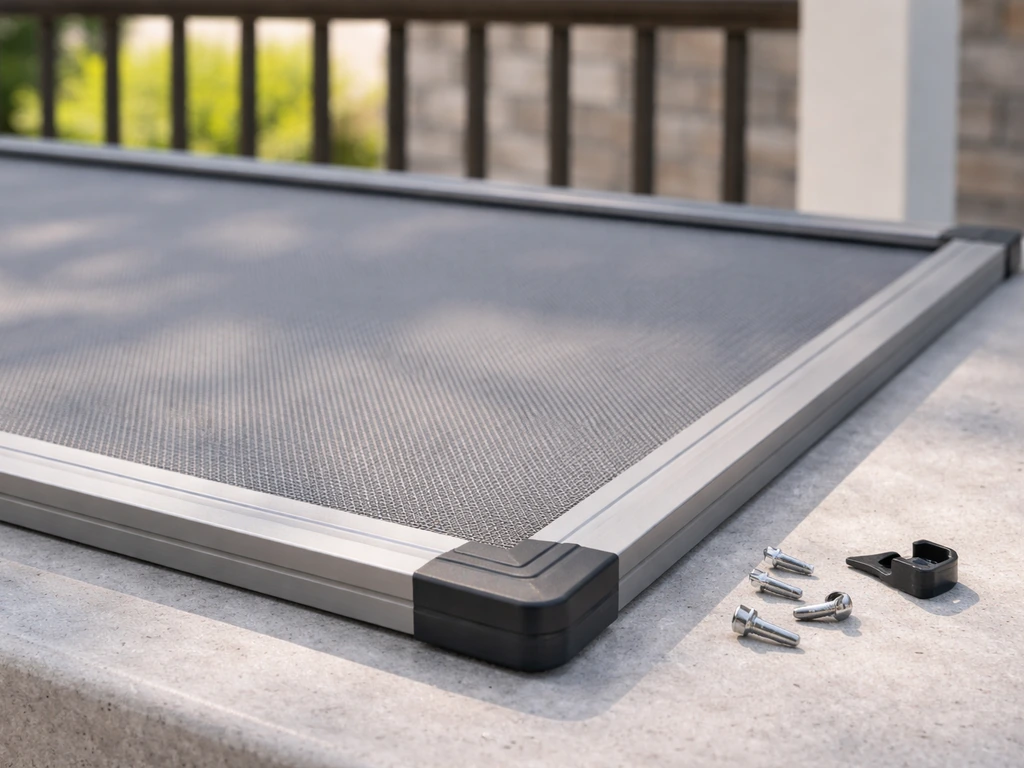
- Cut screen mesh to size, leaving about 1 inch of overhang on all sides. Lay the frame on a flat surface, lay mesh over it, and start pressing the spline (the rubber cord) into the channel around the frame using a spline roller tool. Work one side at a time, pulling the mesh taut as you go. Trim the excess mesh with a utility knife once all four sides are done.
- Attach side panels to railing posts or wall anchors using the fasteners specified for your frame system. Use stainless steel screws to avoid rust streaking. Keep fasteners at least 2 inches from the ends of frames to prevent cracking.
- Install the screen door last. Use a door closer (spring or pneumatic) so it self-latches, and install a latch at handle height. Check that the door opens outward for easy egress.
- Seal any gaps between panel edges and existing structures with foam weatherstripping or screen molding. This is the most important step for bug control and the one most DIYers skip.
- Check the full perimeter from the inside with a flashlight at night to spot any gaps where light bleeds through.
Common mistakes that cause problems later
- Sizing frames to the largest measurement instead of the smallest, which causes panels that don't fit flush
- Skipping the weatherstripping seal around panel edges, leaving gaps that mosquitoes find immediately
- Using drywall screws or standard steel screws in aluminum frames, which causes rust streaks and frame corrosion
- Installing the screen door so it opens inward, which creates a tripping hazard and makes emergency exit harder
- Over-tensioning the mesh during spline installation, which distorts the frame over time
- Attaching panels to building walls without anchor-appropriate fasteners for concrete or stucco, which leads to pull-out failure in the first windstorm
- Blocking an egress window with a panel, which is a code violation and a life safety issue
Keeping your screens in good shape over time
Screens are low-maintenance but not zero-maintenance. Fiberglass mesh is the most forgiving to clean but the most UV-sensitive over time. Do patio screens block UV rays, and how well that solar exposure protection works depends on the mesh material and openness factor. Aluminum mesh lasts longer but can oxidize in coastal environments. Either way, a simple annual routine keeps them functional for their full expected lifespan.
Routine cleaning
Clean screens once or twice a year with a soft brush and mild soap and water solution. Rinse with a garden hose on a gentle setting, not a pressure washer, which can stretch or tear mesh. For aluminum frames, a light coat of car wax after cleaning helps prevent oxidation. For vinyl frames, avoid harsh chemical cleaners that can dry out and crack the material.
Seasonal checks
At the start of each season, check every panel for small tears, loose spline, or gaps at the frame edges. Small tears (under 3 inches) can be patched with a screen repair kit available at any hardware store for under $10. Larger tears mean it's time to rescreen that panel, which is a simple job: remove the old spline, pull out the damaged mesh, cut new mesh to size, and roll in fresh spline. Rescreening a single panel takes about 20 minutes once you've done it once.
Before winter or storm season
If your screens are removable, taking them down before harsh winters or before a major storm protects them from wind damage and extends their life significantly. Store them flat or vertical (not stacked with heavy items on top) in a dry location. If your screens are permanent, check that all attachment fasteners are tight before storm season and add extra weatherstripping if gaps have developed from seasonal expansion and contraction.
With proper care, aluminum-framed fiberglass screens should last 10 to 15 years before the mesh needs replacement, and the frames themselves should outlast the mesh by another decade or more. RiteScreen similarly notes that fiberglass window screens typically last about 10 to 15 years in moderate climates, with aluminum mesh often lasting 20 to 25 years or more How Long Do Window Screen Materials Last. Aluminum mesh panels can go 20 to 25 years before replacement is needed. The screen door closer is usually the first component to need attention: replace it when it stops closing reliably, which is typically every 5 to 8 years depending on use and climate.
Your next steps in order
Here's how to take this from article to finished project without getting stuck. Start with the approval and permit step: contact your HOA or landlord this week, submit whatever form is required, and call your local building department to check permit requirements. Follow your local approval and permit rules first, then choose the screen type that fits your patio goals how to screen in a patio.
While you're waiting for approvals, measure your patio and sketch out where panels, the door, and any sealed corners will go. Then decide on your system type and materials based on your budget and whether you want the flexibility of retractable screens or the durability and lower cost of fixed panels. A patio screen alternative to permanent enclosures is often retractable or removable systems, depending on what your HOA allows fixed panels.
For a true best option, match the enclosure setup to how much shade, privacy, and bug protection you need, then compare fixed panels versus retractable screens best screen for patio enclosure. If your patio is under 150 square feet and roughly rectangular, this is a realistic weekend DIY project. If it's larger, irregular, or your approval process requires a licensed contractor, get two or three bids before deciding.
Either way, the screening system you end up with will be far more useful if you spend the time upfront getting the rules, measurements, and material choices right. Once you have approval and measurements, you can choose a fixed panel, retractable, or privacy-focused screen system and then install it step by step how to screen a patio enclosure.
FAQ
Can I screen in my apartment patio without HOA approval if I do it “just for bugs”?
Usually no. Even if the goal is insect control, a screened enclosure is still an exterior modification in many condo and multifamily communities, so you should submit an Architectural Review Committee request and wait for written approval before installing any frames or attaching hardware.
What should I include in the photos and documentation for my HOA or landlord submission?
Take wide-angle photos of each patio side (including corners), close-ups of existing railings or walls where you plan to attach, and a measuring shot showing at least one reference dimension. Include a simple sketch that labels openings, where the screen door will be, and which panels will be removable.
Do I need a permit if I only replace old screen mesh on an existing frame?
Often, mesh replacement on an existing, approved frame is treated as a repair and may not require a permit. However, adding or replacing any structural components, changing the size of the enclosure, or installing a new frame typically triggers permitting, so ask your local building department to classify your specific scope.
How do I know whether my screen will block a required emergency egress window?
Check your building plan for any required egress openings and verify the screen placement will not cover an egress window or the path to it. If your patio is served by a bedroom window, call the building department with your window location and planned screen measurements before ordering materials.
What’s the safest rule of thumb for screen door size and placement on an apartment patio?
Plan for at least about a 32-inch clear width for comfortable movement, keep the door in the most direct access path, and avoid placing the door so it conflicts with any railing return, corner posts, or required walkway clearances.
Can I install screens by drilling into the building wall, or should I only attach to existing railings?
Attaching to existing railing systems or pergola members is usually easier to approve and often avoids drilling into the building structure. Drilling into exterior wall surfaces can be treated as a bigger alteration (and may require engineering or specific fastener rules), so confirm attachment points with your HOA and the permit office.
What openness factor should I choose if I want privacy but still want airflow?
A common target for privacy screens is roughly 3% to 5% openness. If you feel the patio gets hot, consider using standard insect mesh on the most air-intake side and reserve the denser privacy screen for the neighbor-facing side only.
Should I put privacy screens on every side for maximum privacy?
Not necessarily. Screens on all sides can trap heat and make the space feel enclosed. A practical approach is a mix, using privacy or solar mesh where sightlines matter most and keeping higher-openness insect mesh on other sides to maintain cross-ventilation.
How can I preserve airflow if my patio has only one “open” side?
Create an air pathway using a screened door opening rather than fixed panels on the only accessible side, and position vents or openings so airflow can travel from near the door toward the opposite side. If the patio is truly enclosed on three sides, expect reduced airflow and consider prioritizing retractable coverage for days when you need more breeze.
Are retractable screens allowed in apartments, and what’s different about them for approval?
They are often more acceptable because they can look less like a permanent enclosure, but approval still depends on your HOA’s definition of an exterior change. Ask whether they want removable hardware, specific anchoring locations, or restoration clauses if you move out.
What’s the most common DIY mistake that causes a screen enclosure to fail or get rejected?
Misaligned measurements and poor corner or attachment details. If frames don’t sit square, panels bow, gaps form at edges, and fasteners can pull away, which can look unfinished and also creates weather leaks your HOA may dislike. Measuring at top, middle, and bottom and using the smallest dimension helps prevent this.
How should I handle winter or storms if my patio screens are removable?
Remove screens before harsh winter wind if your system is not designed for it, store them flat or upright in a dry area, and avoid stacking heavy items on top. If you’re expecting a major storm, prioritize removal if your HOA or manufacturer guidelines allow it, otherwise ensure fasteners are tight beforehand.
What repair is worth doing versus replacing a whole panel?
Small mesh tears under about 3 inches are usually patchable with a spline-and-mesh repair kit. If the damage is larger, the frame is warped, or you have multiple repeated tears, replacing or rescreening that panel is typically more efficient and results in a cleaner edge fit.
Next Article
Best Screen for Patio Enclosure: Types, Costs, and How to Choose
Choose the best screen for a patio enclosure with types, costs, measuring tips, durability, wind and bug-control tradeof