Screening in a patio means building a framed mesh perimeter around your outdoor space so you can sit outside without fighting bugs, while still getting fresh air and natural light. You can do it yourself for a few hundred to a few thousand dollars depending on whether you're starting from a bare slab or working around an existing patio cover. The basic process is: plan your layout and measure carefully, put up an aluminum or wood frame, stretch and spline the screen fabric into the frame, seal the edges, and add a door. That's it. The rest is just details, and this guide covers all of them.
How to Screen in a Patio: DIY Steps for Covered or Open Areas

Miles Hart
1 May 2026
What 'screening in a patio' actually means
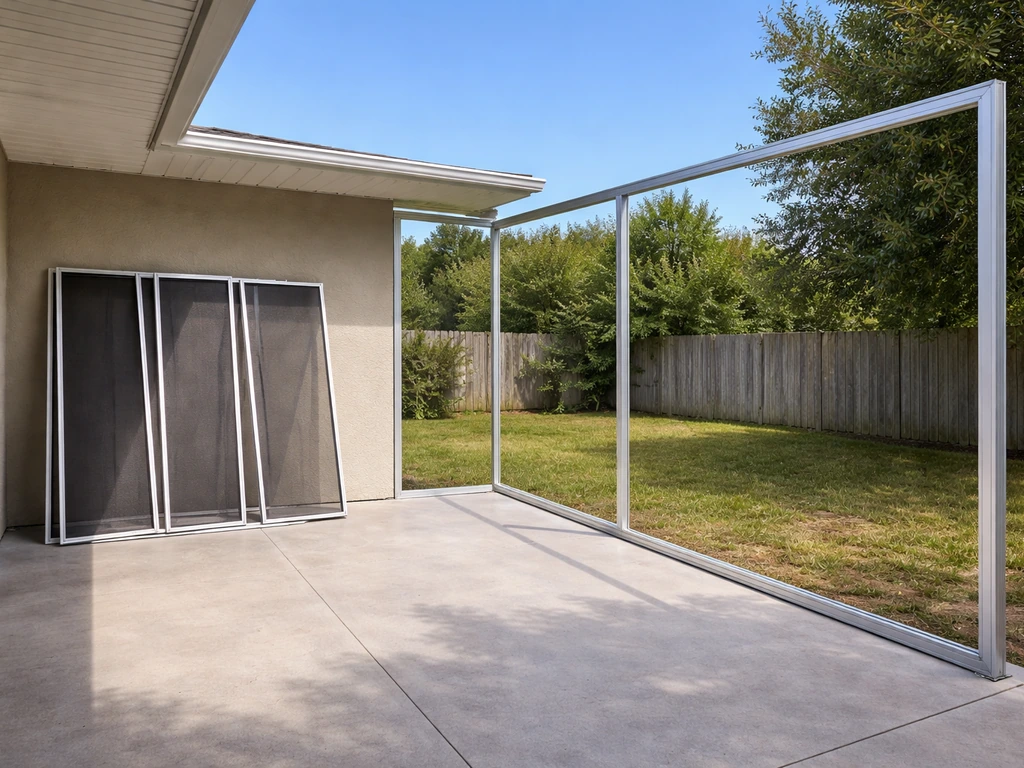
A screened-in patio is an outdoor space enclosed by a framed mesh screen perimeter. The goal is to keep insects out while maintaining airflow, unlike a sunroom or enclosed porch that uses glass or solid walls. The structure typically uses aluminum posts and beams (or wood) to form the frame, and a mesh screen fabric is stretched across each opening and secured with a flexible rubber or vinyl spline pressed into a groove in the frame. The perimeter usually ties into the house wall on one or two sides and sits on top of an existing concrete slab.
What you can screen in covers a wider range than most people realize. You can screen a completely open slab patio by adding your own framing from scratch. You can screen around an existing patio cover or pergola, using the roof structure you already have and just building the walls underneath it. You can also screen in the area under an elevated deck.
When you're working under a deck, focus on weatherproofing and drainage near the overhead structure as well as standard insect sealing screen in the area under an elevated deck. The approach changes slightly for each scenario, but the core skills and materials are the same. If you live in an apartment or rental, there are lighter retractable and curtain-style options, though those involve different trade-offs on insect sealing.
If you are screening in an apartment patio, focus on lightweight, easy-to-install options and confirm your rental rules before building apartment or rental.
Plan it: measure your space and decide on framing
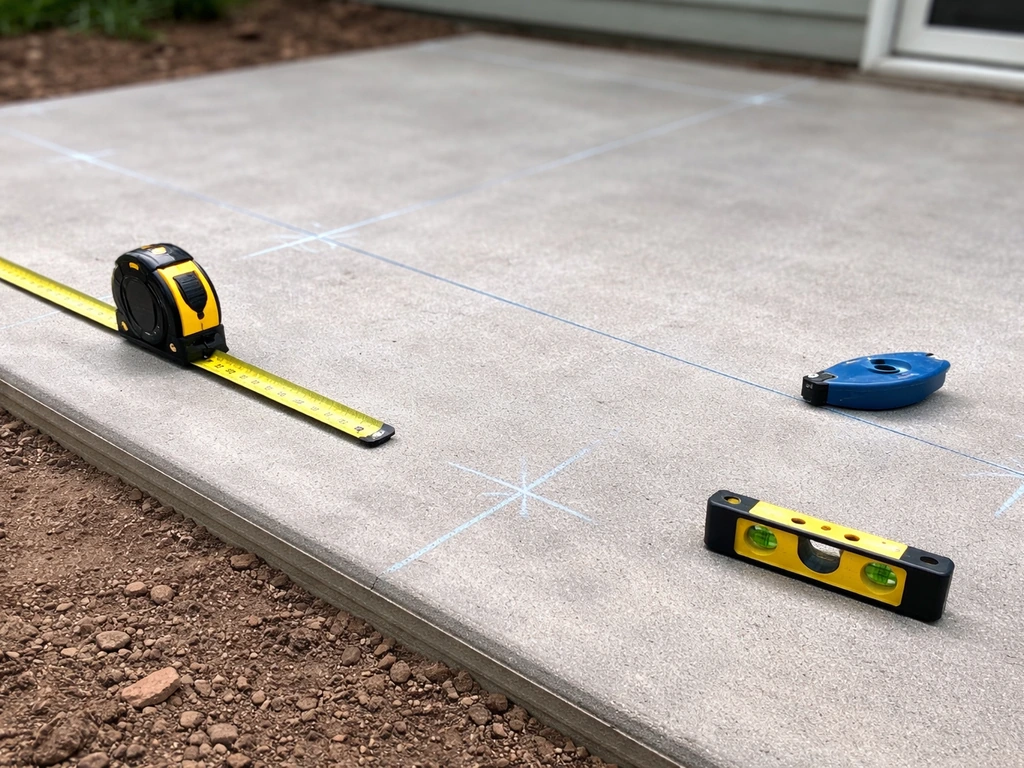
Before you buy anything, spend time on measurements and layout. This is where most DIY screen projects go sideways, so it's worth doing slowly and carefully.
Key measurements to take
- Overall dimensions: measure the full width and depth of the slab or area you want to enclose
- Height: measure floor to ceiling (if you have an existing cover) or to the desired top rail height if you're going open-sided with a screen above
- Wall tie-in points: mark exactly where your frame will attach to the house, including fascia height and any obstructions like light fixtures or hose bibs
- Post spacing: most aluminum screen enclosure systems use spans of 8 to 12 feet between posts; check your kit's specs before finalizing the layout
- Door rough opening: plan for at least 36 inches wide and your full height, placed where you'll actually use it most
- Out-of-square check: measure diagonals of your slab; if they differ by more than half an inch, you'll need to account for that in your frame layout
Two starting points: open slab vs. existing patio cover
If you're starting with a bare open slab, you'll build the full frame: corner posts, intermediate posts, a top plate that ties into the house fascia, and a header beam across the open side. You're essentially building a simple room frame out of aluminum channel or lumber. This is more work but gives you full control over dimensions and layout.
If you already have a patio cover or roof, you're in better shape. You build the screen walls underneath the existing structure, and the roof is already done. If your existing patio cover already has a roof, you can screen in the patio by building the screen walls underneath the cover and sealing the edges for insect protection. This is genuinely easier and cheaper, since you skip all the roofing work.
You'll still need to anchor posts to the slab and tie the top rail to the underside of the existing roof framing, but the scope is much smaller. Some enclosure companies specifically advertise this approach, letting you use your existing patio cover as the ceiling of your new screen room.
Framing material choice
Extruded aluminum is the standard for DIY screen enclosures. A common size is 2-inch by 2-inch aluminum channel, which is lightweight, rust-resistant, and designed to accept standard spline groove hardware. Wood framing works too and costs less upfront, but it requires painting, is heavier, and will eventually rot or warp unless you use pressure-treated lumber. For most homeowners, aluminum is worth the slightly higher material cost because it's maintenance-free and the groove geometry is consistent, which makes screen installation much easier.
Screen materials and system types compared
The screen fabric and the system you use to hold it in place are two separate decisions, and both matter. Here's how the main options break down.
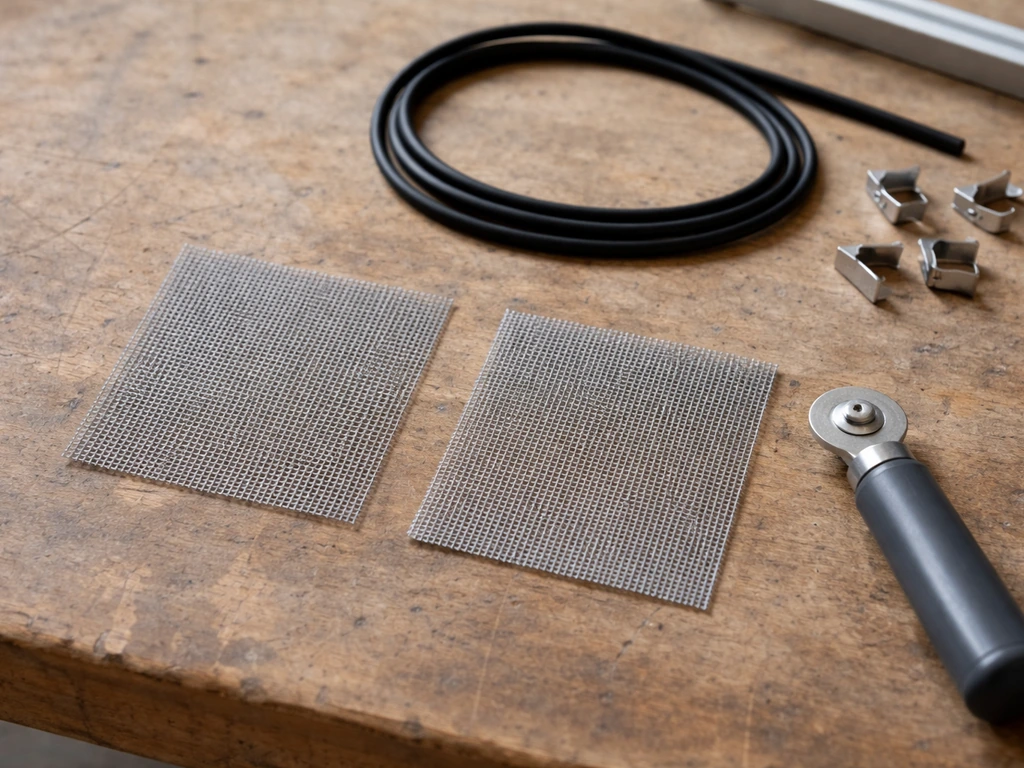
Screen fabric types
| Screen Type | Best For | Key Spec / Trade-off |
|---|---|---|
| Standard fiberglass (18x14 mesh) | General insect control, budget builds | Most affordable, easy to work with, can sag over time in wide spans |
| Aluminum mesh | Long-term durability, won't sag or rust | Harder to cut cleanly, more expensive, excellent longevity |
| Phifer TuffScreen (vinyl-coated polyester) | High-traffic areas, pets, kids | Heavy-duty, installs like regular screen, resists tears better |
| Phifer No-See-Um (20x20 mesh) | Areas with gnats, sand flies, or small insects | Tighter weave reduces airflow slightly, keeps out nearly everything |
| Sun-control screen (e.g., ADFORS Sun Guard) | Hot climates, afternoon sun exposure | Blocks up to 75% of solar rays, still allows airflow, reduces glare |
For most screened patios in temperate climates, standard fiberglass or aluminum mesh is fine. If you're in a coastal or Southern region with small biting insects, go with a 20x20 mesh like Phifer No-See-Um. Phifer’s swatch card describes “small insect protection” screening options and notes 20x20 no-see-um style materials [a 20x20 mesh like Phifer No-See-Um](https://www. phifer.
com/wp-content/uploads/2021/12/swatch-cardscreeningwindowdoorsmall-insect-protection-screenv24-060724. pdf). If your patio bakes in afternoon sun, a sun-control screen does double duty as both bug barrier and heat reducer. The spline you use needs to match the fabric and frame: aluminum frames typically use 0.
160-inch diameter spline, while fiberglass and vinyl screens use 0. 175-inch spline. Get this wrong and the screen will either pop out or not seat properly, so confirm your spline size before buying.
Enclosure system types
| System Type | How It Works | Pros | Cons |
|---|---|---|---|
| Fixed spline panels (DIY kit) | Aluminum frame with spline-groove screen panels bolted together on site | Permanent, insect-tight, wide range of kit sizes, cleanest look | More labor-intensive to install, not easily removed seasonally |
| Roll/retractable screens | Screen rolls into a housing above the opening and pulls down when needed | Can open fully when not needed, good for mild climates | More expensive per opening, less insect-tight at edges |
| Screen curtains / tension panels | Heavy mesh curtains hung from a top track | Lowest cost, DIY-friendly, removable | Poor insect seal, not suitable as a full enclosure replacement |
| Hard-top enclosure kit | Pre-engineered system with aluminum roof panels + screen wall sections | Complete room feel, includes roof, integrated door system | Higher cost, more complex install, may require permits |
For a genuine screened-in patio that actually keeps bugs out, fixed spline panels are the right call. They're the most common DIY approach, the hardware is widely available (including modular kits from suppliers like Madden Industries and Screen Tight systems sold at big-box stores), and the finished result looks intentional rather than improvised. Retractable screens work well for single door or window openings and can be combined with a fixed-panel wall system if you want one wall to open up fully.
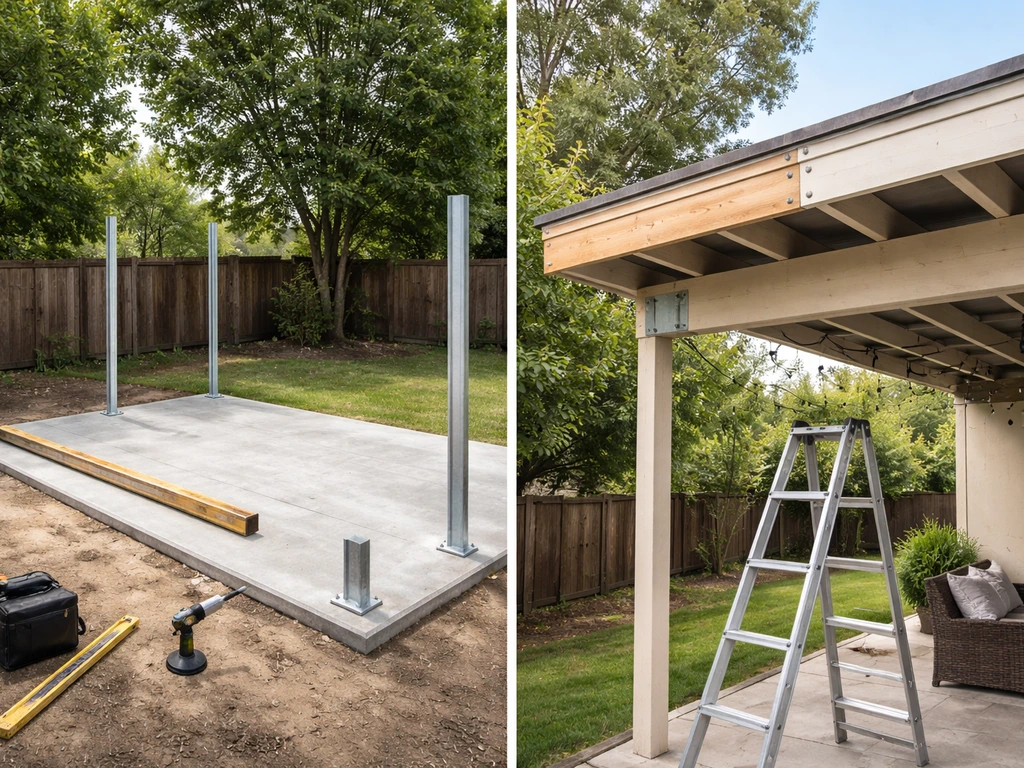
DIY step-by-step: build the frame
This walkthrough covers building a new aluminum frame on an open slab patio. If you have an existing patio cover, skip the roof/top-beam steps and follow the tie-in notes instead.
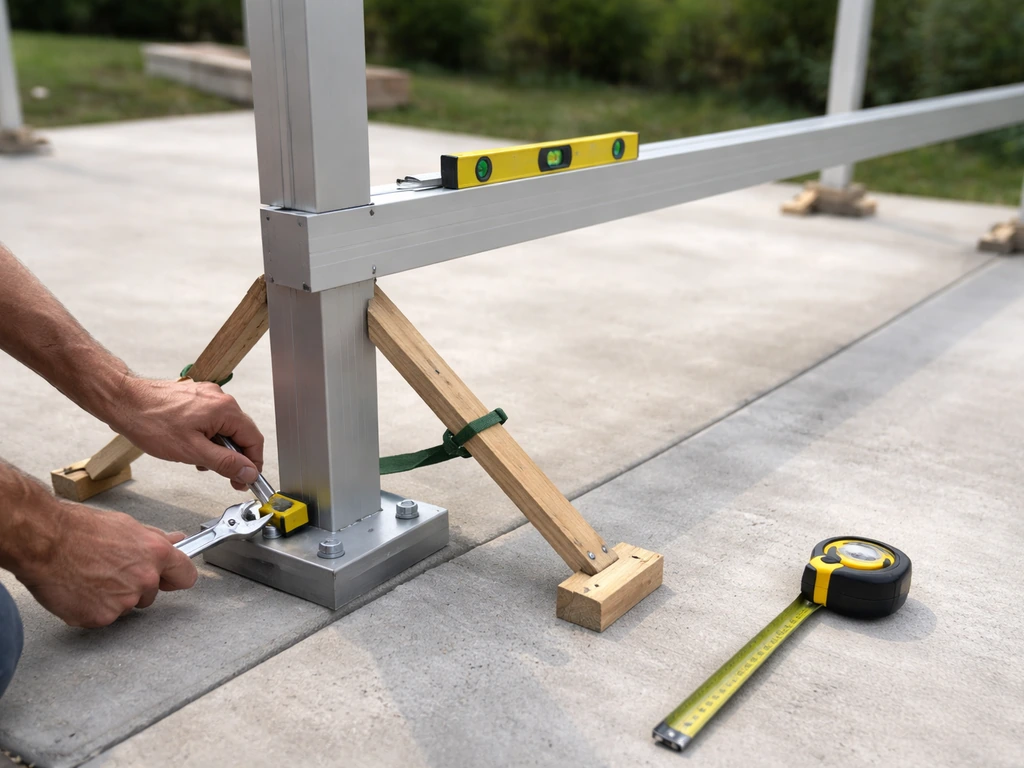
- Mark your post locations on the slab using a chalk line. Space posts 8 to 12 feet apart depending on your kit's specs. Corner posts go at the corners; intermediate posts go along any wall longer than your maximum span.
- Drill anchor holes into the concrete slab at each post base location using a hammer drill and masonry bit. Use anchor bolts or concrete screws rated for post base hardware.
- Attach aluminum post base brackets to the slab, then set your corner posts plumb using a level. Have a second person hold the post while you secure it, or use temporary bracing.
- Run a top plate (top horizontal rail) from the house fascia to the first corner post, then along the perimeter to the far corner. This is what your screen panels will attach to at the top. For open-slab builds, this rail also carries whatever roof or open-top structure you're adding. For under-an-existing-cover builds, bolt this rail to the underside of the existing roof framing.
- Attach the house-side wall header: this is the horizontal beam that spans the connection between your screen frame and the home wall. Run a bead of caulk along the back of this header where it meets the fascia or siding to prevent water infiltration. Secure screw heads with silicone sealant.
- Install your bottom rail along the slab perimeter. This rail anchors the screen at ground level and creates the lower spline groove. Use concrete anchors at 24-inch intervals.
- If you're building an uncovered slab and want a simple open-top (screen walls only, no roof), you can cap the top rail with a screen panel that runs horizontally overhead. If you want a solid roof, that's a bigger project, and most DIYers either use their existing cover or hire a roofer for that part.
- Cut intermediate horizontal rails to span between posts at any mid-wall height if your total wall height exceeds 8 feet. Most residential builds with 8-foot ceilings won't need this, but tall enclosures do.
Install the screens and weatherproof the perimeter
Once the frame is up and square, screen installation goes panel by panel. Work from one corner outward toward your planned door opening, which you'll leave for last.
- Roll out your screen fabric across the first panel opening and cut it roughly 2 to 3 inches larger than the opening on all sides. You'll trim the excess after the spline is installed.
- Lay the screen flat over the frame so it covers the groove on all four sides of the panel. Start at the top and press the screen lightly into the groove by hand to hold position.
- Using a spline roller, roll the correct-diameter spline into the top groove first, pressing it firmly into the groove with the flat side of the spline against the frame. Keep the screen taut but not stretched so tight it distorts the mesh.
- Move to the bottom groove next, pulling the screen gently downward to remove any slack before rolling in the spline. Then do each side. Working top-bottom-sides (rather than going around the perimeter sequentially) keeps the fabric tensioned evenly.
- Trim excess screen with a sharp utility knife, cutting flush against the outer edge of the spline. A dull blade will pull the mesh rather than cut it, so use a fresh blade.
- At corners where two screen panels meet, use corner trim or an aluminum corner post with grooves on both faces. The spline on each adjacent panel seats into its own groove in the corner post. Follow your system's guidance on scribing the post top to match any slope at the roof line.
- Seal the top rail where it meets the house with paintable or clear silicone caulk. Also seal around any screw penetrations. This is the most common water intrusion point in DIY screen enclosures, so don't skip it.
- At the bottom rail, if your slab has any low spots or gaps between the rail and concrete, fill them with caulk or apply foam backer rod first. Insects will find any gap at grade level.
- Check every panel for sagging. A small amount of bow in very wide panels is normal; anything that creates a gap at the spline line needs to be re-splined with better tension. It's faster to redo it now than after everything else is done.
Airflow and ventilation
Standard insect screen mesh (18x14 fiberglass or aluminum) passes plenty of air. Tighter meshes like 20x20 No-See-Um reduce airflow a bit, and sun-control screens reduce it further. If you're building in a hot climate and you're worried about heat buildup, plan for at least two sides of screen (opposite sides) so cross-ventilation can work. A screen room with screen on only one side will feel stuffy in summer.
Doors, access, and finishing details
Plan the door opening as part of your original layout, not as an afterthought. A door rough opening needs vertical uprights on both sides (door jambs), a header across the top, and a threshold or bottom rail with a weatherstrip at the sill. Most DIY screen enclosure kits include door assembly instructions that integrate with the spline-groove system, so the door opening remains insect-sealed just like the wall panels.
For a single door, a standard 36-inch aluminum screen door works well and is sold at every home center. For wider access, a double door or a retractable screen spanning a larger opening works better. If you want one entire wall to open up (for example, to connect your patio more openly to the yard), a retractable roll screen system installed at the top of that wall opening lets you roll it down when you need it and up when you don't.
A few finishing details that make a real difference: install a door closer spring so the screen door snaps shut every time rather than being left ajar. Add a hook-and-eye latch at the bottom of the door to keep it from blowing open in wind. If you have kids or dogs, consider TuffScreen or a kick plate at the base of the door panel, since those are the first surfaces to get damaged.
Finally, check whether your local building code requires a permit for a screen enclosure. Many jurisdictions do, especially if the enclosure is attached to the house or exceeds a certain square footage. A quick call to your local building department before you start will tell you what you need.
Cost, effort, and DIY vs. hiring it out
The cost range for screening in a patio is wide because the variables are wide. If you already have a patio cover, that approach is often the cheapest way to screen in a patio because it skips roof work and reduces the amount of framing you need cheapest way to screen in patio.
Choosing the best screen for a patio enclosure comes down to your climate, the insect pressure in your area, and how much airflow you want to keep best screen for patio enclosure. A professionally built screened-in patio enclosure typically runs $15,000 to $40,000 depending on size, region, and materials. On a per-square-foot basis, current estimates put the range at roughly $50 to $175 per square foot for a full professional build.
A smaller aluminum screen enclosure (say, 200 square feet) built by a contractor can total around $4,000 and up on the low end, and much more if you're adding a new roof structure.
DIY cuts that cost dramatically if you already have a slab and, ideally, an existing patio cover to work from. A DIY aluminum framing kit with screen fabric for a 200- to 300-square-foot patio typically runs $800 to $2,500 in materials, depending on the system and screen type you choose. Linking this to a patio enclosure gives you a clear picture of what to measure, what materials to buy, and how to plan the layout how to screen a patio enclosure. Add $100 to $200 for tools if you don't own a drill, spline roller, and utility knife already. If you need permits, budget $100 to $500 depending on your municipality.
When to DIY vs. hire a pro
| Scenario | DIY or Hire? | Why |
|---|---|---|
| Existing covered patio, simple rectangular shape | Strong DIY candidate | Frame is half-built for you, clean geometry, kit systems fit well |
| Open slab, no roof, straightforward rectangle | DIY possible with moderate skill | You'll need to frame a full enclosure; doable but more work |
| Irregular shape, sloped ceiling, or multiple angles | Consider hiring or consult a pro | Complex geometry makes fitting screen panels and cutting corners much harder |
| Large area over 400 sq ft or multi-story | Hire a contractor | Structural loads, permit complexity, and safety risks increase significantly |
| Tight budget, small patio, good at basic carpentry | DIY | You'll save the most money on exactly this kind of project |
Your next-step checklist
- Measure your patio: overall dimensions, height, and diagonal check for square
- Decide your starting point: open slab from scratch, or build walls under an existing cover
- Call your local building department and ask if a permit is required for an attached screen enclosure
- Choose your system: DIY aluminum frame kit (most common) or hire a contractor for complex shapes
- Pick your screen fabric based on your climate and priorities: standard mesh, No-See-Um for small insects, sun-control screen for heat, TuffScreen for durability
- Confirm spline diameter before ordering: 0.160-inch for aluminum screen, 0.175-inch for fiberglass or vinyl mesh
- Order materials with 10% overage on screen fabric for cuts and mistakes
- Plan your door location before you start framing, not after
- Gather tools: hammer drill with masonry bits, spline roller, sharp utility knife, level, chalk line, caulk gun
- Seal all wall-to-house connections with silicone caulk during installation, not as a patch later
If your patio is under an elevated deck rather than a ground-level slab, the screening process is similar but adds weatherproofing challenges at the overhead deck connection and drainage considerations. Patios with existing roofs but no walls are genuinely the easiest DIY starting point you can get. Either way, the fundamentals above apply: measure carefully, frame square, tension the screen properly, and seal every edge where the frame meets the house. Do those four things well and you'll have a screened patio that works for years.
FAQ
What size mesh should I choose if I’m trying to block tiny midges as well as mosquitoes?
For the tightest bug control, many homeowners use a 20x20 no-see-um style mesh, but note the trade-off: airflow drops and some sun-control screens can reduce ventilation further. If your goal is “maximum bug blocking,” plan cross-breezes by screening at least two opposite sides, or add a small fan to compensate for lower airflow.
How do I prevent screen panels from sagging or popping out after installation?
Keep the frame square before you spline, then stretch the screen evenly panel by panel, not in one quick tug. Use the correct spline diameter for your frame and fabric system, and trim the screen with a clean, sharp utility knife so the spline seats fully in the groove. Sag usually comes from uneven tension or an incorrect spline size that never fully locks.
Should I screen the entire perimeter, or can I leave one wall open for airflow?
You can leave one side open for air movement, but it reduces the “bug room” effect, especially when wind blows from the open direction. If you want good airflow without inviting insects, consider screening three sides and keeping the open side positioned away from entrances, grills, and seating, or add a self-closing door to control airflow into the enclosure.
How do I seal the top and bottom edges where the enclosure meets the house or posts?
Edge sealing matters as much as the spline connection. Use the manufacturer’s recommended seal strip or weather-resistant edge trim at joints where the frame meets siding, fascia, or masonry, and double-check any corners. For bottom edges, a door-style threshold or bottom rail with a weatherstrip helps stop wind-driven insects from sneaking under the screen.
Do I need to worry about drainage if my patio has slopes or existing patio cover runoff?
Yes. If you build on a slab, ensure water can still drain away from the posts and frame line, and avoid creating a low “catch” where runoff pools against the structure. If you are screening under an elevated deck, keep an eye on where deck water lands, you may need gutters or flashing at the overhead connection so the screen walls do not get repeatedly saturated.
Can I install screens over existing brick, stucco, or uneven concrete without redoing the whole perimeter?
Often you can, but you must deal with irregular surfaces. Use shims and proper anchoring so the frame is plumb and square before spline and screening. If the surface is wavy, plan for an edge trim that can compress slightly, otherwise gaps can appear and insects will find them.
What’s the right type of door setup for screening in a patio so it stays insect-sealed?
Plan for a rough opening with jambs, a header, and a bottom rail or threshold that includes a weatherstrip at the sill. Use a door closer spring so the door snaps shut fully, and add a latch that holds the bottom edge securely in wind. If you live in a high-wind area, a hook-and-eye latch at the bottom helps prevent the door from lifting slightly and creating a gap.
How should I choose between fixed spline panels and retractable screens?
Use fixed spline panels for maximum sealing on walls that do not need frequent opening, and choose retractable systems for openings like a single large access point. Retractables are convenient but can be more sensitive to alignment and can have more “leak paths” at the track, so buy a system designed for outdoor enclosure use and keep track hardware protected from dust and debris.
Are permits usually required for screened-in patio enclosures?
Many places require a permit when the enclosure is attached to the house or increases usable covered area beyond a threshold. Even if the project is “just screens,” treat it like an enclosure, and call your local building department with your approximate square footage and whether it attaches to the structure.
What tools do I actually need for a DIY spline-and-frame screen install?
At minimum, plan for a drill/driver, a spline roller (or spline presser), a sharp utility knife, and measuring tools that can reach the full perimeter. If you need to cut aluminum channel, add an appropriate cutting method like a miter saw with the right blade or hand tools that produce a square end, because poor cuts cause loose spline and misalignment.
How do I keep kids or pets from damaging the screen at the door and lower wall?
The bottom portion and the door panel are the first areas to fail, consider a kick plate on the door and a protection panel or stronger mesh around the lower frame sections. If you expect heavy contact, you can use more durable options like tougher screen materials in the door zone rather than treating the entire perimeter the same.
How do I estimate costs more accurately than the typical per-square-foot range?
Break your estimate into frame length (linear footage), number of openings (doors, retractables), and screen type (standard, no-see-um, or sun-control). Also include anchoring and edge sealing materials, and add a small labor-equivalent line item for accurate cutting and fitting. If you already have a patio cover, costs drop mainly because you skip roof framing and top-beam work.
Next Article
Ground Level Deck vs Patio: Costs, Durability, and Fit
Compare ground level deck vs patio on costs, build methods, durability, maintenance, and usability to pick the best fit.