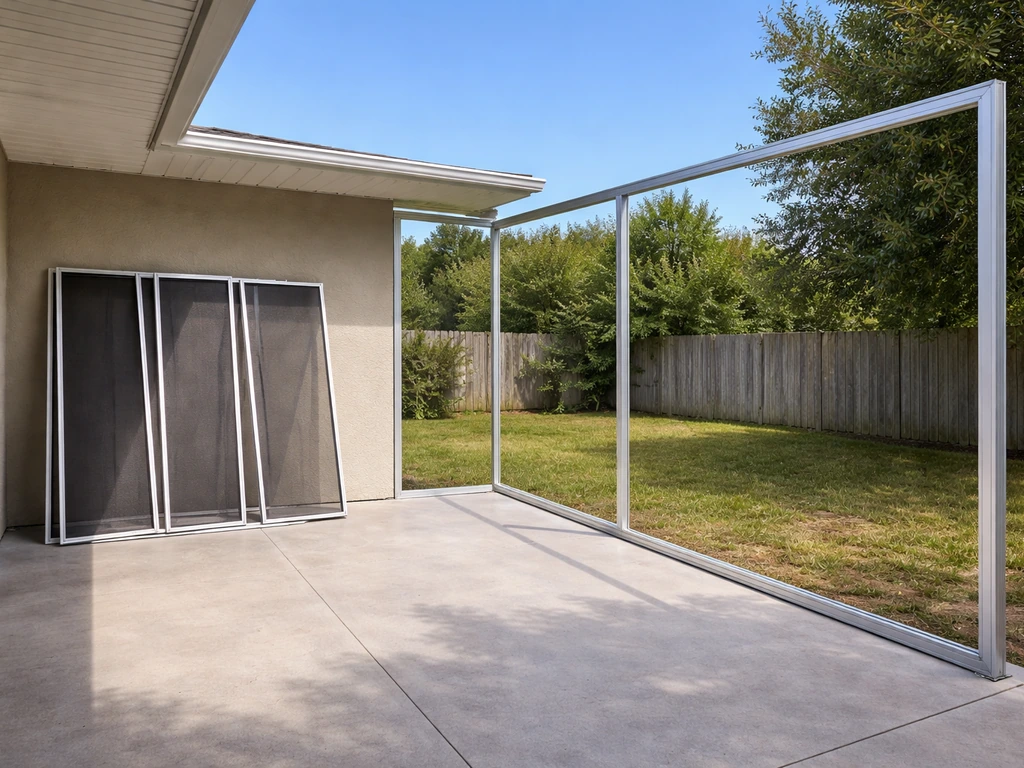
Screening a patio enclosure means building a framework around your patio's open sides and attaching insect screening to those panels so bugs stay out while air flows through freely. You can do this around an existing covered patio in a weekend or two using a spline-and-track system like Screen Tight, or you can frame out a more permanent aluminum or wood structure for a larger open area. Either way, the core process is the same: plan your layout, frame the openings, stretch and lock in your screen, add a door, and seal everything so it holds up through wind and rain.
How to Screen a Patio Enclosure: Step by Step Guide

Miles Hart
16 May 2026

Planning and design for a screened patio enclosure

Before you buy a single roll of screen, you need to nail down what you're actually building. A screened patio enclosure, as defined by most building departments, is a structure where the open sides of a covered patio are enclosed with insect screening, sometimes with optional removable vinyl or acrylic wind-break panels added for cooler months. That's different from a sunroom, which uses glass or solid walls. The distinction matters because permits, materials, and costs all differ.
Start by checking your local permit requirements. Cities like Tampa specifically categorize aluminum screen rooms and screen enclosures as a distinct permit type, and Fairfax County in Virginia classifies screened-in porches as one-story covered structures open to the exterior on at least two sides with screening no thicker than 0. 5 mm. Most jurisdictions will ask for a simple site plan and possibly a load calculation before they issue a permit.
This isn't just bureaucracy: in Florida, screen enclosure frames are governed by wind-load provisions of the building code, and counties like Collier County require explicit load inputs (5 psf for combined wind and roof load, 300 lb vertical live load on primary members). Skipping the permit can cost you far more if you need to tear down or retrofit later.
Next, figure out your coverage and access points. Walk the patio and decide which sides get screened and where you need a door. A standard screened room typically has one hinged screen door, though larger patios benefit from a double door or a zip-panel section that rolls out of the way for furniture moves. Think about how you use the space: if you grill on that patio, you'll want a wide door or a removable panel near the grill area. Sketch the layout on paper with rough dimensions before anything else.
Materials and enclosure system types
Screen types
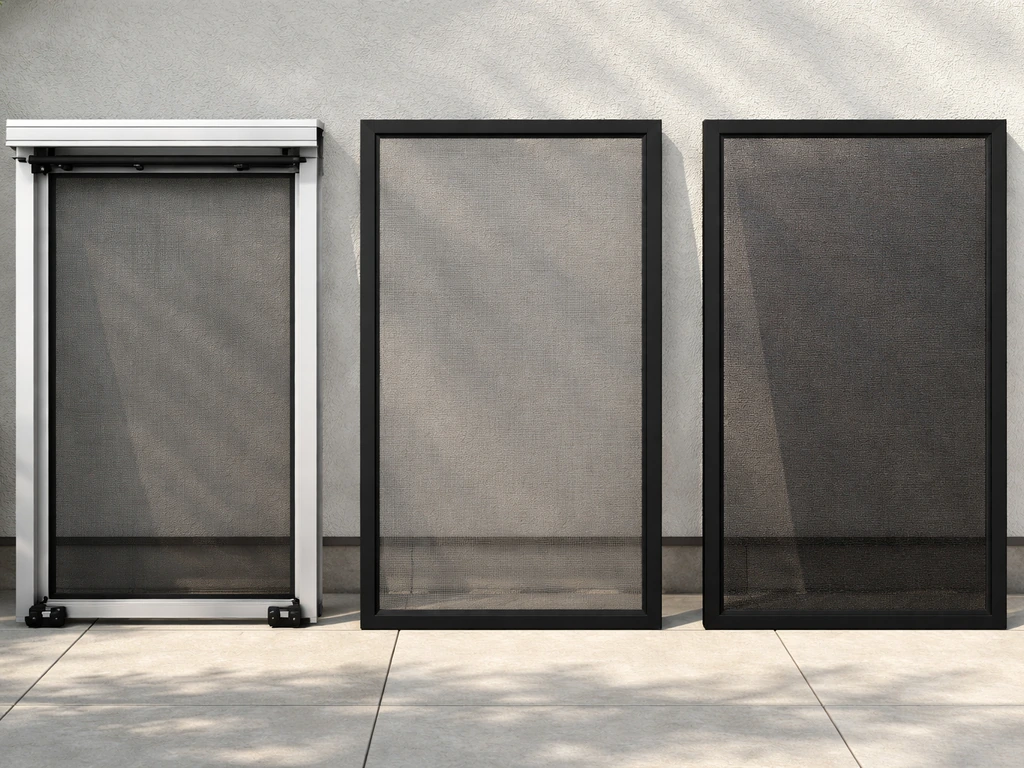
The screen material you pick affects durability, visibility, airflow, and cost more than almost anything else. Choosing the best screen for a patio enclosure depends on whether you prioritize airflow, durability, visibility, or sun and insect protection best screen for patio enclosure. [Phifer's 18x14 fiberglass mesh is the traditional choice for patio and pool enclosures](https://www. phifer.
com/es/producto/fibra-de-vidrio-18-14/) specifically because the tighter weave (18 threads per inch horizontally, 14 vertically) handles larger openings without sagging. If you are looking for a patio screen alternative to fiberglass or aluminum mesh, compare materials for airflow, visibility, and durability before you buy patio and pool enclosures. For most homeowners doing a standard covered patio, this is where to start.
If sun control matters to you, solar or sun-shade mesh can reduce heat and glare by up to 97% and block 80% to 97% of UV rays, though airflow and outward visibility both drop with lower-openness fabrics. Phifer rates their products on an "openness" percentage ranging from 73% down to 3%, so the tighter the weave, the less breeze and the harder it is to see out at night.
Aluminum screen is stiffer and slightly harder to work with, but holds its shape well in wider spans.
| Screen Type | Best For | Durability | Airflow/Visibility | Relative Cost |
|---|---|---|---|---|
| 18x14 Fiberglass | Standard patio enclosures, large openings | Good | High | Low |
| Solar/Sun-Shade Mesh | Hot climates, UV protection priority | Good | Low to moderate | Moderate |
| Aluminum Mesh | Wide spans, high-traffic areas | Very good | High | Moderate |
| Pet/Super Screen | Homes with large dogs or heavy use | Excellent | Moderate | Higher |
Frame and system choices
You have three main framing approaches. A spline-track system (Screen Tight is the most common brand) uses a PVC or aluminum base channel screwed to existing wood framing, with screen rolled in and locked by a spline, then capped with a cover strip. This is the most DIY-friendly option. A full aluminum-frame system uses extruded aluminum posts and beams for a freestanding or attached enclosure and is what most screen room contractors install.
Wood framing works well if you're building onto an existing wood deck or porch structure and want a look that matches the house. For doors, you'll choose between a hinged aluminum or wood screen door ($100 to $2,500 depending on size and quality), a retractable zip-roll panel, or a magnetic screen curtain for lower-traffic openings.
Hardware and fasteners
Don't underestimate the fasteners. Screen Tight specifies that their original system uses 0.175-inch rubber spline for standard fiberglass screen and 0.160-inch spline for aluminum or specialty screens like SuperScreen or pet screen. Using the wrong spline size means the cap won't seat properly and screen will pop out. For framing screws in aluminum systems, stainless or coated deck screws resist corrosion much better than standard zinc screws in humid or coastal climates. When installing roof panels on an aluminum system, caulking screw heads is a required step to prevent water infiltration at every fastener point.
Measuring, layouts, and building setup
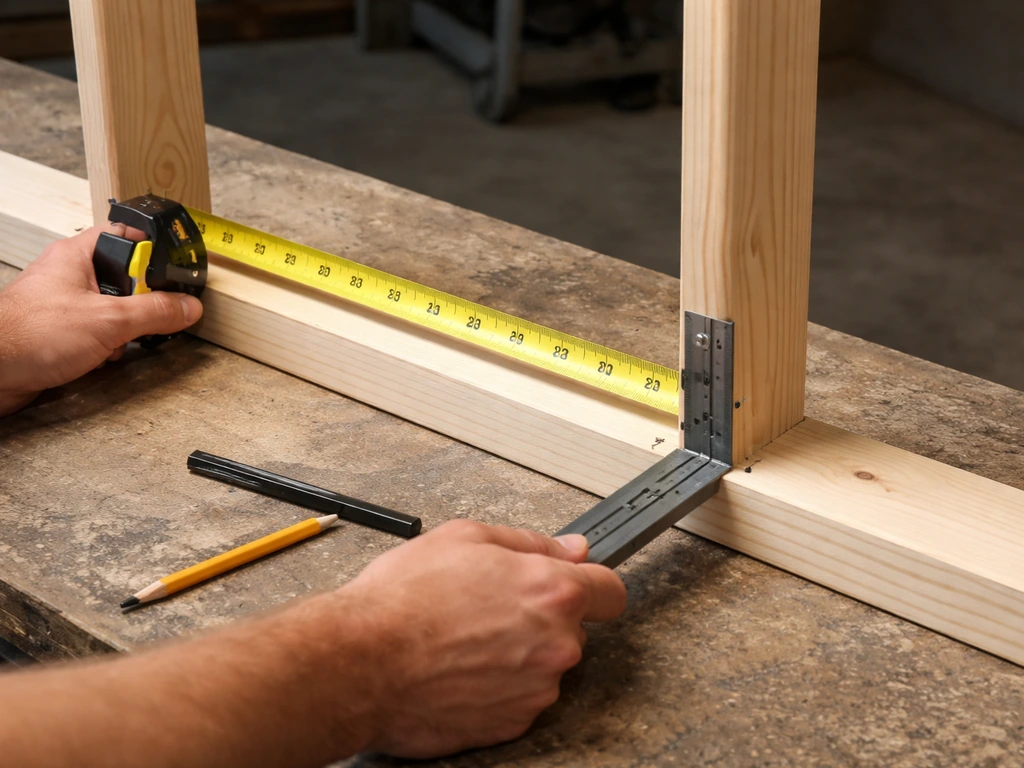
Accurate measuring is where most DIY screen jobs go sideways. The rule to remember: measure the frame, not just the opening. For door and zip-panel systems, measure the actual door jamb opening width and height, not just the gap you walk through. For retractable zip-roll screens, the manufacturer recommends adding 1 inch on each end so the screen overlaps the side molding when installed, which eliminates gaps at the edges. Zip-Roll’s installation instructions for retractable zip-roll screens recommend adding 1 inch on each end so the screen overlaps the side molding and helps eliminate edge gaps.
For the full enclosure, measure each bay (the space between posts or framing members) individually. Even a professionally built patio frame can vary an inch or two from bay to bay. Write down each width and height separately rather than assuming they're all equal. Then add 2 to 3 inches of overage to each screen roll cut so you have material to grip while tensioning.
Squareness matters especially for door frames. The EZ Screen Room assembly instructions specifically call out using a square to verify that door frames are true before fastening. An out-of-square door frame will mean a screen door that either binds or won't latch properly. Check diagonal measurements (corner to corner) before locking anything in: if both diagonals match, the frame is square.
- Measure each bay individually, recording width and height separately
- Measure door jamb openings from frame to frame, not from finish trim to finish trim
- Add 1 inch overlap allowance on each side for zip-roll or retractable systems
- Add 2 to 3 inches of overage per screen panel for tensioning grip
- Check frame squareness by comparing diagonal measurements before fastening
- Mark all post/base strip locations on the floor with chalk line before drilling
Step-by-step installation process
The workflow below covers a spline-track system (like Screen Tight) attached to an existing covered patio with wood framing, which is the most common DIY scenario. If you're building an aluminum freestanding frame from scratch, the framing steps come first and the screen installation steps are the same. If you’re working under a deck, the same spline-track steps apply, but you’ll need to account for how the deck structure affects your panel layout and clearance how to screen in a patio under a deck.
- Prepare the openings: Remove any existing trim or partial enclosure materials. Check that all framing members (posts, beams, sill plates) are solid, plumb, and rot-free. Replace any soft or damaged wood before proceeding.
- Attach the base strip: Screw the base channel to the framing along all four sides of each bay. Use screws rated for exterior use and space them every 8 to 12 inches. For aluminum track systems, pre-drill to prevent splitting or cracking the extrusion.
- Cut the screen: Roll out the screen and cut each panel 2 to 3 inches wider and taller than the opening. Keep the roll flat and cut with sharp scissors or a utility knife against a straightedge to avoid a ragged edge.
- Set the screen in the base: Lay the screen over the opening and fold it into the channel groove. Start at the top, press the screen into the groove with your fingers, then use a spline roller to push the spline into the groove over the screen. Work top to bottom, then sides.
- Tension the screen: When you reach the bottom, pull the screen downward slightly before pressing in the final spline. This removes the sag that's almost inevitable in large panels and gives you a drum-tight finish.
- Trim excess screen: Use a sharp utility knife to trim the screen flush with the outer edge of the base channel. A single clean pass is cleaner than multiple strokes. Make sure excess screen doesn't interfere with the cap snapping onto the base.
- Snap on the cap strip: Press the decorative cap over the base channel to lock the spline and cover the edges. It should snap firmly with hand pressure. If it won't seat, check that screen isn't caught under the edge.
- Install the door frame and door: Set the door frame in the designated bay opening, check for square, and fasten. Hang the hinged screen door and adjust hinges until the door swings freely and closes squarely. Install the door latch, sweep (the rubber strip along the bottom that seals the gap), and any unused latch hole covers.
- Seal fastener heads: On any roof panels or areas where screws penetrate the frame, apply a bead of exterior caulk over each screw head to prevent water infiltration.
Finishing details and weather and wind performance
A screened enclosure that looks great in calm weather can fail badly in a storm if you skip the finishing details. Wind is the primary threat. Florida's Hurricane Retrofit Guide documents how wind loads act through cables and frame components to try to topple or rack an enclosure, and research into Florida storm failures points to lateral wind forces exceeding frame capacity and loose mechanical connections (bolts, brackets, screws) as the leading causes of damage. This doesn't mean your backyard patio screen room needs to be engineered like a pool cage in Miami, but it does mean you should use correctly sized fasteners, check that all base tracks are solidly anchored to the framing rather than just to cladding, and add corner bracing if your patio is in an exposed location.
For rain, the screen material itself matters. Some Phifer products include Water Shed Technology, a hydrophobic coating that causes water to bead and run off rather than pooling in the mesh openings. If your patio is in a high-rain area or you want to maintain visibility during a shower, it's worth spending a few cents more per square foot for a water-shedding screen.
Corners are the most common leak and failure points. Where the screen base channel meets at a 90-degree corner, cut the channel at 45-degree miters and caulk the joint before snapping on the cap. At the top of each panel where it meets the roof structure, use a continuous bead of exterior caulk rather than relying on the cap alone to seal out weather.
For doors, the sweep along the bottom is non-negotiable in bug-prone areas. Even a quarter-inch gap at the door base is enough for mosquitoes and small insects to enter. Check the sweep alignment when the door is closed and adjust the hinge tension or replace a worn sweep if light shows under the door. If you live somewhere with significant seasonal temperature swings, a retractable zip-panel on at least one bay lets you close off the enclosure in cooler weather without a full conversion to a sunroom.
Maintenance is minimal but important. Check spline and caps each spring for UV degradation or loose sections. Fiberglass screen typically lasts 10 to 15 years under normal sun exposure before it starts to get brittle, but coastal salt air or constant UV can shorten that. Aluminum screen lasts longer but can oxidize and become stiff. Rescreen individual panels as needed rather than waiting until the whole enclosure looks shabby.
Cost, DIY vs pro help, and home value
Cost ranges vary a lot depending on what you're starting with. If you already have a covered patio with solid framing, you're in the least expensive scenario: screening an existing porch runs roughly $5 to $20 per square foot according to data from HomeAdvisor, Angi, and This Old House. On a 200-square-foot patio, that's $1,000 to $4,000 total, materials and labor included. A new screened porch built from scratch runs $25 to $120 per square foot, with a national average around $32,400 according to Forbes Home for a mid-range build. Screen doors add $100 to $2,500 depending on material, size, and whether you're buying a basic aluminum hinged door or a custom wood unit.
DIY is very doable for a spline-track system on an existing covered patio. The tools required are basic (drill, spline roller, utility knife, miter saw for framing), the materials are widely available at home improvement stores, and a 200-square-foot enclosure can be screened in a weekend with two people working. The places where DIY gets complicated are: freestanding aluminum frame systems that require specific extrusion connectors and torque specs, any permit that requires engineered drawings, and situations where the existing framing needs significant repair before screening. In those cases, a professional screen room contractor typically charges in the $10 to $20 per square foot labor range on top of materials.
On home value, a screened patio enclosure sits somewhere between a decorative upgrade and a functional addition. It typically returns somewhere in the 50% to 70% range on resale (meaning a $5,000 project might add $2,500 to $3,500 in appraised value), though in markets where outdoor living is a strong selling point, like the Southeast or Southwest, a well-built screened enclosure can be a genuine differentiator that moves a listing faster. The comfort and daily usability benefits are arguably more immediate than the resale math: a screened patio extends your usable outdoor season significantly, especially in mosquito-heavy regions.
If you're weighing options before committing, it's worth knowing that the approach for a ground-level patio is essentially the same as screening in a porch, and the same materials and systems are used under a deck or on a roofed structure. The biggest variable is whether you're working with an existing roof or need to add one, since an open patio without a roof requires a full framing and roofing project before any screening can happen. If you need to screen in a patio with a roof, the roof line and wall framing determine how the screen panels and door openings will be sealed and supported existing roof.
FAQ
Is a screened patio enclosure the same as a sunroom for permits and codes?
Confirm your enclosure type first. A screened patio enclosure is usually treated as an insect-screened enclosure (not a sunroom) when the open sides are enclosed with screening and any optional panels are removable. If you plan to add solid walls, insulated panels, or glass, many jurisdictions will require a different permitting path and may change the wind-load and egress requirements.
How do I avoid getting screen rolls cut to the wrong size?
Use a test fit before cutting rolls. After you measure each bay, dry-fit the frame tracks and cap strips, then verify you can pull the screen material taut without tilting the spline channel out of plane. If you tension a screen that is even slightly misaligned, it will look wavy and can reduce how well the spline seats.
Where do screened patio enclosures usually leak or let bugs in?
Decide which insects matter and size the openings accordingly. Mosquitoes can get through surprisingly small gaps, so focus on the door sweep, corners, and where the base track meets framing. Use continuous sealing at all corners and at the top where panels meet the roof structure, then recheck after the first rain.
What happens if I use the wrong spline or screen for my system?
Don’t assume all screen types will work with the same spline. The spline thickness and the screen thickness must match the system you’re using, otherwise the cap may not fully seat and the screen can pop out. If you switch from fiberglass to aluminum mesh or a specialty pet screen, verify the exact spline size before ordering.
Can I screen my patio if it’s in a high-wind area or on an exposed corner?
Yes, but brace and anchor decisions change. Wind loads act on the whole frame, so rely on solid anchoring to structural framing, not just exterior cladding. If your patio is exposed (open fields, corner lot, high wind areas), add corner bracing and verify that fasteners and tracks are installed exactly per the manufacturer instructions.
How do I seal the screen enclosure so it doesn’t leak at corners or where it meets the roof?
Plan for the roof interface early. The easiest way to prevent leaks is using an exterior-rated caulk line where the top of each panel meets roof structure, and making sure base channel joints are properly mitred and caulked at corners. If your patio roof underside has irregularities, you may need to adjust panel positioning so the screen meets evenly.
What’s the best door setup for a patio you use year-round and for grilling?
Choose a door option that matches your traffic pattern, not just size. For grilling, a wider hinged door or a removable zip-panel near the grill area reduces the need to maneuver heavy equipment through narrow openings. If you use the patio seasonally, a zip-panel can help you close off one bay in cooler months.
How often should I inspect and rescreen my patio enclosure?
Expect some maintenance differences between screen materials. Fiberglass often becomes brittle after long UV exposure, and coastal salt air can accelerate wear, while aluminum screen can stiffen and oxidize. Do a quick spring check of spline and caps, then rescreen only the affected panels rather than replacing everything.
What’s the correct way to check squareness for door frames?
It depends on how much mismatch you have between bays and diagonals. If diagonals do not match, fix the door frame before you install the screen door or zip-panel mechanism, because an out-of-square frame will cause binding and poor latching. Measure diagonals corner-to-corner and adjust the frame alignment before locking fasteners.
How do I ensure a retractable zip-panel doesn’t leave gaps at the sides?
For retractable zip-roll systems, the overlap is what prevents edge gaps. Adding the recommended overage at both ends helps the screen cover the side molding when installed. If you cut too short, you will get visible light gaps that defeat the bug-blocking purpose.
Can I screen an open patio that doesn’t have a roof yet?
If you don’t already have a proper roof and wall support, you may need additional work before screening. Open patios without a roof typically require a framing and roofing upgrade first, and the final screen plan depends on the new roof line and how wall framing will support sealing at the panel tops.
How do I choose between airflow and heat or glare reduction for my screen material?
If you’re seeing uneven airflow or reduced visibility, it usually comes down to openness percentage and screen weave. Tighter-weave and lower-openness fabrics improve sun and insect blocking but reduce outward visibility and breeze. If comfort is the priority, choose a mesh that balances openness with the level of sun and UV control you want.
Next Article
How to Screen in a Patio: DIY Steps for Covered or Open Areas
DIY guide for screening in a patio: plans, materials, framing, sealing, and tips for covered or open spaces.