A DIY enclosed patio kit gives you a framed, paneled structure that turns an open or covered patio into a protected outdoor room, and most complete kits include an aluminum frame, roof panels, glass or screen infill panels, a door with lockset, weather stripping, fasteners, caulking, and an installation manual. What they almost never include: foundation anchors, gutters, downspouts, or site prep materials. That gap between what the box contains and what the job actually needs is where most DIY enclosed patio projects hit their first wall. This guide walks you through every phase so you can plan accurately, buy confidently, and build correctly.
Do It Yourself Enclosed Patio Kits: A Step-by-Step Guide

Miles Hart
18 May 2026
What an enclosed patio kit actually includes

Most enclosed patio kits fall into two broad categories: screen enclosure kits and solid panel (glass or insulated) enclosure kits. They share a general anatomy but differ significantly in what they protect against and how complex the install is.
Screen enclosure kits
Screen enclosure kits, like those from Screen Tight or ScreenHouse, are designed to keep bugs out and allow airflow while giving your patio a defined, finished boundary. A typical kit includes aluminum or extruded frame rails, a screen fabric system (traditional spline-based or spline-free), a door frame and jamb kit, a roof structure (either a screen roof or hard-top insulated roof panel), and all the screws and fasteners needed for frame-to-frame connections. Screen Tight's system, for example, uses a 1/4-inch by 2-1/4-inch concrete anchor to tie the framework to your foundation or wall, with separate sheet metal, self-drilling, and hex head aluminum screws for different connection points. ScreenHouse's hard-top enclosure manual specifies leaving a precise 36-inch gap in the bottom U-channel as the door opening and notes that you must supply your own fasteners for attaching channel profiles to your existing surface, since house wall and slab conditions vary too much to prepackage a universal solution.
Newer screen systems like ScreenEze's SNAPTRACK skip the spline entirely. The kit includes a pre-drilled aluminum base, a vinyl cap that snaps over the screen fabric to lock it in place, a plinth kit for corners, and all hardware. Introduced in 2020, the two-piece base-plus-cap design makes re-screening faster and is genuinely more DIY-friendly than traditional spline-and-roller methods. The tradeoff is that the vinyl cap is a different material than the aluminum frame, so color matching and UV durability over time can differ.
Solid panel and glass enclosure kits
Glass and insulated-panel kits step up significantly in cost and complexity. Patio Enclosures' EasyRoom is one of the better-documented examples of this category. [A full EasyRoom kit includes an aluminum frame, single- or double-pane insulated glass panels, aluminum screen mesh panels, an aluminum foam-core roof, glass or aluminum foam-core wing panels](https://www. patioenclosures.
com/sunroom-kits. aspx) (for the sides), a center ridge beam if you choose the gable roof option, full screens, a lockset, weather stripping, fasteners, caulking, and a detailed installation manual. What it does not include: foundation fasteners or screws (again, site conditions vary), gutters, downspouts, or any site preparation materials. The insulated glass panels make this closer to a three-season or four-season sunroom than a pure screen porch, and the weight and structural load requirements are correspondingly higher.
| Kit Type | Best For | Bug Protection | Weather Protection | DIY Difficulty | Typical Kit Price Range |
|---|---|---|---|---|---|
| Screen enclosure (spline) | Warm climates, bug control | Excellent | Minimal | Moderate | $1,500 to $5,000 |
| Screen enclosure (spline-free snap) | Warm climates, easier DIY | Excellent | Minimal | Lower | $1,800 to $5,500 |
| Hard-top screen enclosure | Year-round screen use, rain protection | Excellent | Moderate | Moderate-High | $3,000 to $8,000 |
| Glass/insulated panel kit | Three- or four-season use | Excellent | High | High | $8,000 to $25,000+ |
Enclosed patio vs screened porch vs covered patio: picking the right structure
Before you order a kit, it's worth confirming you're solving the right problem. These structures overlap in function but differ in how they're built, what they cost, and what your municipality will require of you.
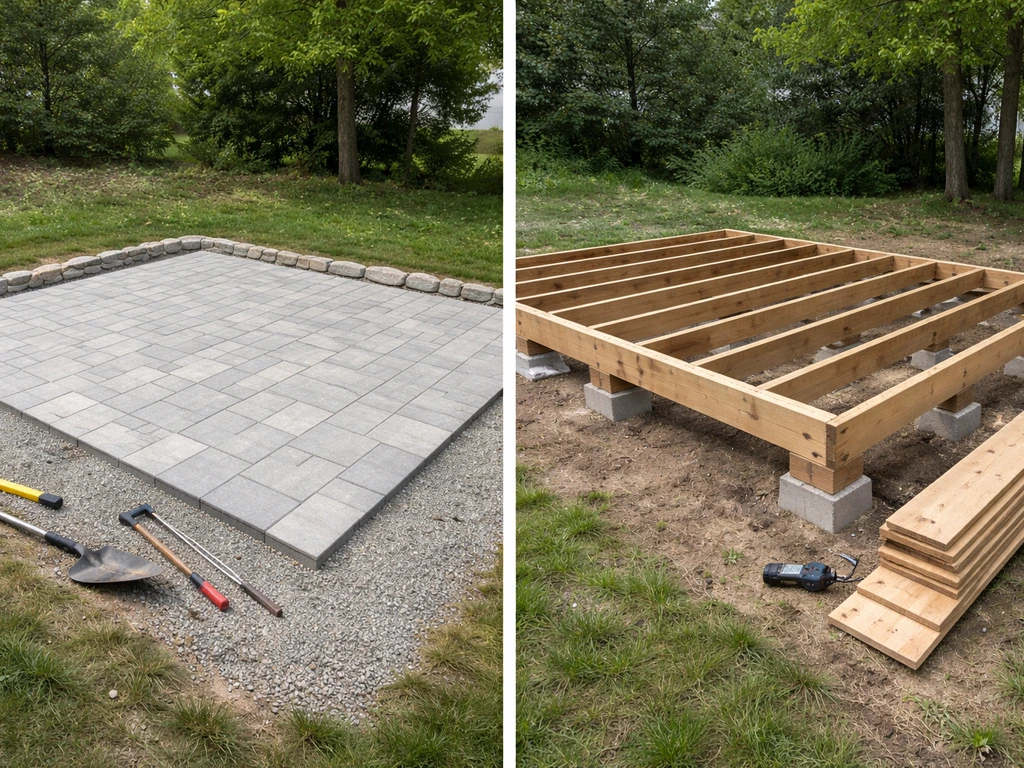
- Enclosed patio (with kit): A retrofit enclosure added to an existing slab or covered patio. Uses a prefabricated kit system. Fastest path to an enclosed space. Dependent on the quality of your existing foundation and cover.
- Screened porch: Often built from scratch as part of the home or a new addition. Uses standard lumber framing. More flexibility in design but requires more carpentry skill and typically more permitting.
- Covered patio (pergola or roof only): Weather protection from above but open on the sides. No bug or wind protection. Lower cost and usually no permit needed, but doesn't create an enclosed room.
- Deck with enclosure: A raised structure that may require a different kit type or custom framing to handle the height and lateral load differences. Not all flat-slab kits transfer directly to raised decks.
If you have an existing concrete slab patio and want to enclose it for bug protection without major construction, a screen enclosure kit is your most direct path. If you want year-round use with real weather protection and energy efficiency, a glass panel kit or a contractor-built sunroom addition makes more sense, even though the cost jumps considerably. Covered patio plans that include DIY roof structures are a related but distinct option if you're starting from scratch rather than enclosing what you have. Covered patio plans for a do-it-yourself project often come with guidance on framing, roofing, and sealing so the structure stays weather-tight covered patio plans do it yourself.
Planning before you buy: measurements, site checks, and climate
Measuring your space
Most kit manufacturers require you to submit exact dimensions before they fabricate your components, and custom-cut aluminum panels are non-returnable once made. Measure your slab's length, width, and the height of any existing roof structure or overhead attachment point at least twice, and measure at multiple points since concrete slabs are rarely perfectly square. Check for out-of-square conditions by measuring both diagonals; if they differ by more than 1/2 inch, you'll need to address that before framing goes up. Also note the height of your existing roofline or beam where the enclosure will attach, the slope of your slab (most slabs have a slight pitch for drainage, which affects how bottom rails sit), and the location of any existing posts, drains, or utilities.
Site conditions to assess
- Slab condition: Look for cracks, heaving, or spalling. A compromised slab creates anchoring problems and can void kit warranties.
- Drainage: Where does water go during heavy rain? Enclosing a space changes drainage patterns. Make sure your slab drains away from the house and the enclosure won't pool water.
- Existing roof attachment point: Most enclosure kits tie into your home's wall or existing roof structure at the top. Check that the ledger or wall surface is solid and free of rot or deterioration.
- Sun and wind exposure: South- and west-facing patios get the most solar heat gain. Glass panel kits in those orientations may need low-E coatings to stay comfortable. High-wind zones require heavier anchoring and may limit which screen materials are appropriate.
- Utilities: Mark the location of any underground utilities, exterior outlets, or lighting before drilling anchors into the slab.
Climate and use case
Climate drives the right kit choice more than anything else. In Florida or the Gulf Coast, a screen enclosure (often called a Florida room or lanai enclosure) handles the primary concerns: bugs, sun, and rain protection. In the mid-Atlantic or Pacific Northwest, you need at least a hard-top roof and ideally insulated panels if you want to use the space from late fall through early spring. In cold climates, a screen-only enclosure is a three-month solution at best. Ask yourself whether you want bug protection only, year-round weather protection, or a thermally conditioned space (which then requires HVAC and pulls you into sunroom-addition territory rather than a patio kit).
Permits, codes, HOA rules, and safety requirements

This is the section most DIYers skip and later regret. Enclosed patio structures almost universally require a building permit in the US, with the possible exception of very small, detached, open-sided screen structures in some jurisdictions. Assume you need a permit until your local building department tells you otherwise in writing.
What permitting typically involves
- A site plan showing the enclosure's location relative to your property lines and house (setback requirements vary by zone, often 5 to 10 feet from the side or rear property line)
- Construction drawings or manufacturer specs showing the structural design, roof load capacity, and anchoring method
- Wind load compliance documentation (especially critical in hurricane zones and required in Florida, the Gulf Coast, and coastal areas of the Southeast)
- Electrical plans if you're adding lighting, outlets, or ceiling fans inside the enclosure
- Inspections at foundation anchor stage and at final completion
Egress and safety
Building codes require that enclosed structures have adequate egress, meaning you need at least one door that opens outward or swings freely and meets minimum width requirements (typically 32 to 36 inches clear). If the enclosure will be adjacent to a bedroom window that currently serves as an emergency egress point, you need to account for that access being maintained. Screen door hardware should meet latch and self-closing requirements if children are present, particularly around pool areas where local codes may mandate pool-barrier compliance.
HOA considerations
If you live in a neighborhood with a homeowners association, get written approval before purchasing any kit. HOAs commonly regulate enclosure materials (no aluminum visible from the street in some communities), colors, roof pitch or style, and whether screen or glass is permitted. Some HOAs prohibit enclosures entirely or require them to match the home's architectural style. Submitting manufacturer spec sheets and a rendering with your HOA request speeds up approval and documents the plan if questions arise later.
How to install an enclosed patio kit: phase by phase
The exact sequence varies by manufacturer, but the general installation phases are consistent across most kit systems. Read your specific installation manual completely before starting, and flag any steps that require tools or skills you don't currently have.
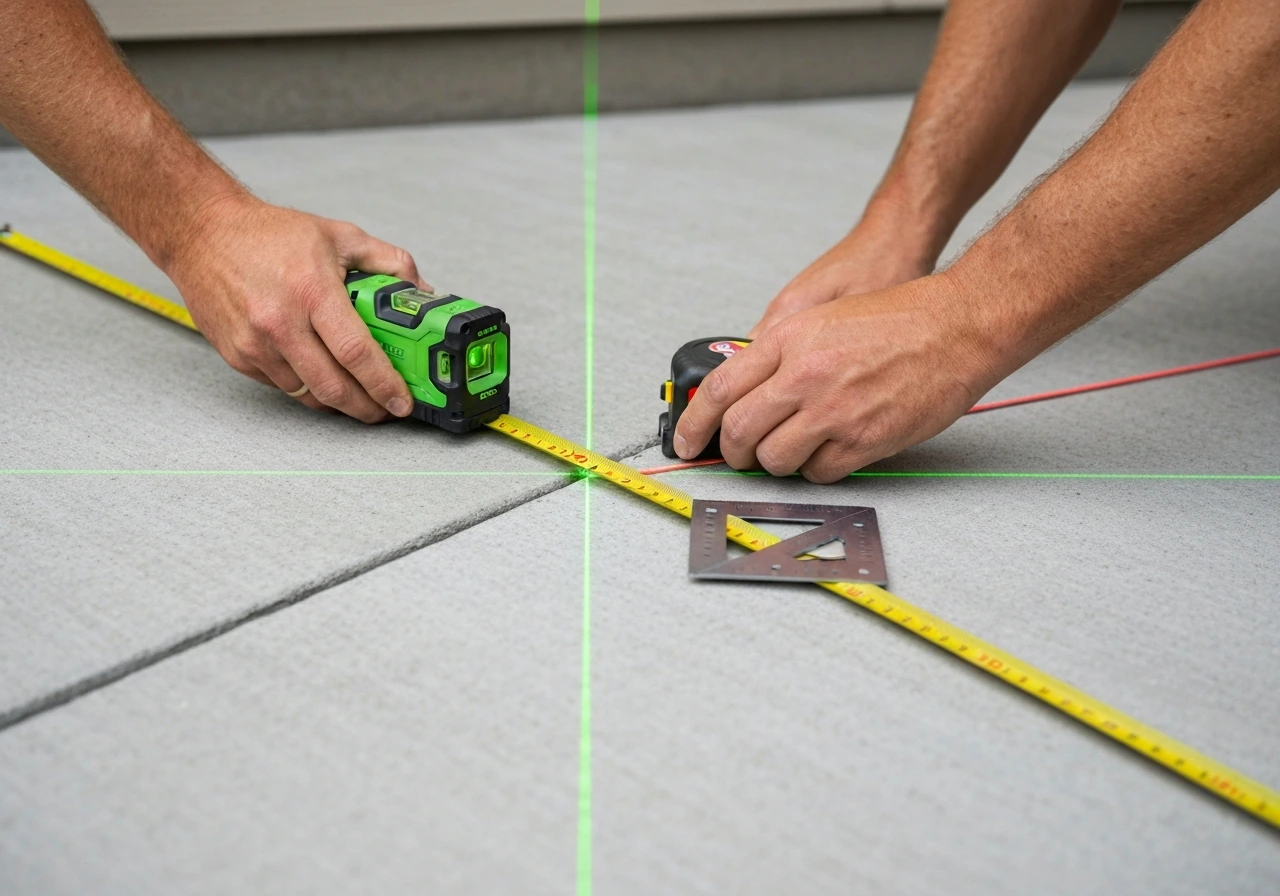
Phase 1: Site prep and layout
Clean the slab thoroughly and let it dry completely. Mark the perimeter layout using chalk lines or a laser level. Confirm your corners are square using the 3-4-5 triangle method (a 3-foot and 4-foot leg should produce a 5-foot hypotenuse at a true 90-degree corner). Mark all anchor locations before drilling anything. If your slab has a drain, confirm the bottom rail system won't block it.
Phase 2: Anchoring bottom rails and wall attachment
Bottom rail installation is where structural integrity starts. Most systems use a U-channel that runs along the slab perimeter and anchors into the concrete. Screen Tight's system specifies 1/4-inch by 2-1/4-inch concrete anchors for this purpose. Drill anchor holes slightly deeper than the anchor length, clean out the dust, and set anchors per the torque specs in your manual, since over-torquing can crack the slab.
The ScreenHouse hard-top manual specifies leaving exactly a 36-inch break in the bottom U-channel for the door opening, and the customer must supply appropriate fasteners for attaching channels to existing wall surfaces because no universal fastener fits every wall type. At the top, the enclosure ledger or top plate attaches to the house wall or existing roof structure.
Use the correct fastener type for your wall material (masonry anchors for stucco or block, structural screws into studs for wood-framed walls). This connection carries the roof load, so it cannot be fastened into siding or sheathing alone.
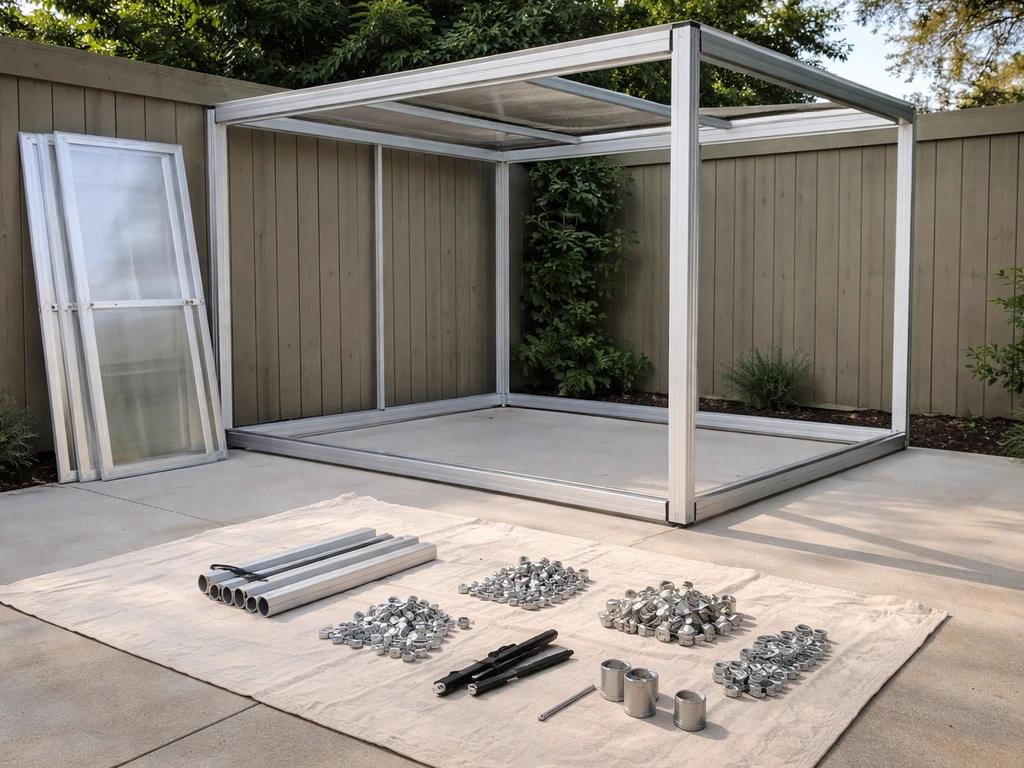
Phase 3: Framing and posts
Assemble and erect vertical posts and corner posts per the kit sequence. Most aluminum kit systems use a slip-fit or screw-together connection at the top and bottom rail. Keep posts plumb using a level; even a small lean compounds across the width of the structure and causes panel gaps later. Install the top beam, ridge beam (for gable options), and any intermediate horizontal rails before moving to panel installation.
Phase 4: Roof panels
Roof installation is typically the most physically demanding phase because you're working overhead. Insulated foam-core aluminum roof panels are heavy and awkward; a helper is not optional here. Panels slide or clip into the ridge and perimeter channels. Fasten each panel per the sequence in your manual. Critically, apply caulking to every screw head after driving it, as Screen Tight's installation guidance specifies, to prevent water intrusion at each fastener point. Miss even a few of these and you'll have drip points inside the enclosure within a season.
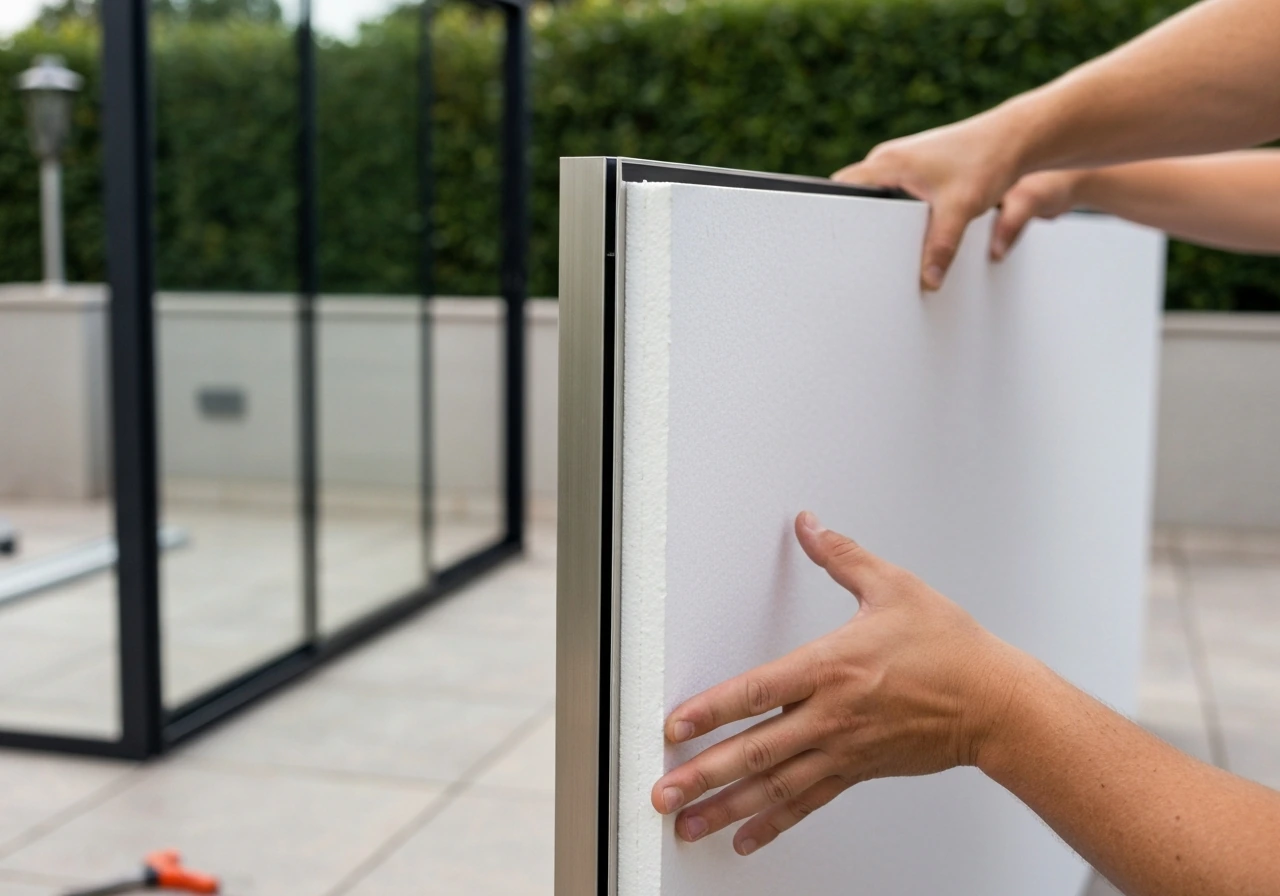
Phase 5: Screen or glass panel installation
For screen systems using traditional spline, stretch screen fabric across the opening and press spline into the channel groove using a spline roller. Cut excess fabric flush after spline is set. For snap-cap systems like ScreenEze SNAPTRACK, the process is different: install the base strip on the opening frame, lay the screen fabric over it, and press the vinyl cap down over both the base and the fabric edge until it snaps into place. No roller or spline required. For glass panel systems, panels are pre-fabricated to your dimensions and typically clip or screw into the aluminum frame. Glass panels need to be handled carefully and set in their gaskets squarely to avoid point-load cracking.
Phase 6: Door installation and hardware
Most kits include a screen door frame and jamb kit with all components for hanging and hardware. Hang the door, check for square and plumb, and adjust hinges if the door rubs. Install the lockset and self-closing hardware per the kit instructions. Test the latch thoroughly before finishing the surrounding screen or panel sections.
Phase 7: Sealing and finishing
Run a bead of exterior-grade caulk along every joint where the enclosure meets the house wall, the slab, and any trim pieces. Apply caulk to all roof-to-wall transitions. If the kit includes touch-up paint (ScreenHouse includes it for their systems), use it on any scratched or cut aluminum surfaces immediately; bare aluminum oxidizes and stains adjacent materials over time. Install any gutters and downspouts, noting that most kits do not include these components. Route downspouts to discharge at least 4 feet away from the foundation.
Common pitfalls and how to avoid them
- Not reading the full manual before starting: Installation sequences matter. Installing panels before anchoring the frame is a common mistake that requires disassembly.
- Skipping the slab condition check: Cracks or heaving that shift during the season will break caulk seals and loosen anchors. Address slab issues first.
- Under-anchoring the base rail: Using too few anchors or incorrect anchor depth is the top cause of enclosure failure in wind events.
- Ignoring drainage at the base: Bottom rails sitting in standing water will corrode faster and allow water intrusion. Confirm the slab slopes away from the enclosure.
- Buying a kit before measuring accurately: Custom-fabricated panels cannot be returned. Measure twice (or more) and use a steel tape, not a soft measuring tape.
Costs, maintenance, durability, and long-term performance
What you'll actually spend
Kit prices cover components only. A basic aluminum-framed screen enclosure kit for a 200-square-foot patio typically runs $1,500 to $5,000 depending on roof type, manufacturer, and screen material. Hard-top screen enclosure kits for the same footprint run $3,000 to $8,000. Glass or insulated panel kits like the EasyRoom can run $8,000 to $25,000 or more at the kit-only price, before installation labor, permitting, or site prep. Total project cost (including permit fees averaging $200 to $800, concrete anchors and specialty fasteners you have to buy separately, gutters and downspouts, any electrical work, and your labor time) typically runs 30 to 60 percent above the kit price for a screen enclosure and even higher for glass systems.
If you hire a contractor to install a kit you've purchased, labor runs $40 to $100 per hour depending on your region, and a typical screen enclosure installation takes two to four days for a crew of two. Factor that into your DIY-vs-contractor comparison. If you are wondering whether Home Depot offers patio installation, the answer usually depends on local availability and the specific patio and enclosure services available in your area Home Depot patio installation.
Contractor-supplied-and-installed screen enclosures in Florida commonly total $6,000 to $15,000. In the Northeast or Midwest, fully enclosed glass sunroom additions run $20,000 to $60,000 or more for a contractor build. The DIY kit path is genuinely cheaper, but the savings assume a smooth install with no major errors requiring professional remediation.
Durability and maintenance
Aluminum frames are low-maintenance but not no-maintenance. Rinse them down twice a year with a garden hose to remove salt air residue (critical in coastal areas), pollen, and mildew. Inspect all caulk joints annually and re-caulk any cracked sections before they allow water entry. Screen fabric, even heavy-duty fiberglass or aluminum mesh, typically lasts 7 to 15 years before it becomes brittle or develops tears. Spline-retained screen is easier to re-screen yourself; snap-cap systems like SNAPTRACK are even faster to replace since you just pop the cap, swap the fabric, and re-snap.
Storm damage is the most common cause of enclosure replacement. Screen mesh can be destroyed in a severe thunderstorm or hurricane even when the frame survives. Glass panel enclosures fare better in wind but are vulnerable to impact from branches and debris. If you're in a hurricane zone, verify that your kit carries an appropriate wind-load rating (many Florida-market kits are rated for 130 mph or higher) and that your installation method meets local code for storm-anchor requirements.
Home value and comfort impact
An enclosed patio adds usable square footage to your outdoor living area and generally increases the functional appeal of a home for buyers. However, it rarely counts as conditioned square footage for appraisal purposes unless it's fully thermally insulated and connected to the home's HVAC system. In warm-climate markets (Florida, Georgia, Arizona), a screen enclosure is often expected and its absence can actually disadvantage a home during resale. In northern markets, a three-season enclosed porch is a selling point but doesn't carry the same premium as heated square footage. Expect a modest positive impact on resale value, not a dollar-for-dollar return on your investment.
How to choose the right kit and what to confirm before you buy
Not all kits are created equal. Aluminum gauge matters: look for kits using 6000-series extruded aluminum, which is stronger and more corrosion-resistant than rolled aluminum. Verify that the roof system matches your climate load requirements, particularly snow load in northern states and wind load in coastal areas. Confirm that the manufacturer provides a full parts list and exploded assembly diagrams, not just a simplified instruction sheet. Manufacturers that produce multi-page, photo-referenced installation manuals (as Patio Enclosures and ScreenHouse both do) give you a meaningful advantage over kits with vague instructions.
Questions to ask the manufacturer or supplier before purchasing
- Does the kit include custom-fabricated components cut to my dimensions, or are these standard sizes I cut on-site?
- What wind load and snow load ratings does the system carry, and is documentation available for my permit application?
- What fasteners are NOT included, and what are the specifications for the concrete anchors I need to supply?
- Is customer support or a technical installation helpline available during my project?
- What is the warranty on the frame, roof panels, and screen components separately?
- Are replacement screen panels, glazing panels, or screen fabric available for purchase independently in 10 years?
Pre-purchase and pre-build checklist
- Measure your slab length, width, and height at multiple points and confirm diagonals for square.
- Inspect the slab for cracks, heaving, and drainage direction.
- Inspect the wall or roof attachment point for rot, deterioration, or inadequate structure.
- Contact your local building department to confirm permit requirements and setback rules.
- Submit an HOA request with manufacturer specs and a site drawing if applicable.
- Determine your use case (bug protection only vs weather protection vs year-round) and select the appropriate kit type.
- Get quotes from at least two kit suppliers and compare the full parts list, not just the headline price.
- Identify all components NOT in the kit (foundation anchors, gutters, electrical) and price them separately.
- Read the full installation manual before ordering to confirm you have the tools, skills, and help needed.
- Schedule your permit inspection timeline before starting so you don't have to stop mid-project waiting for an inspector.
If you're still sorting out whether an enclosed patio kit is the right approach versus a DIY-built covered patio, a screened porch from scratch, or a project sourced through a home center, those are distinct paths with different tradeoffs worth understanding before you commit. If you are planning your project through a home center, a Home Depot DIY patio plan can help you map the parts list and the work steps before you buy an enclosed patio kit.
You can also use the same DIY planning mindset for do it yourself decks and patios, especially when you want a defined outdoor space that matches your climate and layout DIY-built covered patio. The kit approach works best when you have a solid, existing slab foundation, a clear use case, and the patience to read and follow detailed assembly instructions.
When all three of those are in place, a well-chosen DIY enclosed patio kit is one of the more satisfying home improvement projects you can tackle on your own.
FAQ
Do it yourself enclosed patio kits require a permit in every location?
In the US, permits are common, but rules vary by jurisdiction and enclosure type. Before you buy, contact your local building department and ask whether a permit is required for a screened enclosure versus a solid-panel enclosure, and whether “temporary” or “open-sided” classifications apply to any part of your plan. Get confirmation in writing if they say you are exempt.
What’s the most common reason DIY installs fail even when measurements are correct?
Most failures come from missed drainage and water-sealing details, not from frame assembly. If your kit manual does not explicitly address water management at the door sill, roof-to-wall joint, and slab-to-rail interfaces, treat caulking and flashing as critical tasks and plan to re-check them after the first heavy rain.
Can I install an enclosed patio kit on a patio that is not perfectly level?
A lot of slabs have a drainage pitch, and many kit systems accommodate this through bottom-rail geometry, but severe out-of-level conditions can create uneven gaps and poor door alignment. If you find more than minor variation, consider leveling or shimming per the manufacturer’s guidance, and avoid improvising with random wood shims that can rot or change the fastening grip.
Do I need to worry about the existing slab drain when installing a bottom U-channel?
Yes. Even if the kit is designed for perimeter anchoring, the bottom rail can block or re-direct flow from a slab drain. Confirm the drain location relative to the channel run and ensure the rail system leaves the drain functional, otherwise water can pool under the enclosure and cause long-term deterioration of caulk joints.
Are HOA rules only about aesthetics like color and visibility?
HOAs also frequently regulate roof pitch, roof style, screening type, and whether the enclosure alters the exterior footprint. Some require submittal of structural calculations or manufacturer wind-load documentation, especially for glass enclosures, so ask what documents they want before you order custom-fabricated panels.
Can I buy a kit and return it if my measurements are wrong?
Many manufacturers treat custom-cut aluminum, glass panels, and insulated sections as non-returnable once fabricated. To reduce risk, validate your measurements using a rigid squareness check (both diagonals), verify roofline attachment height at multiple points, and double-check door opening clearances before your order is finalized.
Do door clearances for enclosed patios match standard interior door sizes?
Not always. Building codes focus on egress, and manufacturers may specify a door opening and swing behavior that differs from your expectations. Verify the clear opening width when the door is fully open, and confirm hinge side and latch hardware do not obstruct egress paths from the enclosure.
What’s the difference between spline-based screen and snap-cap systems for maintenance?
Spline systems usually require removing spline and re-seating screen fabric with a roller, while snap-cap systems let you pop off the cap and replace fabric more quickly. Snap-cap kits are often faster for DIY re-screening, but you should confirm color matching and UV tolerance of the vinyl cap since it can age differently than the aluminum frame.
How do I ensure roof load and wind load ratings match my area?
Do not rely only on the kit marketing name like “Florida-rated.” Ask for the kit’s published wind-load and, if relevant, snow-load parameters, then compare them to your local design requirements. Also confirm that your installation method (anchor type, number, and spacing) matches the rating assumptions, since incorrect anchoring can void the performance you paid for.
Can I attach the top plate or ledger to siding or sheathing?
Typically no. The manufacturer guidance is usually explicit that the structural connection must go into the correct substrate, like studs for wood framing or proper masonry anchors for masonry walls. If your wall has siding over sheathing, fastening into the siding alone can fail under roof load, even if the screws “feel tight.”
What should I do about aluminum oxidation and scratches during installation?
Use the kit’s specified touch-up paint promptly on bare aluminum, especially at cut edges and any scuffed areas. Oxidation can stain adjacent trim materials and make later cleanup harder, so plan to keep the touch-up can accessible during the install rather than after everything is finished.
Do enclosed patio kits include gutters and downspouts, and should I add them anyway?
Most kits do not include gutters and downspouts. Even if the enclosure roof drains correctly at the roof-to-wall transition, plan where the runoff will go and route downspouts at least several feet away from the foundation to prevent water intrusion, slab erosion, and caulk joint failure near the perimeter.
How long should screen or glass enclosures last before needing major repairs?
Screen enclosures commonly last many years, but tears and mesh damage are often storm-related rather than age-related. Glass enclosures generally resist some wind better, but impact from debris and failures at gaskets can be the first issues. Inspect caulk joints, door operation, and any gasket seating annually, and address small leaks quickly before they cause hidden deterioration.
Will an enclosed patio count as increased living space for appraisal?
Usually only if it is properly thermally insulated and tied into the home’s HVAC system. A screened or partially enclosed space often adds functional value for daily use, but appraisers may treat it differently. If appraisal value matters, ask your local appraiser or permitting office what inspection requirements trigger “conditioned” status.
Next Article
Do It Yourself Decks and Patios: Which Is Easier?
Compare DIY decks vs patios, pick the easier build, plan layout, permits, materials, costs, and maintenance step by step