For most patios, the right DIY kit comes down to three choices: a screen enclosure kit for bug control (around $2,000–$5,000 for 200 sq ft), a vinyl/clear panel system for seasonal wind and rain protection, or an all-season insulated panel room that pushes into the $11–$21 per sq ft range. Which one fits your situation depends on your climate, how you want to use the space, and whether your patio slab or deck can support the structure. Get those three things right before you buy anything, and the rest of the project becomes a lot more manageable.
Do-It-Yourself Patio Enclosure Kits: Complete Guide

Miles Hart
30 Apr 2026
What a DIY patio enclosure kit includes (and what it doesn't)
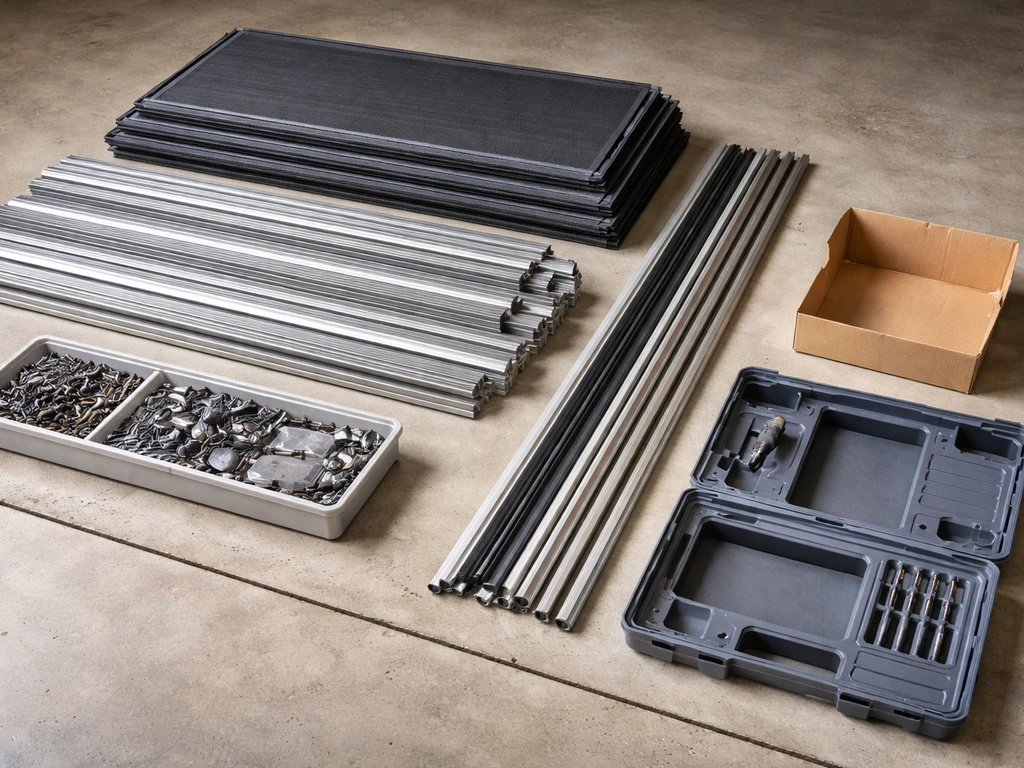
Most kits are more complete than people expect, but they almost always leave a few things out. A well-specified hard-top screen room kit from a brand like ScreenHouse typically ships with aluminum panels or roof sections, beams, extruded fascia, a pre-pitched backwall C channel, a front gutter, screws and hardware, sealant, touch-up paint, tar tape, and top and bottom post brackets. More comprehensive DIY sunroom-style kits like the Patio Enclosures EasyRoom go further: aluminum frame components, single-pane or double-pane insulated glass or screen mesh panels, an aluminum foam-core roof, a center ridge beam for gable configurations, full screens, a lockset, weather stripping, fasteners, caulking, and an blank" rel="noopener noreferrer">installation manual.
What kits routinely leave out: a concrete hammer drill and masonry bits (required if you're anchoring into a concrete slab, and explicitly called out in EZ Screen Room documentation), any electrical work for outlets, fans, or lighting, a door if it's not part of the base kit tier, and sometimes the foundation anchors themselves. If you're installing on concrete, budget for 1-1/2" Tapcon screws for the bottom receiving channel alongside whatever hardware ships with the kit. Sealing materials like exterior caulk are sometimes included and sometimes not, so check the kit's parts list before you order.
- Hammer drill and masonry bits (concrete slab installs)
- Tapcon or equivalent masonry anchors for bottom channel
- Exterior caulk/sealant if not explicitly listed in kit contents
- Screen door (often sold separately or as an upgrade tier)
- Electrical components: outlets, ceiling fan box, hardwired lighting
- Flashing tape or step flashing at the house wall attachment point
- Any permits, HOA application fees, or engineer stamps
Planning before you buy: measuring, layout, permits, and HOA
Getting your measurements right
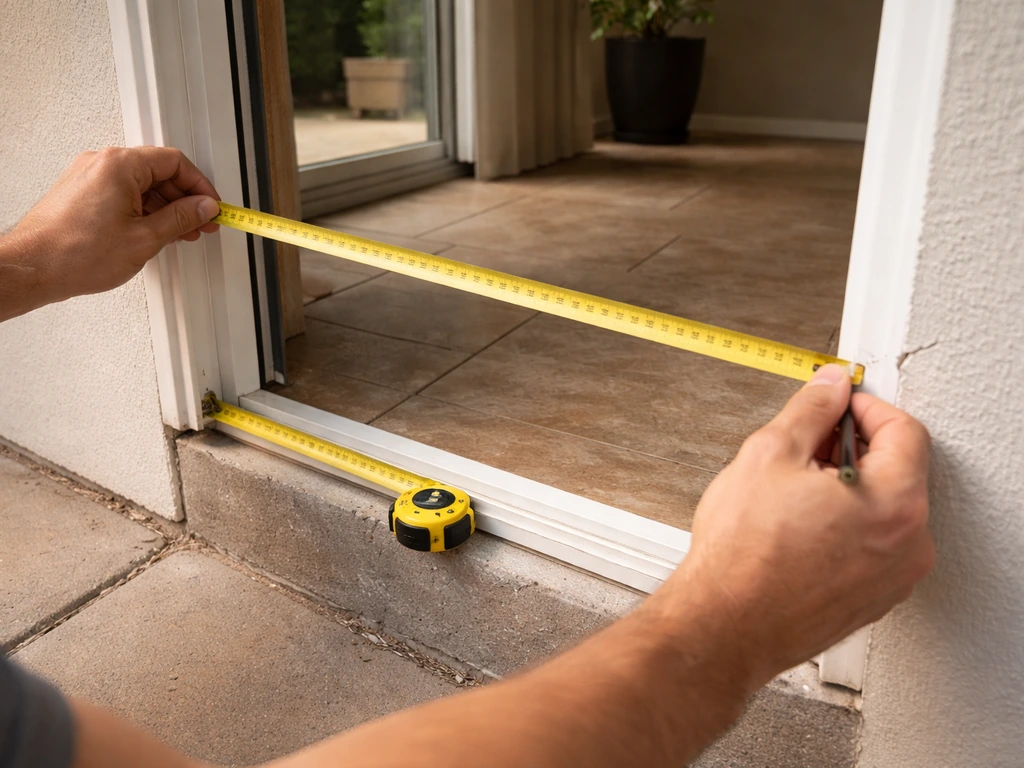
Don't measure once. Take measurements at multiple points across your opening and use the smallest number when there's any variation. A common mistake is assuming all wall openings or post spacings are the same, especially on older patios where the slab may have settled unevenly.
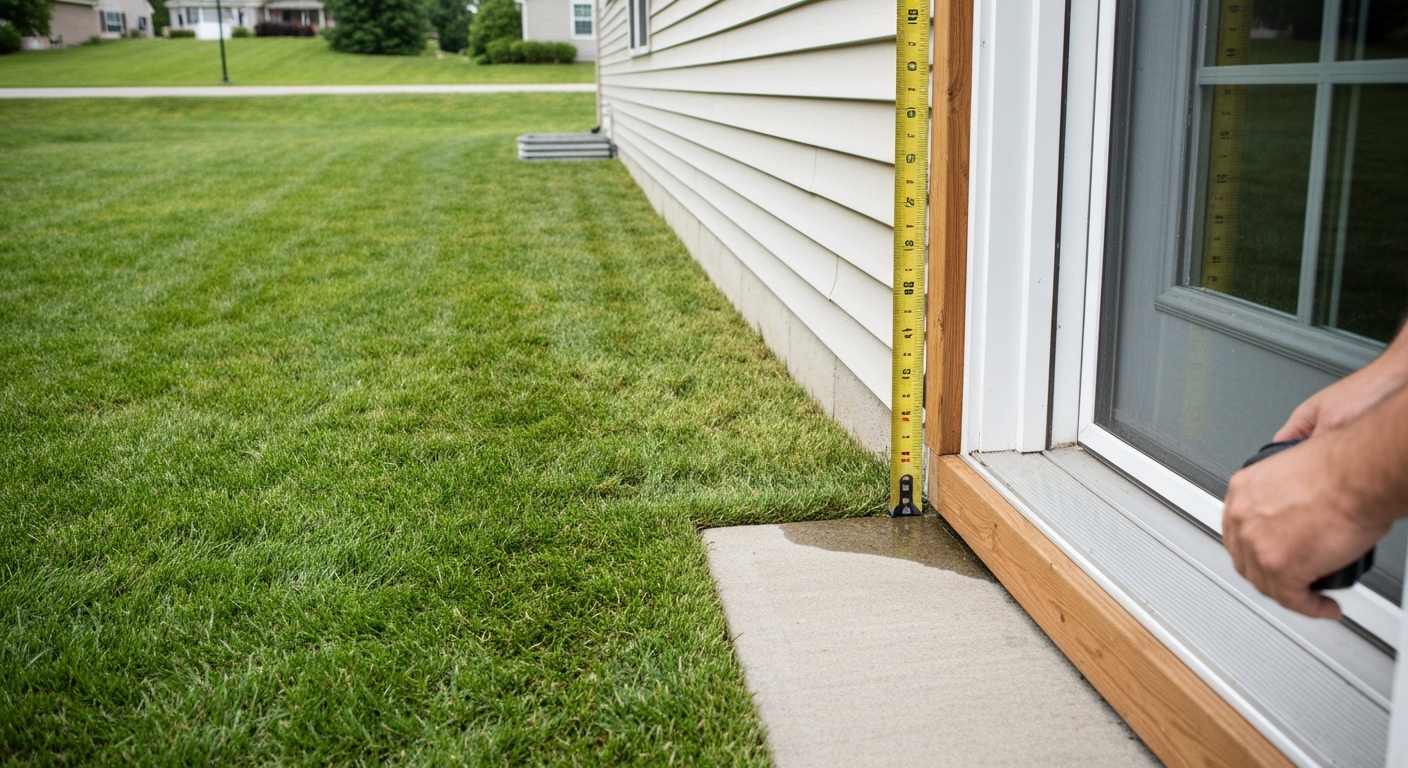
For screen rooms specifically, you need the vertical measurement from the deck or slab surface up to the bottom flange of the installed C channel before you build the wall or track system, because the panel sizing depends on that number. Covered patio plans can help you translate your measurements into the right kit type, layout, and sequencing so your enclosure stays weather-tight covered patio plans do it yourself.
Door openings are equally precise: a standard 36-inch screen door needs an opening that measures exactly 36 inches x 81 inches, and that has to be framed before you order the door.
For screening material, the rule of thumb is that screen fabric needs to be at least 4 inches wider than your largest panel opening. That allowance gives you enough material to pull taut, press spline into the groove cleanly, and trim flush without ending up short. Order tight on screen width and you'll be driving back to the hardware store mid-project.
Permits, zoning, and HOA checks
Permit requirements vary enough by city that you can't skip this step. Some jurisdictions treat attached patio enclosures as structures requiring a building permit, while others only trigger permits when structural changes are made to the main building wall. Where it gets nearly universal is electrical: if you add any hardwired outlet, ceiling fan, or lighting, you're very likely triggering an electrical permit under NFPA 70 regardless of whether the enclosure itself requires a structural permit. Zoning and lot coverage limits can stop a project even when a permit isn't required, so call your local building department with your site dimensions before committing to a kit size.
HOA approval is a separate track from your city permit and often has its own submission requirements: material type, color, visibility from the street, and sometimes wind-load or fire-rating documentation. Utility setbacks are another real-world check. Run your proposed enclosure footprint past your property plat to make sure you're clear of easements, and call 811 before doing any ground anchoring if you're working around a yard-side patio.
Choosing the right kit type for your climate and goals
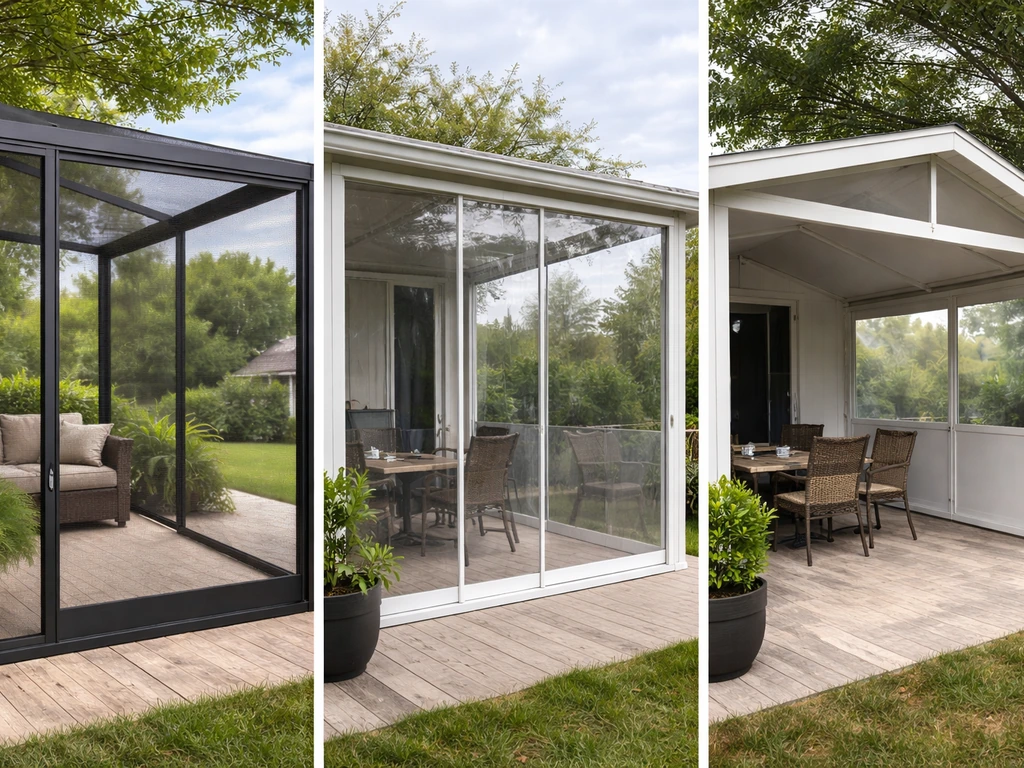
The three main categories serve genuinely different purposes, and buying the wrong one for your climate is the most expensive planning mistake you can make.
| Kit Type | Best For | Typical Cost Range (DIY) | Limitations |
|---|---|---|---|
| Screen enclosure (aluminum frame + screen mesh) | Bug control, airflow, mild climates | $2,000–$5,000 for ~200 sq ft | No wind/rain protection, no thermal benefit |
| Vinyl/clear panel system | Seasonal wind and rain blocking, 3-season use | $11–$21/sq ft installed (DIY materials) | Condensation on cold surfaces, not insulated |
| All-season / insulated panel room | Year-round use, cold climates, thermal comfort | $7,200–$55,200+ depending on size/glazing | Higher cost, may require engineering/permits |
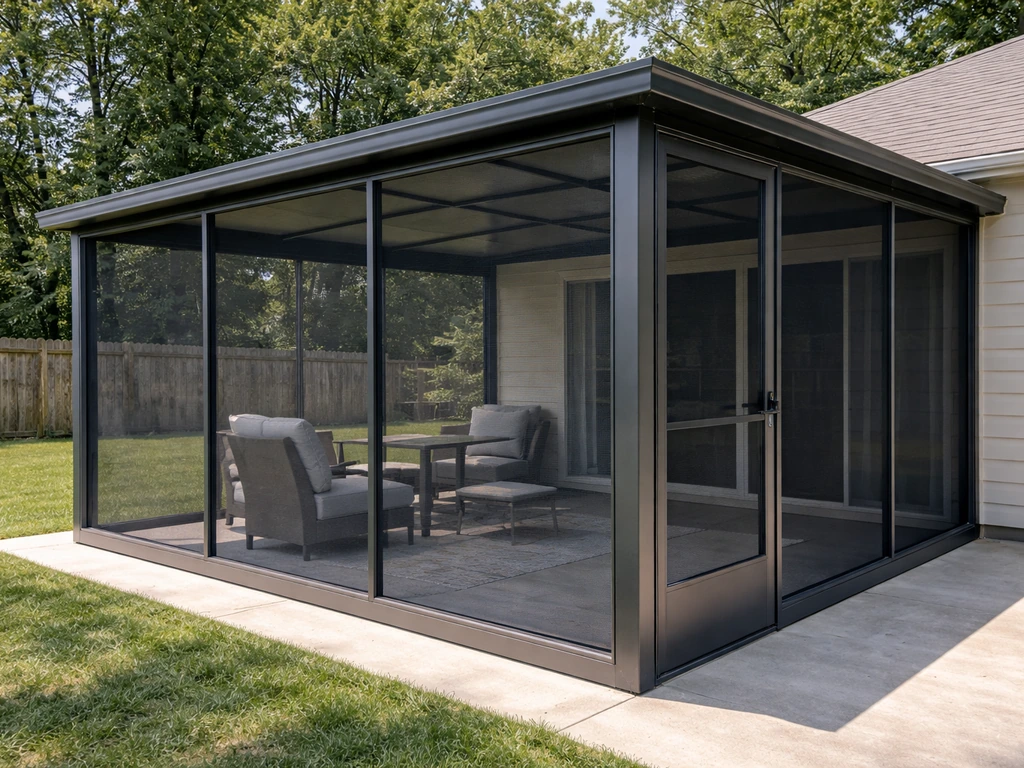
Screen enclosure kits like the EZ Screen Room (available at Home Depot in sizes like 8x10 ft, model EZSR810) are framed aluminum systems that give you a true screened-in porch feel. They're the easiest to install and the most forgiving on DIY skill level. Vinyl and clear panel systems, like V-Track-style roll-down or slide-track panels, can block wind-driven rain and cold intrusion and work well as a three-season solution, but they're not insulating in any meaningful R-value sense.
When interior warm air hits cold vinyl in winter, you get condensation, so plan for airflow even in cold-weather enclosures. All-season systems with foam-core insulated panels or dual-pane glass are a different category entirely: they perform closer to a sunroom addition, require more careful installation, and often cross the threshold into permit-required territory.
If you're in the Sun Belt or coastal South and your main goal is keeping bugs out while you grill or eat outside, a screen room kit is the right tool. If you're in the mid-Atlantic or Pacific Northwest and want to use the space from March through November without freezing, a clear vinyl or polycarbonate panel system makes more sense. If you want to sit out there in January in New England, you're really looking at an all-season room, not a kit in the traditional sense.
Step-by-step installation: from prep to final seal
Step 1: Site prep and foundation check
Before anything goes up, confirm your patio slab or deck is level, structurally sound, and large enough for the kit footprint with any required clearances. Concrete slabs need to be free of major cracks or heaving at anchor points. If you're going into wood decking, check that the joists below your anchor locations are in good condition. Sweep the perimeter clean and snap chalk lines to mark your wall positions accurately.
Step 2: Anchoring the bottom channel

On concrete, use 1-1/2" Tapcon masonry screws or 2" hex head screws to fasten the bottom receiving channel. This requires a hammer drill with masonry bits, not a standard drill driver. Get the channel set level before you drive every fastener, because this is your foundation for everything that goes up. On wood decks, lag screws into the framing members work, but pre-drill to avoid splitting.
Step 3: Framing the walls and roof structure
Assemble the aluminum frame components per your kit's manual, working corners first and then filling in intermediate posts or mullions. For screen rooms, the top C channel attaches to the house fascia or ledger board; measure the vertical distance from the slab to the bottom flange of that channel before cutting any wall sections, because that number controls your panel dimensions.
At the roof/wall interface where the enclosure meets the house, run a bead of caulk on top of the C channel making sure it's consistent thickness with no air pockets, then flash over it. ScreenHouse’s hard-top screen room installation manual instructs builders to use a level chalk line at the surface where the bottom channel will be installed and advises caulking the top of the C channel when applicable [run a bead of caulk on top of the C channel](https://screen-house.
com/buy/enclosures/Screenhouse-HardTopScreenroom-Manual. pdf). This joint is where most leaks start.
Step 4: Installing panels or screens
For screen rooms using the spline method, work top to bottom. Pull the screen fabric taut as you press the spline into the groove with a spline roller, keeping even tension across the panel. Loose spline is what causes sagging screens a year later, so take your time and press it fully seated. Trim excess screen flush with a utility knife after the spline is fully set. For vinyl or polycarbonate panel systems, follow the track engagement sequence in your manual precisely as panels are usually locked into the frame in a specific order.
Step 5: Door installation
Screen door installation starts with confirming the rough opening is framed to spec before the door ships. For a standard 36-inch screen door, that means a 36" x 81" opening in the framing. Before ordering, also confirm your hinge side and swing direction relative to how people will actually enter and exit the space, because getting it wrong means reordering. Once hung, install the threshold seal, door sweep, and weatherstripping. These three pieces are what make the door bug-tight; skipping any one of them defeats the purpose of the enclosure.
Step 6: Final sealing and caulking
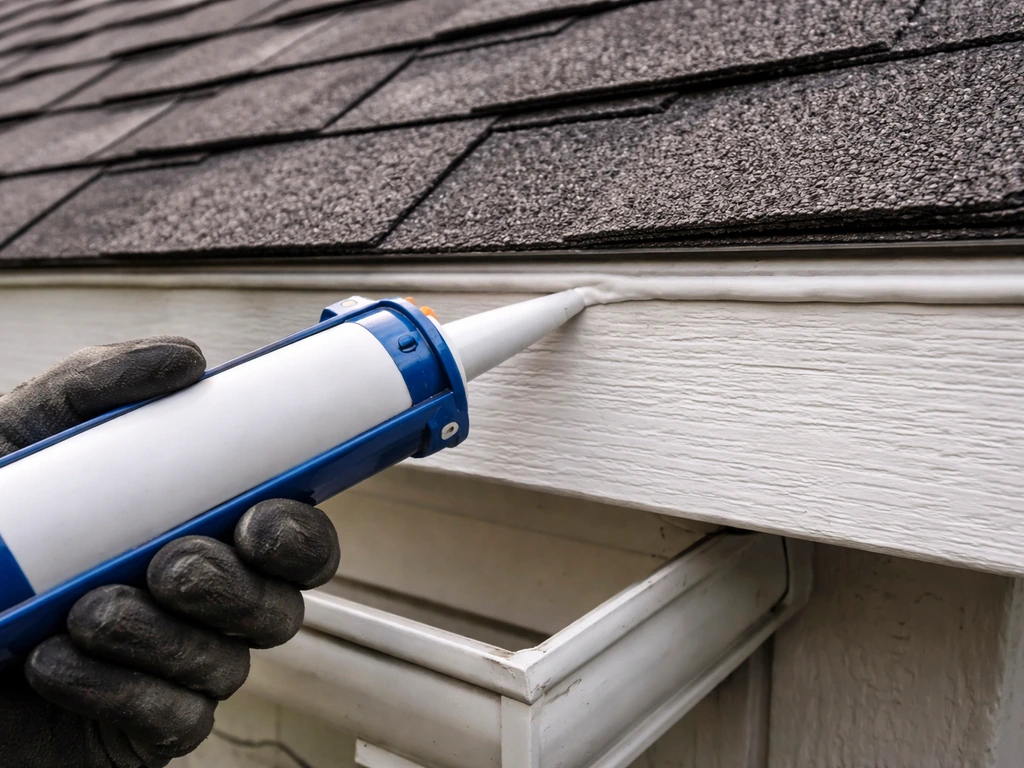
Seal every roof-to-wall joint, every fascia cap over a gutter, and every place where dissimilar materials meet. The manual from a quality kit will call out these points specifically: for example, putting a bead of caulking on the underside of the top lip before sliding it into place, and caulking where the fascia caps the gutter at the roofline. Use a paintable exterior caulk at the house wall and a clear silicone at aluminum-to-aluminum joints. Don't skip the interior side of the top channel; that's where wind-driven water finds its way in on the first storm.
Costs, effort level, and where the budget blows up
At the low end, a basic screen room kit for a 10x10 or 10x12 patio runs $2,000–$5,000 in materials. Step up to a vinyl or clear panel system and you're looking at $11–$21 per square foot in kit materials before any labor. A three-season enclosure project totals roughly $7,200–$55,200 depending on size, panel type, and whether you hire out the roof attachment. Most DIYers with decent tool skills can complete a screen room in one to three days. A more complex insulated panel room might take a long weekend with a helper.
Where budgets actually blow up: buying the wrong size kit and needing to return it (shipping fees are brutal on aluminum extrusions), discovering the concrete slab isn't level enough and needing to grind or shim, adding electrical after the fact, not factoring in permit fees and HOA application costs, and underbuying on caulk and sealant. If you're near the coast or in a high-wind zone, the wind-load rating of your kit matters, and a heavier-rated system costs more upfront but far less than repairing storm damage.
- Buying based on nominal slab size without accounting for clearances and overhangs
- Skipping the level check on the concrete before anchoring
- Using a regular drill on concrete instead of a hammer drill
- Screen fabric sized too close to the opening, leaving no spline allowance
- Skipping the roof/wall flashing step and discovering leaks on the first rain
- Not confirming door swing direction before ordering
- Assuming all panels in a kit are identical in size (they often aren't)
Maintenance, weatherproofing, and upgrades over time
Screen enclosures are low maintenance but not zero maintenance. Inspect spline and screening annually; sunlight degrades standard fiberglass screen over five to seven years in high-UV climates. Re-spline individual panels rather than replacing the whole enclosure when you find tears or sagging. For vinyl panel systems, condensation management is an ongoing issue when temperature swings are large. Build in some ventilation path, even if just a small operable vent at the top of the panels, because sealed vinyl enclosures with no airflow will fog and eventually mold at the frame edges.
Annually, hit the caulk joints at the roof/wall interface with a UV-stable exterior caulk refresh. Aluminum frames don't rust, but fasteners can corrode in coastal environments, so check for loose screws at anchors and post brackets every spring. For cold-climate enclosures, adding a small space heater, radiant panel, or even a ceiling fan to move air can dramatically extend the usable season without replacing the structure. If you want to upgrade a screen room to three-season use later, many aluminum frame systems accept clear vinyl panel inserts that slide into the existing screen track, which is a cost-effective mid-point between a full rebuild and freezing.
Shopping at Home Depot and other retailers: what to check before buying
Home Depot carries EZ Screen Room kits in specific model numbers tied to dimensions, for example, the EZSR810 for an 8x10 ft enclosure. Always verify the exact model number against your measurements rather than shopping by general size category, because two kits labeled similarly can have different included components. Read the product PDF or installation manual (usually linked from the product page) before adding to cart, not after. The parts list in that document tells you what's actually in the box, and that's where you'll find the note about needing a hammer drill for concrete installs.
When comparing kit listings across retailers, look for these specifics in the product documentation: whether screening, spline, and weather stripping are included or sold separately; whether doors are included or an add-on SKU; what the wind load or wind-speed rating is (relevant if you're in a high-exposure location); and whether the manufacturer has phone or online installation support. Brands with active installation support pages, like ScreenHouse, tend to publish detailed guidance for edge cases like roof-to-wall flashing and gutter integration, which makes the DIY process significantly easier. If you’re wondering whether Home Depot offers patio installation, start by checking whether the kit or enclosure you’re buying includes professional installation options for your location.
Parts availability matters more than people think at the point of purchase. If you need a replacement post bracket or a section of C channel three years from now, a kit from a brand with an active dealer network or direct web store is a much better long-term investment than a closeout kit from a marketplace seller. Check that replacement parts are listed and purchasable before committing to a brand. For larger or more complex all-season systems, some projects genuinely benefit from a professional handling the roof attachment and structural anchoring while a capable DIYer handles framing and panel installation, which keeps labor costs manageable without sacrificing structural integrity.
If you're comparing this type of kit-based approach to custom-built covered patio plans or fully contractor-installed enclosures, the DIY kit route generally saves 30–50% on labor but requires you to be comfortable with basic framing, concrete anchoring, and careful sealing work. If you're searching for do it yourself enclosed patio kits, start by matching the kit type to your climate goals and confirming your slab or deck can support the enclosure footprint.
If you are planning DIY decks and patios with one of these kit-based enclosure approaches, measure your opening carefully before you buy anything. If you already know you want a DIY build, covered patio plans do it yourself can help you size the enclosure, plan the roofline, and estimate permits and materials before you buy a kit. That's a realistic trade-off, not a guaranteed savings, especially if you hit a complication mid-project.
Know your own skill level honestly before you commit to a three-day timeline on a 300 square foot enclosure.
FAQ
Can I install do-it yourself patio enclosure kits if my patio is not perfectly level?
You can, but you must correct the base before assembly. If the slab or deck varies at anchor points, shimming or grinding may be needed so the bottom receiving channel sits level. If you skip that step, doors and sliding panels often bind, and screen spline tension can become uneven, leading to sagging or gaps.
What should I do if I discover I need electrical inside the enclosure after the kit is purchased?
Stop and plan the wiring route before frame assembly. Hardwired outlets, fan power, or lights typically trigger an electrical permit, and running conduit or wiring after the roof and channels are installed can require partial disassembly. Decide where the devices will go, confirm clearances around rails and roof beams, then coordinate with the kit layout before you drill any new penetrations.
Are concrete anchors the same for all do-it yourself patio enclosure kits?
No. Many kits use specific anchor strategies depending on whether you mount to the house side, the patio slab, or a deck framing member, and some omit the anchors entirely. Confirm whether the kit expects Tapcon-style screws, expansion anchors, or through-bolts, and verify the concrete thickness and edge distance so you do not crack the slab near corners.
How do I choose screen fabric width if my panel opening dimensions vary?
Use the largest opening dimension as your baseline. The screen needs to be at least several inches wider than the largest panel opening so you can maintain consistent spline tension and still trim flush. If you size to the smallest opening, you can end up with insufficient material on one panel and incomplete spline seating.
Will condensation be a problem with vinyl or clear panel enclosures?
It can be, especially in cold weather, when warm indoor air meets colder panel surfaces. Plan for airflow, such as a small operable vent or a controlled intake path, because sealed enclosures can fog and promote mold at frame edges. Also check that your kit design includes a way to manage water runoff at the tracks and bottom seals.
Do I need to flash the roof-to-wall joint even for screen-only kits?
Yes. The joint where the enclosure meets the house is still a leak risk, even when the walls are just screen. The most important step is proper caulking plus flashing over the top channel interface so wind-driven water cannot travel behind dissimilar materials or under the gutter and fascia components.
What’s the most common door mistake in DIY patio enclosure kit installs?
Installing the door after the rough opening is wrong or after you choose the wrong swing direction. Many screen doors require an exact rough opening size, and hinge orientation must match how people will enter and exit. If you get the swing side wrong, reordering is often more expensive than adjusting your plan upfront.
Do kit-based enclosures need a ventilation path, and where should it go?
For screen rooms, ventilation usually happens through screen leakage and openable sections, but for vinyl and clear systems you should include an intentional airflow route. A top vent, small operable panel section, or vented design near the high point helps reduce fogging and moisture buildup. Avoid relying solely on occasional door opening if the goal is year-round comfort.
Can I reuse old hardware or sealant when upgrading an existing enclosure with clear inserts?
Usually no. Old sealant can fail when exposed to new movement and temperature cycles, and spline grooves may not accept new fabric or inserts properly if contamination or aging residue is present. Clean the track or groove area, use the sealant types specified by the kit, and replace any worn weather stripping so the upgraded system seals uniformly.
How do I know if wind-load rating is truly adequate for my location?
Match the kit’s documented wind rating to your site exposure and local conditions, including how open or sheltered the patio is. In high-wind or coastal zones, lighter-rated systems may cost less initially but can require more frequent fastener checks and risk damage during storms. If the kit listing does not clearly state wind-speed or load limits, ask the manufacturer before buying.
What maintenance should I schedule beyond the annual inspection mentioned for spline and caulk?
Add a seasonal fastener and drainage check. Look for loose screws at anchor points and post brackets, and clear debris from gutters and track channels so water can drain out instead of pooling. In coastal areas, also watch for early corrosion around metal fasteners and touch up where the coating is damaged.
What if my HOA approval gets denied due to material or color visibility?
Treat HOA requirements as design constraints, not paperwork. Before ordering, confirm which panel materials and frame colors are allowed, whether enclosure height changes the look from the street, and whether specific documentation is needed for wind load or fire ratings. If your kit options do not match HOA specs, it is better to switch models early than to attempt a retrofit after approval.
Next Article
Grass Is Higher Than Patio: Causes, Fixes & Deck vs Patio
Grass higher than patio? Causes, slope checks, repair options, lower lawn, raise patio, or build a deck, with costs & DIY