You can absolutely build a covered patio yourself. A basic attached patio cover on a concrete slab, using wood framing and a corrugated polycarbonate or metal roof, is a realistic weekend project for someone comfortable with a drill, a circular saw, and a level. The realistic material cost runs $12 to $25 per square foot if you're doing the labor, compared to $20 to $50 per square foot for a pro installation. That gap is real money on a 200-square-foot structure. What separates a successful DIY from a frustrating one is having a concrete plan before you buy a single board, which is exactly what this guide covers. If you want to go beyond a covered patio, you can also apply the same DIY mindset to decks and patios by planning layout, materials, and permits before you start DIY decks and patios.
Covered Patio Plans DIY: Build Steps, Costs, Codes

Covered Patio vs. Pergola, Deck, and Porch: Why the Difference Matters
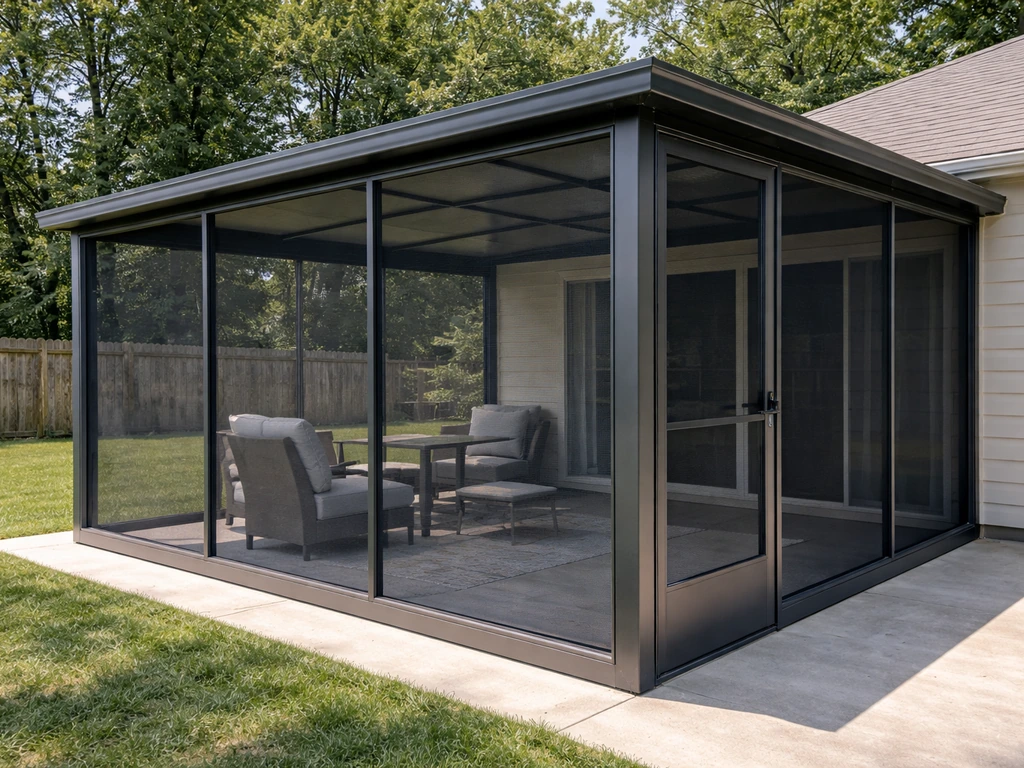
Before picking a plan, it helps to know what you're actually building. A covered patio is a roofed structure over a ground-level hardscape surface (concrete, pavers, or gravel). It's not a pergola (open lattice, no real weather protection), not a deck (elevated wood platform, which has its own framing and ledger challenges), and not an enclosed porch (which adds walls and is treated more like interior conditioned space by most codes). This distinction matters because your permit category, structural load requirements, and DIY difficulty all change depending on which one you're building. IRC Appendix H is specifically written for patio covers, and that's the code section most inspectors will reference when you pull a permit for a covered patio. Pergola plans won't cut it if you're putting on a solid roof, and deck framing guides don't fully apply to ground-level structures. If you're comparing those options, it's worth looking at DIY patio enclosure kits or enclosed patio kit options separately, since those step into a different permit and structural category. If you are thinking about enclosing the space, do it yourself enclosed patio kits can simplify the wall and panel planning. If you are thinking beyond a roof and want more enclosure options, do-it yourself patio enclosure kits can help you plan the walls and panels as a cohesive system.
Choosing the Right Covered Patio Style
There are four main covered patio styles you'll encounter in DIY plans, and the right one depends on your climate, home style, and how much structural work you want to take on.
| Style | Best For | Roof Type | DIY Difficulty | Climate Notes |
|---|---|---|---|---|
| Attached lean-to | Most suburban homes, small to mid-size spaces | Single-slope shed roof | Easiest | Good for rain/shade; add snow load calc in cold climates |
| Gable (freestanding or attached) | Larger patios, better ventilation | Two-slope peaked roof | Moderate | Better for snow shedding; more framing complexity |
| Hip roof cover | Wind-prone regions, wide spans | Four-slope roof | Advanced | Best wind resistance; engineer involvement recommended |
| Flat/low-slope cover | Modern homes, mild climates | Flat or <2:12 pitch roof | Easy to moderate | Requires careful drainage design; poor for heavy snow areas |
For most first-time builders, the attached lean-to is the right call. You're tying into one wall of the house (which gives you a built-in anchor), the roof framing is a single plane, and the material list is short. A freestanding gable is the better choice if you want more headroom, plan to use the space in warm weather with airflow, or your home's wall isn't in the right position. Avoid flat roofs in climates with more than a few inches of annual snowfall unless you're engineering the structure specifically for that load.
DIY Scope and Feasibility Checklist
Be honest with this checklist before you start. Overestimating your scope is the most common reason DIY patio projects stall midway or fail inspection.
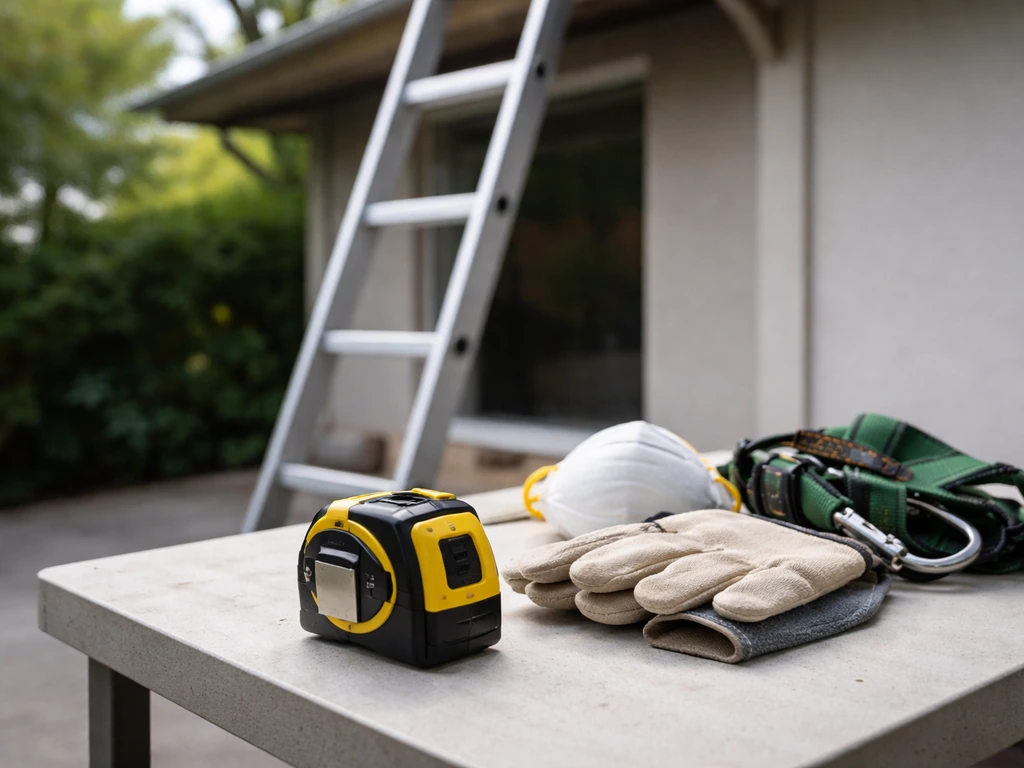
- Can you safely work at heights up to 10 feet? Roof framing on even a single-story structure means working on ladders or scaffolding. OSHA fall-protection standards kick in at 6 feet for construction work, so plan your fall protection accordingly.
- Do you have or can you rent a laser level, circular saw, post-hole digger (or auger), drill/impact driver, and framing square? A kit installation guide lists a laser level as a baseline tool, and that's not optional for getting posts plumb and beams level.
- Is your existing concrete slab in good shape? Cracks, heaving, or poor drainage will affect your foundation plan. If you don't have a slab yet, budget and plan for one before framing starts.
- Are you comfortable with ledger attachment? If your patio cover is attached to the house, the ledger connection is the single most structurally critical detail. Nail-only ledger connections are a documented cause of structural failure. You need through-bolts or structural screws with proper flashing.
- Have you checked your local frost depth? Footing depth isn't universal. Cold-climate footings must go below the frost line, which in northern states can be 36 to 48 inches deep. Southern states may only need 12 to 18 inches.
- Are you willing to pull a permit? If not, reconsider. An unpermitted structure can create problems when you sell, may not be covered by insurance, and could require removal.
- Do you have a helper? Most framing steps (raising beams, holding posts plumb) genuinely require two people. Solo builds can be done but take significantly longer and involve improvised bracing.
If you checked all of those, you're a real candidate for a full DIY build. If you flagged the ledger connection, structural sizing, or frost depth as uncertainties, consider hiring a structural engineer for a one-time plan review (typically $300 to $600) rather than hiring out the whole project. That's the most cost-effective way to get confidence on the technical details while keeping your labor savings.
Materials and Tools for Do-It-Yourself Builds
Framing Materials
- Pressure-treated lumber for all ground-contact or near-ground members (posts, ledger, bottom plates). Use PT rated for ground contact (UC4B or UC4C) for posts in concrete.
- Standard SPF or Douglas fir framing lumber for rafters and beams above the ledger line (where it stays dry).
- Post bases and beam hangers (galvanized or stainless for coastal areas) — avoid skipping these in favor of toenailing, which is not structurally equivalent.
- Structural lag screws or through-bolts for the ledger (minimum 1/2-inch diameter, staggered, spaced per IRC tables).
- Joist hanger nails and structural screws (not drywall screws, which are not rated for shear loads).
Roofing Materials
| Roofing Option | Approx. Material Cost (per sq ft) | DIY Friendliness | Best Use Case |
|---|---|---|---|
| Corrugated polycarbonate panels | $2–$5 | High | Light, fast to install, good light diffusion |
| Metal roofing (corrugated steel) | $3–$7 | High | Durable, low maintenance, good for rain/snow |
| Asphalt shingles over sheathing | $2–$5 (plus OSB) | Moderate | Matches house roof, best aesthetics |
| Aluminum patio cover panels (kit) | $8–$15 | High (kit system) | Clean look, fast install, full kit ecosystem |
For most DIY builds, corrugated metal or polycarbonate is the fastest and most forgiving. Asphalt shingles over plywood sheathing look the best and match most homes, but they add weight and require a bit more framing precision. Aluminum patio cover panel kits (sold at Home Depot and Lowe's) are worth comparing if you want a finished look without cutting and fitting individual panels.
Tools You'll Need
- Laser level or builder's level (non-negotiable for post and ledger layout)
- Circular saw and miter saw
- Drill and impact driver
- Post-hole digger or rented power auger
- Speed square and framing square
- Chalk line
- Ladder (6-foot and 8-foot minimum) or scaffolding for roof work
- Safety glasses, work gloves, hearing protection
- Concrete mixing tools or wheelbarrow if mixing on site
Step-by-Step DIY Building Plan: Foundation to Roof
Step 1: Lay Out Your Footprint
Start by marking out the patio cover's corners with stakes and string lines. Use the 3-4-5 triangle method to confirm square corners (3 feet on one side, 4 feet on the adjacent side, and the diagonal should measure exactly 5 feet). Mark post center locations on your layout. For a typical 12x16 foot lean-to, you'll have two front posts and the house wall as the back support. Post spacing of 8 to 10 feet on center is a common starting point for 4x4 or 4x6 posts, but verify against your span tables or local code.
Step 2: Dig and Pour Footings
Footing size and depth are site-specific. A typical requirement for a lightweight patio cover in a mild climate is a footing roughly 12 inches in diameter and 14 inches deep. In frost-prone areas, the footing must extend below the local frost line, which can be 36 to 48 inches in northern states. Check with your local building department before digging. Mix and pour concrete (or use fast-set concrete poured dry around a post), then set a post base anchor or set the post directly while the concrete is wet. If you set posts directly in concrete, use PT rated for ground contact. Let footings cure for at least 24 to 48 hours before loading them.
Step 3: Attach the Ledger Board
For an attached cover, the ledger is the most critical piece. Remove any siding where the ledger will sit, and attach the ledger directly to the house rim joist or structural framing using 1/2-inch lag screws or structural through-bolts, staggered in two rows. Do not use nails only. Install proper flashing above the ledger before re-installing siding so water cannot get behind the ledger and rot the house's band joist. This is a documented durability failure point, and getting it right protects both the structure and your home. Set the ledger height so your roof will pitch away from the house at a minimum 1/4 inch per foot (more on that in the design tips section).
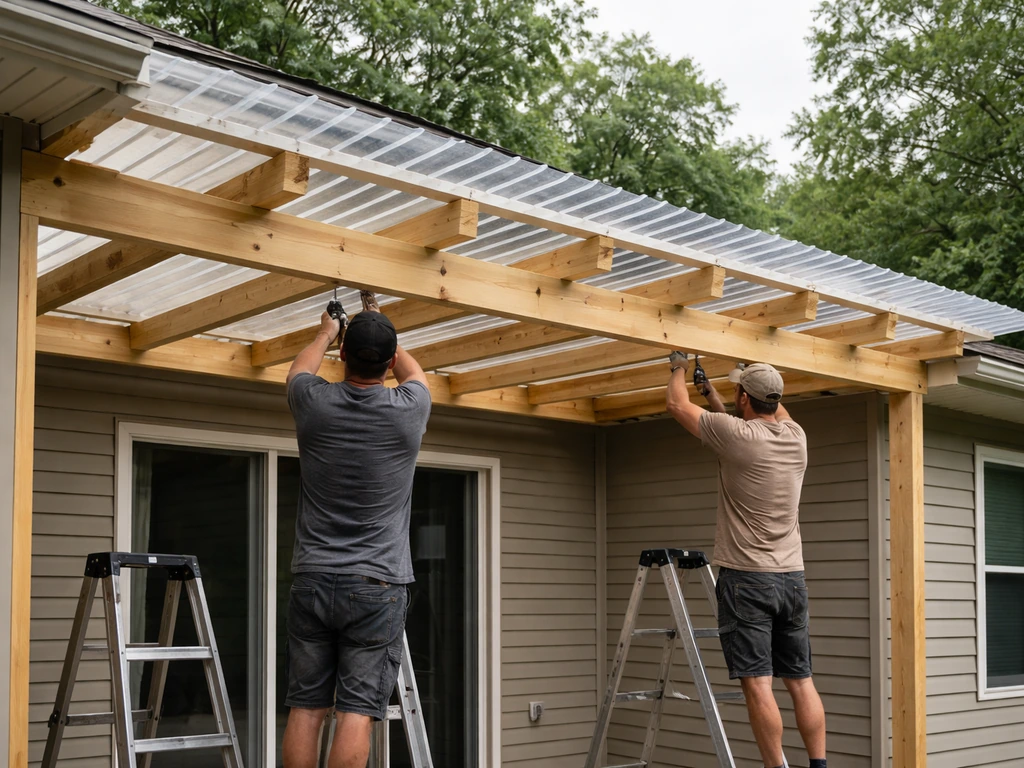
Step 4: Set Posts and Beams
Set your posts in post bases or in concrete, check for plumb in both directions with a level, and brace them temporarily with diagonal 2x4s staked to the ground. Once posts are set and braced, cut your beam to length and raise it into position on top of the posts. Use post caps (metal hardware connectors) to attach the beam to the tops of the posts rather than just toenailing. For a 12-foot beam span, a doubled 2x8 is a common starting point, but check your local span tables. The beam should be level across its length.
Step 5: Install Rafters
Rafters run from the ledger (or ridge beam, for a gable) down to the beam at the front posts. Typical rafter spacing is 16 or 24 inches on center. Use rafter hangers at the ledger end and metal hurricane ties or rafter ties where rafters rest on the beam. This connection point is where wind uplift loads transfer, and it's where failures happen in high-wind events when connections are skipped. Cut a bird's mouth notch at the bearing end if your design calls for it, and let rafters overhang the front beam by 12 to 18 inches for weather protection and aesthetics.
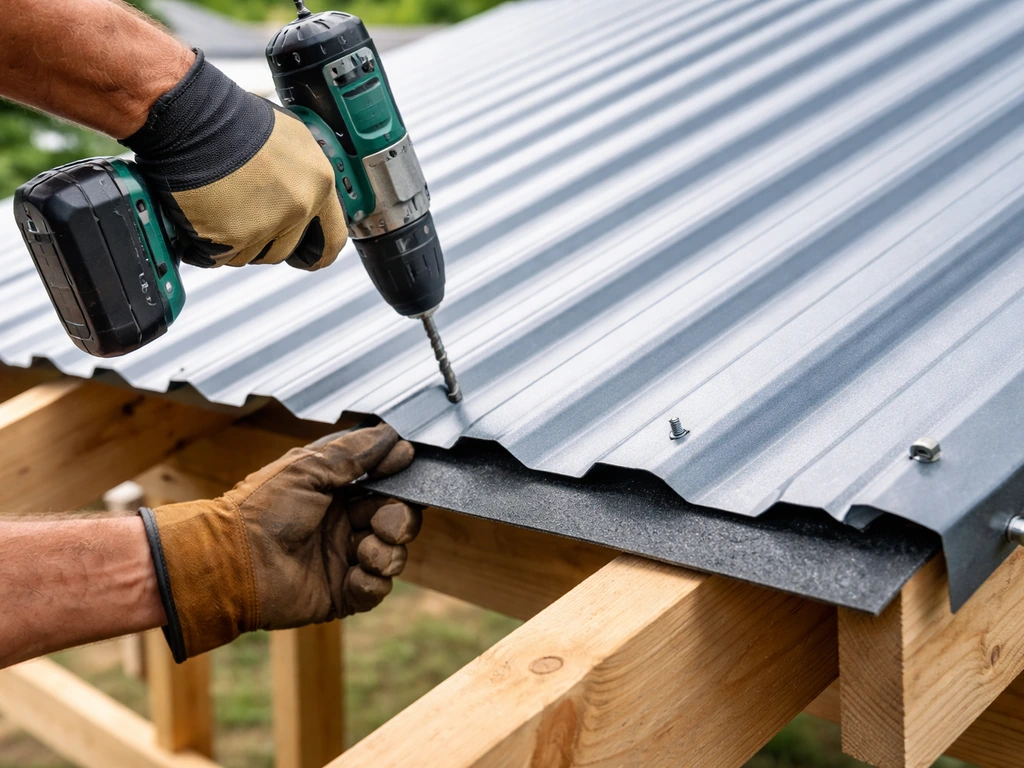
Step 6: Install Roofing
If using corrugated metal or polycarbonate, fasten panels according to the manufacturer's overlap and fastener spacing requirements. Use closure strips at the ridge and eave to block insects and debris while allowing some ventilation. Overlap panels by at least one corrugation on the sides and 6 inches at end laps. If using asphalt shingles, install OSB or plywood sheathing first, then synthetic underlayment, then shingles from the bottom up. Both systems need a proper drip edge at the eave to direct water off the framing.
Step 7: Finishing Details
Trim exposed rafter tails with fascia board, caulk any penetrations through the house wall, and paint or seal any exposed wood that isn't already pressure-treated. If you're adding electrical (lights, fans), that work typically requires a separate electrical permit and may need a licensed electrician depending on your jurisdiction.
Cost Breakdown vs. Hiring a Pro
| Cost Category | DIY Estimate | Pro Installation Estimate |
|---|---|---|
| Materials (framing, hardware) | $8–$15 per sq ft | Included in pro price |
| Roofing materials | $2–$7 per sq ft | Included in pro price |
| Concrete and footings | $1–$3 per sq ft | Included in pro price |
| Total materials (kit or self-sourced) | $12–$25 per sq ft | N/A |
| Labor (pro) | $0 (your time) | $10–$25 per sq ft |
| All-in installed (pro) | N/A | $20–$50 per sq ft |
| Permit fees | $100–$500 (same for both) | $100–$500 (same for both) |
| Tool rental | $100–$400 (one-time) | Not applicable |
On a 200-square-foot covered patio, the DIY material cost typically runs $2,400 to $5,000. A pro doing the same job would charge $4,000 to $10,000 all-in. That's a potential savings of $2,000 to $5,000 for your labor, which on a relatively simple structure represents real value. The break-even point shifts if you need to buy specialty tools you won't reuse, or if the project scope grows to include electrical, complex rooflines, or a new concrete slab. A new 200-square-foot concrete slab alone can add $1,200 to $3,000 to your project, whether you pour it yourself or hire out.
If you're comparing this to a prefabricated kit from a big-box store, DIY patio enclosure kits and aluminum panel systems generally fall in the $12 to $15 per square foot range for materials and are designed for homeowner installation, which can reduce tool requirements and guesswork on sizing. Some big-box stores, like Home Depot, also offer patio installation services, so it can be worth checking their current options and scheduling an estimate.
Permits, Codes, Safety, and Inspections
Most jurisdictions require a building permit for any permanent roofed structure attached to your home or exceeding a minimum size (often 120 to 200 square feet, depending on local rules). IRC Appendix H requires patio covers to be designed for all dead loads plus a minimum vertical live load of 10 psf (0.48 kN/m²), with snow loads used where they exceed that minimum minimum vertical live load of 10 psf for patio covers. Even if your structure is small enough to potentially skip a permit, an attached cover that ties into the house almost always requires one. Pull the permit. It protects you.
IRC Appendix H is the section of the International Residential Code written specifically for patio covers. The key structural requirement is that the structure must be designed to handle dead loads plus a minimum vertical live load of 10 pounds per square foot (psf), with snow loads used in place of that minimum in areas where snow loads exceed 10 psf. Wind load requirements are also code-driven and vary by your local wind zone. In hurricane or high-wind regions, the connection detailing (particularly at rafters and posts) is non-negotiable and is the most common point of catastrophic failure when connections are undersized or skipped.
A typical permit submittal for a covered patio includes a plot plan showing where the structure sits on your property (setbacks matter), a foundation plan showing footing size and depth, and a roof framing plan with member sizes, spans, and spacing. Some jurisdictions accept prescriptive plans (you show compliance with the code tables directly), while others require stamped engineered drawings for anything beyond a basic size. Call your local building department before you finalize your design, not after.
Plan for at least two inspections: a footing inspection before you pour concrete (the inspector checks depth and diameter), and a framing inspection before you install roofing. Some areas also require a final inspection after completion. Schedule these in advance because they can add days or weeks to your timeline depending on the department's workload.
On the safety side: working at heights even on a single-story structure means falls from ladders and roof edges are a real risk. Use a stable ladder on level ground, have a helper hold it, and don't stand on the top two rungs. If you're working near the roof edge for any extended period, a personal fall arrest system (harness and anchor) is worth the rental cost.
Design Tips for Comfort, Drainage, and Longevity
Slope and Drainage
The single biggest mistake on DIY covered patios is insufficient roof slope. Minimum slope for metal or polycarbonate roofing is typically 1/4 inch per foot (a 1:48 pitch), but 1/2 inch per foot is more forgiving and drains faster. Slope always runs away from the house. Your ledger height determines this: set it high enough that the front beam is low enough to give you adequate pitch across the full span. On a 12-foot-deep patio, a 1/2-inch-per-foot slope means the front beam is 6 inches lower than the ledger. Plan this before you buy lumber.
Overhang and Ventilation
A 12- to 18-inch rafter overhang past the front beam does two things: it keeps rain off the people sitting under the patio, and it protects the front beam from direct weather exposure. In hot climates, a larger overhang on the south and west sides also provides passive shading. For ventilation, avoid sealing the eave ends of corrugated panels completely. Use vented closure strips or leave a small gap at the ridge (if you have a ridge) to let heat escape. A sealed metal or polycarbonate roof in a hot climate turns into a radiant heat source from below without some ventilation.
Wind and Snow Considerations
In high-wind areas, every rafter-to-beam and beam-to-post connection needs metal hardware (hurricane ties, post caps). The structural failure mode in wind events is uplift, which pulls the roof off from above rather than pushing it in from the side. Patio covers and overhangs are particularly vulnerable because a single failed connection can trigger a progressive failure across the whole structure. In snow country, size your rafters for the actual snow load in your area (check your local ground snow load map), and pitch the roof steeply enough that snow sheds rather than accumulates. Flat roofs in moderate-to-heavy snow areas need engineered sizing, not guesswork.
Long-Term Maintenance

- Inspect and re-caulk the ledger flashing every 2 to 3 years. This is where water damage to your house starts if it's neglected.
- Check post bases annually for standing water, rust on metal connectors, or rot at the post bottom.
- Clear debris from the roof surface and gutters (if installed) each fall before freeze-thaw cycles start.
- Re-seal or repaint exposed wood every 3 to 5 years depending on your climate and the wood species used.
- Check all structural hardware (post caps, hurricane ties, joist hangers) for rust or loosening, especially in coastal or humid climates.
A covered patio built with proper footings, correctly flashed ledger, hardware-connected framing, and a pitched roof that drains away from the house should last 20 to 30 years with normal maintenance. The ones that fail early almost always share the same problems: inadequate ledger connection, poor drainage design, or skipped hardware at the rafter-beam junction. Get those three things right and the rest is detail work.
FAQ
Can I build covered patio plans do it yourself as a freestanding patio cover instead of attached to the house?
Yes, but you need to treat it like a new structure for permitting and sizing. A freestanding cover with posts and independent footings usually avoids ledger flashing requirements, but it must still meet the same patio-cover load basics (dead load plus minimum vertical live load, or actual snow load where higher). Also confirm local setback rules for detached structures, which are often stricter than attached ones.
What’s the easiest way to avoid the slope mistake when using covered patio plans do it yourself?
Do not rely on “level” alone, you must set roof slope based on the ledger height. For corrugated metal or polycarbonate, aim for at least 1/4 inch per foot minimum, 1/2 inch per foot if you want faster runoff and more forgiveness. Then re-check rafter length and beam elevation after any layout changes, because small errors at the ledger compound across a full 12 to 16 foot span.
What should I do if my house wall cannot safely support the ledger connection in covered patio plans do it yourself?
If the house wall area is not suitable for ledger mounting (for example, damaged rim joist, older masonry without a proper fastening method, or siding only with no structural backing), adjust the plan before construction. A structural engineer review is the fastest path to confirming an alternate ledger location or redesigning to a freestanding gable or different support scheme that inspectors will accept.
How do I manage water near the ledger so my DIY covered patio doesn’t rot the band joist?
Plan on adding a weather barrier strategy, not just flashing. For attached covers, use flashing above the ledger correctly so water cannot migrate behind the ledger, then seal the wall penetrations and any gaps where trim meets the siding. If your siding type is unusual (stucco, brick veneer, or older lap siding), ask the building department what detailing they expect, because the wrong water management at this junction is a common early failure point.
Can I add lighting or ceiling fans to a covered patio and still qualify as do it yourself?
Electrical is often the main “gotcha” that stops DIY projects. Even if you can install lights or fans, many areas require a permit and sometimes a licensed electrician for wiring, grounding, and bonding when the wiring ties into existing circuits. A practical step is to decide early whether the wiring route will be surface-mounted in conduit (easier to inspect) or concealed, then confirm your local requirements before framing blocks that would be hard to retrofit.
Which roof covering is usually the simplest and most forgiving for covered patio plans do it yourself?
Yes, but don’t choose materials by price alone, choose by span and fastening compatibility. Corrugated metal and polycarbonate are typically faster because they follow simple overlap rules, but shingles look best when you can install sheathing and underlayment carefully and support the added roof weight. If you want a “finished” look without heavy framing changes, aluminum panel kits can reduce cutting and fitting, but still follow manufacturer overlap and fastener spacing.
How do I handle ventilation if I build a covered patio DIY in a hot climate?
In hot climates, ventilation matters because the underside of a sealed roof can act like a radiant heater. Keep eave ends from fully sealing (use vented closure strips or leave appropriate gaps if the system requires them), and if you have a ridge, allow heat escape through a ridge vent strategy. Also consider larger overhangs on sun-exposed sides, especially south and west, to reduce heat gain.
What’s the one thing I should double-check for high-wind areas when using covered patio plans do it yourself?
It’s possible, but you must verify wind uplift and lateral stability details before committing. In high-wind zones, inspectors will expect proper metal hardware at every critical connection, including rafter-to-beam and beam-to-post. If your plan lacks a bracing strategy or uses undersized members for your wind zone, the correct fix is to revise the framing and connection hardware, not to add “bigger screws” randomly.
Can I use the same covered patio plans do it yourself in snow country, or do I need a different roof design?
For snow-prone areas, the right approach is to size for the actual local snow load and choose a roof pitch that sheds accumulation. Flat or near-flat roofs are typically not acceptable without engineered design, because load increases fast with poor shedding. Before building, confirm the ground snow load requirement with your local guidance, then ensure your rafters and spacing match that calculation.
How do I plan my timeline to avoid inspection delays for a DIY covered patio?
Schedule inspections early, because most delays happen when the concrete is poured before a footing inspection or when framing is covered before a framing inspection. A good rule is to keep the job in “inspectable layers,” pour footings only after the inspector signs off, and only install roofing after the framing is approved. If your department is busy, call to confirm the typical lead time so you can line up materials and weather.
What changes when my covered patio DIY turns into a partially enclosed space?
If you are upgrading from a basic roof-only patio cover to something that becomes partially enclosed, your code path can change quickly. As walls, panels, or glazing get added, wind pressure, load design, and even permit classification can shift. A practical decision aid is to treat enclosure as a separate project phase, confirm what portion qualifies as a patio cover versus an enclosed structure, and then use the appropriate kit or plan set for that category.
Do-It-Yourself Patio Enclosure Kits: Complete Guide
DIY patio enclosure kit guide: what’s included, what’s missing, how to measure, install, seal, and budget.