If your yard is flat and your budget is tight, build a patio. If your yard slopes, you want a raised outdoor floor, or you're after that classic wood-deck look, build a deck. Both are genuinely doable as DIY projects, but a patio is more forgiving for first-timers, costs less per square foot, and doesn't require footings or framing. A deck gives you more flexibility on uneven terrain and more of a traditional outdoor-room feel, but it demands more skill, more materials, and usually a permit. The right choice depends on your specific yard, budget, and how confident you are with a saw and a level, and this guide walks through the whole decision, start to finish.
Do It Yourself Decks and Patios: Which Is Easier?

Miles Hart
5 May 2026
Decks vs Patios: Which Is Actually Easier to DIY?
A patio sits at or near ground level. It's a hardscape surface made from pavers, poured concrete, gravel, or flagstone laid directly on a prepared base. There's no structural framing, no ledger board bolted to the house, and no posts set in concrete. That simplicity is a real advantage. Most patio projects come down to digging out the area, compacting a gravel base, adding sand, and laying your surface material. Mistakes are fixable without tearing out lumber.
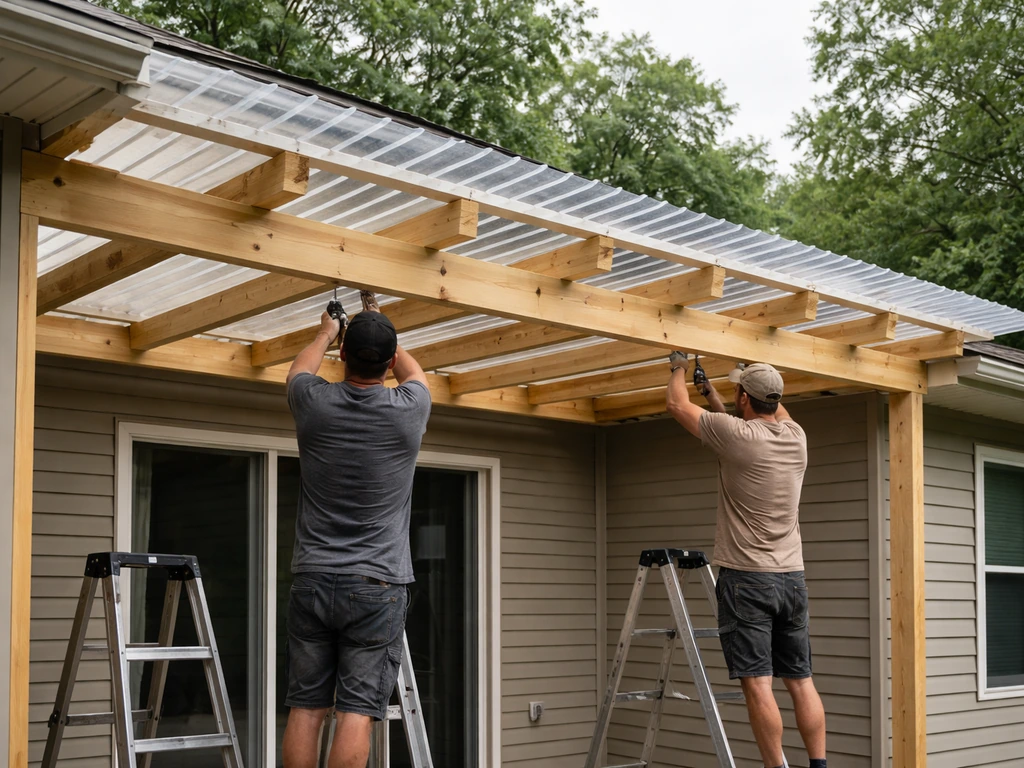
A deck is a raised platform, typically made from wood or composite boards, supported by a structural frame of joists and beams sitting on concrete footings. The more elevation involved, the more complex the build. A low-profile deck sitting just a few inches off the ground is closer in difficulty to a patio. But once you're adding stairs, railings, a ledger attached to the house, or any significant height, you're into structural territory that requires proper planning, accurate cuts, and usually a permit.
| Factor | Patio | Deck |
|---|---|---|
| Skill level needed | Beginner-friendly | Intermediate to advanced |
| Typical cost (materials) | $5–$20 per sq ft | $15–$35 per sq ft |
| Permit usually required? | Rarely | Almost always |
| Best terrain | Flat or gently sloped | Sloped, uneven, or elevated |
| Common materials | Pavers, concrete, gravel | Pressure-treated wood, composite |
| Structural complexity | Low | Medium to high |
| Longevity with maintenance | 20–50+ years | 15–30 years (wood); 25–30 (composite) |
| Resale value impact | Moderate | Moderate to high |
For most first-time DIYers, a paver patio is the safer starting point. You can pause mid-project, make adjustments, and the consequences of a small mistake are far less expensive than mis-framing a deck structure. That said, if your yard drops away from the house, a patio isn't practical and a deck becomes the obvious solution. Know your site before you commit to either path.
Planning Before You Touch a Shovel
Measure and sketch your layout

Start by measuring the area you want to cover and sketching it on paper with actual dimensions. Include the house wall, any doors or windows that affect placement, and note where the sun hits throughout the day. A 12x16 foot space (192 sq ft) is a common starting size for a small deck or patio and comfortably fits a table and four chairs. Go larger if you want room for a grill and lounge seating. Mark your measurements with stakes and string before committing to anything, and stand in the space to see if it actually feels right.
Permits: don't skip this step
Decks almost always require a building permit, especially if they're attached to the house, elevated more than 12 to 18 inches, or over a certain square footage (thresholds vary by municipality, but 200 sq ft is a common trigger). Pulling a permit isn't just bureaucracy: it means an inspector checks your footing depth, joist spacing, and railing height, which protects you when you sell the house. Unpermitted decks are a common headache in real estate transactions.
Ground-level patios usually don't require permits, but check with your local building department if you're close to property lines or in a HOA community. If you want a more weather-protected backyard, you can also use do it yourself enclosed patio kits as a focused way to plan the enclosure and roof system around your patio foundation Ground-level patios. Some jurisdictions also require permits for poured concrete patios over a certain size.
Property lines, utilities, and neighbors
Before digging anything, blank" rel="noopener noreferrer">call 811 (in the US) to have underground utilities marked. This is free and blank" rel="noopener noreferrer">legally required in most states before any excavation. Check your property survey or plat to confirm setback requirements, which are minimum distances your structure must sit from property lines. Typical setbacks range from 5 to 10 feet but vary widely by zone. If you share a fence or property line with a neighbor, a quick heads-up conversation before construction avoids friction later.
Site Prep and Foundations: The Work That Actually Determines Success
The most common reason DIY patios fail isn't the surface material, it's poor base prep. Pavers that sink, concrete that cracks, and gravel that shifts almost always trace back to inadequate grading, a base that wasn't compacted properly, or drainage that was ignored. This part of the project is unglamorous but it matters more than anything else.
Grading and drainage
Your finished surface should slope away from the house at roughly 1/8 inch per foot (about 1% grade) so water doesn't pool against your foundation. For patios, this means shaping the ground before you lay any base material. For decks, the deck boards themselves shed water, but you still want the grade under the deck to direct runoff away from footings. If your yard has significant drainage issues, standing water, or clay-heavy soil, address those problems before building anything on top of them.
Patio base preparation
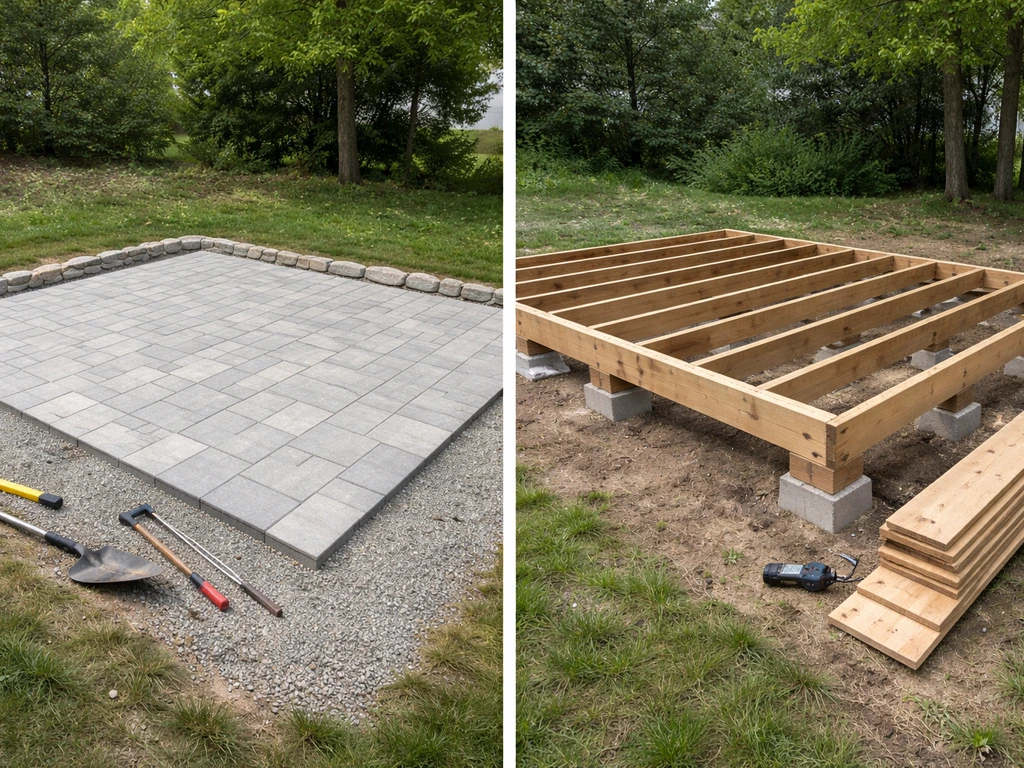
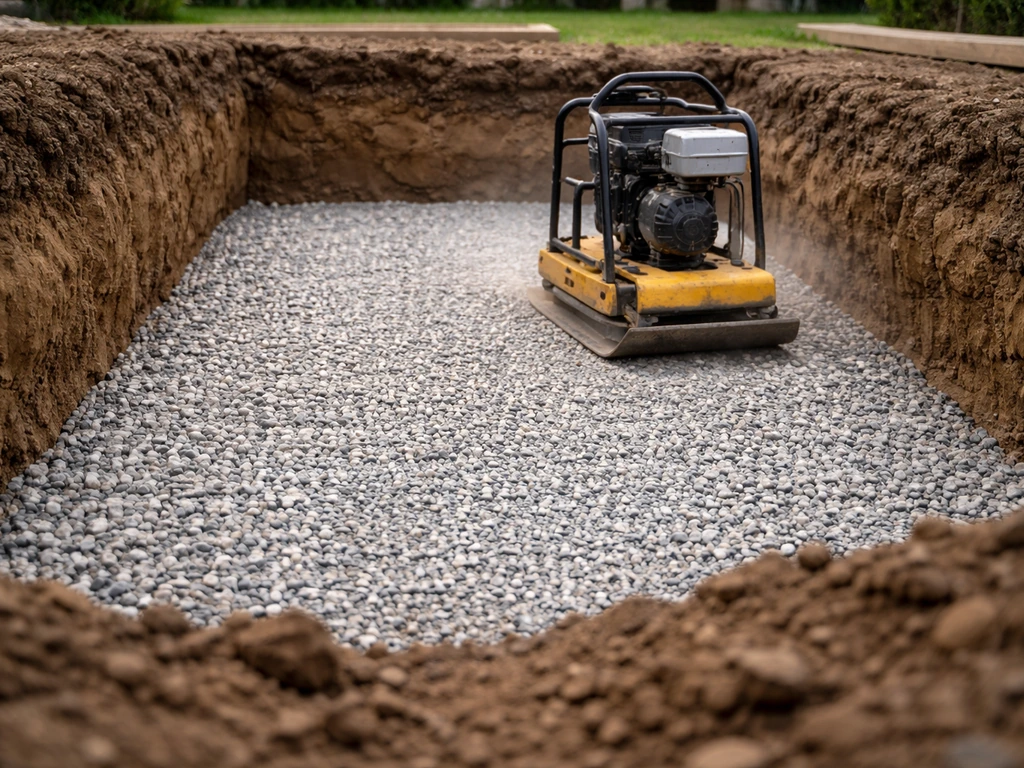
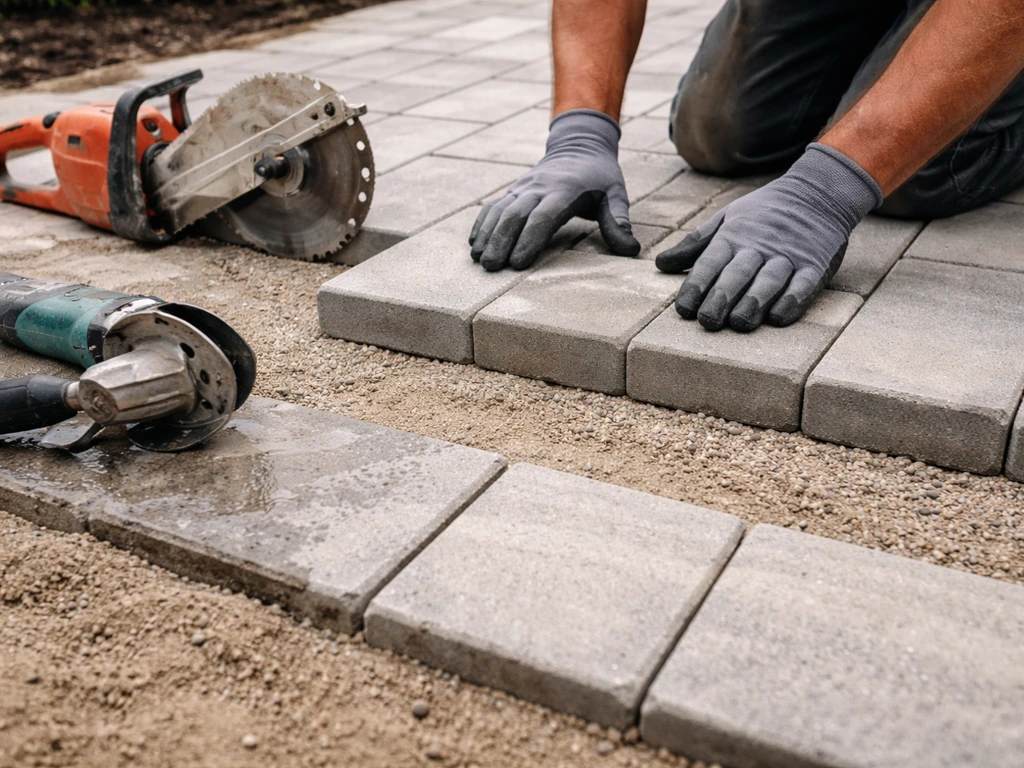
For a paver patio, the standard installation approach works in layers. First, excavate the area to a depth that accommodates your base plus your paver thickness (usually 6 to 9 inches total). Then add a compacted granular aggregate base, typically 4 to 6 inches deep depending on your soil and expected load. Compact this in lifts using a plate compactor (rentable for about $60 to $80 per day), not just by tamping with your foot.
On top of that goes a 1-inch layer of coarse bedding sand, screeded level using a long straight board and two screed rails. The pavers sit directly on the sand, and jointing sand fills the gaps. Each layer matters. Skipping or rushing any one of them leads to settling and movement.
Deck footings
Deck posts must bear on concrete footings that extend below the frost line in your area, which might be 12 inches in mild climates or 48 inches in northern states. Footings that don't go deep enough will heave with frost cycles and rack your entire structure. The diameter and depth of footings are specified by your permit drawings or a span table. For a standard deck post, a 10 to 12-inch diameter tube form (Sonotube) is common.
Pour concrete into the tube, set a post anchor while the concrete is wet, and let it cure for at least 24 to 48 hours before loading it. Don't eyeball footing placement: measure twice from your layout lines because errors here multiply through the whole build.
Materials and Build Options
Patio surface materials
Concrete pavers are the most DIY-friendly patio surface. They're uniform in size, easy to cut with a wet saw or angle grinder, forgiving to lay, and simple to replace if one cracks or sinks. They come in a huge range of colors and patterns, and a quality paver patio can last 30 to 50 years with minimal maintenance. Expect to pay $3 to $8 per square foot for the pavers themselves, more for premium or large-format styles.
Poured concrete is cheaper per square foot ($4 to $7 for materials if you mix and pour yourself, though most homeowners hire this out) and gives a clean, seamless look. The trade-off is that cracks are permanent and hard to repair invisibly. It also requires more skill to pour and finish properly, and in freeze-thaw climates it's more prone to damage than pavers. Stamped or colored concrete adds appeal but adds complexity.
Gravel or decomposed granite is the cheapest and fastest option at $1 to $3 per square foot. It drains perfectly, is easy to install, and can look great in casual or naturalistic designs. The downsides: it shifts under furniture, tracks into the house, and needs occasional raking and top-dressing. It's a good choice for budget-constrained projects or as a temporary solution.
Flagstone and natural stone are beautiful but expensive ($15 to $30 per square foot installed) and harder to lay because each piece is irregular. If you love the look and have the budget, it's a great long-term investment, but it's not the easiest first project.
Deck framing and surface materials
Pressure-treated (PT) lumber is the standard and most affordable choice for deck framing and decking boards. It resists rot and insects and costs roughly $2 to $4 per linear foot for 5/4x6 decking boards. The trade-offs are that it needs annual sealing or staining, it can warp and splinter over time, and it has a utilitarian look until you stain it. Cedar and redwood are naturally rot-resistant, look better unfinished, and cost more ($4 to $7 per linear foot). All wood decks require ongoing maintenance.
Composite decking (brands like Trex, TimberTech, and Fiberon) is made from wood fiber and plastic. It costs significantly more upfront ($5 to $15 per linear foot for boards alone) but requires far less maintenance: no annual sealing, no splinters, and most brands carry 25-year fade and stain warranties. If you're building once and want low upkeep, composite is worth the premium. The framing underneath still needs to be PT lumber or steel, so it's not a total escape from wood.
Step-by-Step DIY Build Workflow
For a paver patio
- Mark the perimeter with stakes and string. Confirm dimensions, check for square using the 3-4-5 triangle method (measure 3 feet on one side, 4 feet on an adjacent side, and confirm the diagonal is 5 feet), and spray paint the outline.
- Call 811 and wait for utility marking before digging.
- Excavate the area to the required depth (typically 7 to 9 inches for a standard paver patio: 4-6 inch base, 1-inch sand, plus paver thickness). Remove all vegetation and roots.
- Check and adjust grade so the base slopes away from the house at roughly 1/8 inch per foot.
- Add and compact the granular aggregate base in 2 to 3-inch lifts. Use a rented plate compactor and check for firmness by pressing your heel into it — a well-compacted base won't give.
- Set screed rails at the correct height and spread 1 inch of coarse bedding sand. Screed it level and smooth. Do not walk on or disturb the screeded sand.
- Lay pavers starting from a corner or straight edge, working outward in your chosen pattern. Maintain consistent joint gaps using spacers if needed. Tap each paver in with a rubber mallet.
- Cut border pavers using a wet saw or angle grinder with a diamond blade. Install plastic or metal edging to lock the perimeter and prevent spreading.
- Spread polymeric sand over the surface, sweep it into joints, compact lightly, and wet with a gentle spray to activate the binder. Repeat if joints settle.
For a ground-level wood or composite deck
- Pull your permit and review the approved drawings before starting any work.
- Lay out the deck perimeter with batter boards and string lines. Locate footing centers precisely using the string lines and mark with stakes.
- Dig footing holes to the required depth (below frost line). Use a clamshell digger or rented power auger. Pour concrete tube forms, set post anchors, and let cure for 48 hours.
- Set and plumb posts. If attaching to the house, install the ledger board first using lag screws into the house rim joist with flashing above to prevent water intrusion.
- Install the beam across the posts, then hang joists using joist hangers spaced to spec (commonly 16 inches on center for 5/4 decking, 12 inches for composite). Nail or screw blocking between joists at midspan for long runs.
- Lay decking boards perpendicular to joists, leaving a 1/8-inch gap between boards for drainage. Fasten with deck screws or hidden fasteners per the composite manufacturer's instructions. Leave a 1/2-inch gap at the house wall.
- Cut the free end of decking boards to a clean, straight line using a chalk line and circular saw after all boards are down. This is faster and cleaner than cutting each board individually.
- Build stairs using a rise of 7 to 7.75 inches and a run of 10 to 11 inches. Cut stringers from 2x12 PT lumber, attach to the deck with hanger hardware, and cap with matching decking boards.
- Install railings at the required height (typically 36 inches for decks under 30 inches high, 42 inches above that). Balusters must have no more than 4-inch gaps. This is a common inspection failure point.
- Schedule the framing inspection before decking if required, and a final inspection after completion.
Common pitfalls at every stage
- Not checking for square before you start laying: a patio or deck that's slightly out of square will cause every row of material to drift, and fixing it late is expensive.
- Underestimating excavation: most people dig too shallow. Measure the required depth before digging, not after.
- Skipping the plate compactor: hand tamping a base layer is not adequate for long-term stability.
- Using the wrong fasteners: deck screws must be rated for exterior/ACQ pressure-treated lumber. Regular screws corrode and fail.
- Installing the ledger without proper flashing: water infiltration behind a ledger board causes rot inside the house wall, not just deck failure.
- Leaving out proper drainage planning: blocking natural runoff paths leads to water pooling under or around the structure.
Realistic Costs and How to Stay on Budget
DIY saves the labor portion of a professionally installed project, which typically runs 50 to 60% of total project cost. For a 200 sq ft paver patio, a professional might charge $4,000 to $8,000 installed. Doing it yourself, you're looking at $1,000 to $2,500 in materials depending on paver type, plus $100 to $200 in tool rentals. For a 200 sq ft pressure-treated wood deck, professional installation might run $6,000 to $12,000. DIY materials land around $2,500 to $4,500 depending on framing lumber costs and whether you add stairs and railings.
| Item | Patio (200 sq ft) | PT Wood Deck (200 sq ft) |
|---|---|---|
| Surface material | $600–$1,600 (pavers) | $400–$800 (5/4x6 PT boards) |
| Base/framing materials | $200–$400 (gravel, sand) | $800–$1,500 (posts, joists, beams, hardware) |
| Concrete/footings | Not needed | $200–$400 |
| Edging/fasteners/misc | $100–$200 | $150–$300 |
| Tool rentals | $100–$200 | $100–$200 |
| Permit | Often not required | $100–$500 |
| Stairs + railings | N/A | $400–$1,200 |
| Total DIY estimate | $1,000–$2,500 | $2,500–$5,000 |
Lumber prices in 2025 and 2026 have remained elevated compared to pre-2020 levels, so build your budget with current prices from your local supplier or big-box store rather than older online estimates. If you’re comparing contractor options, big home improvement retailers can vary, so it’s smart to confirm whether they offer patio installation services in your area does home depot do patio installation. Always add a 10 to 15% material overage to account for cuts, breakage, and mistakes. Budget line items that surprise first-timers most often: concrete disposal (renting a dumpster or hauling excavated material can run $150 to $400), the cost of a quality circular saw or wet saw if you don't own one, and any site drainage fixes you discover once you start digging.
A few smart ways to manage costs: buy pavers or decking in bulk or during end-of-season sales (late summer and fall often see discounts at home improvement stores); consider a gravel base patio as Phase 1 and add pavers on top later; use PT lumber for framing even on composite deck builds to keep the structural cost down; and rent rather than buy specialty tools like plate compactors and post hole augers. For example, you can compare DIY patio materials and project guides at Home Depot before you buy everything you need home depot do it yourself patio.
If you're planning to add features like a pergola, patio cover, or enclosure over your finished deck or patio, factor that into your base design from the start. A covered patio plan is easiest when you plan the support posts and load paths before you pour or set the patio base covered patio plans do it yourself. Structural post placement and load paths are much easier to plan in at the beginning than retrofit later. Related projects like DIY patio enclosure kits and covered patio plans build on what you're creating here, and doing the foundation work right the first time makes those additions much simpler down the road.
Finishing Details, Safety, and Keeping It in Good Shape
Deck safety requirements
Railing height and baluster spacing are code requirements, not suggestions. A deck 30 inches or more above grade needs guardrails at least 36 to 42 inches high (check your local code for the exact threshold). Balusters must be spaced so a 4-inch sphere can't pass through, this is the standard test inspectors use. Stair handrails must be graspable, meaning a round profile or a shape you can actually wrap your hand around, and they must run the full length of the stairs. Post connections are a structural item: use proper post-to-beam hardware rated for the load, and don't rely on toe-nailing alone.
Patio slip resistance and edging
Smooth concrete can be dangerously slippery when wet. If you're pouring concrete, add a broom finish (dragging a stiff brush across the wet surface) for texture. For pavers, choose a surface profile with some texture, especially around steps or near a pool. Metal or plastic paver edging isn't just decorative: it physically locks the perimeter pavers in place and prevents the whole field from spreading outward over time. Install it before your final polymeric sand sweep and stake it firmly every 12 inches.
Ongoing maintenance by material
| Material | Annual Maintenance | Key Long-Term Issues |
|---|---|---|
| Pressure-treated wood deck | Clean, seal or stain every 1–3 years | Checking, splitting, graying without treatment |
| Composite decking | Clean 1–2x per year with soap and water | Fading (warranty-covered on quality brands), mold in shaded areas |
| Concrete patio | Reseal every 2–3 years | Cracking, especially in freeze-thaw climates |
| Paver patio | Refresh polymeric sand every 3–5 years, reseal if desired | Settling over time, weeds in joints without polymeric sand |
| Gravel patio | Rake and top-dress annually | Migration, compaction, weed pressure |
For wood decks, the single most impactful maintenance habit is keeping the surface clean and dry. Leaves and debris that stay wet for days are the beginning of rot. Inspect the ledger board connection and any post bases annually since these are the first places water damage shows up. Tighten any loose fasteners, check railing posts for wobble (this is a safety issue, not just cosmetic), and re-stain before the wood starts to gray and check rather than waiting until it looks bad.
For paver patios, the main long-term issue is joint sand erosion, which lets weeds establish and pavers shift. Polymeric sand significantly reduces this, but it still needs refreshing every few years. If individual pavers settle, the fix is simple: pop them out, add or remove bedding sand, and reset them. That's one of the best things about pavers as a DIY material, you can always go back and correct problems without tearing out the whole surface.
Both decks and patios are long-term investments that reward you more when you build them right the first time. Take the extra day on base prep. Pull the permit. Don't skip the drainage slope. The projects that hold up and add real value to a home are almost always the ones where the unsexy foundational work was done carefully, even when no one was watching.
FAQ
How do I decide between do it yourself decks and patios when my yard is “kind of” sloped? (Not clearly flat or clearly steep)?
If you are unsure, default to a patio when the ground is reasonably level and you can get good drainage away from the house. Choose a deck when you need to clear a slope, create a step-free entrance, or you want an elevated eating or lounge area. A quick tie-breaker is whether you can set the surface about 1% higher than the soil line near the foundation and still keep water moving away without pooling.
What is the easiest way to handle small grade changes with do it yourself decks and patios?
Plan for a dry, level “landing” at the house door, then measure the drop or rise across the build area. For decks, the frame can transition height with stairs or deck height steps, but it adds framing complexity. For patios, uneven ground usually means more grading and a consistent base thickness, which can still be DIY-friendly but requires careful leveling and a long screed setup.
Can I start with a patio and later add a roof or enclosure over it?
Yes, but the decision changes the difficulty. Over a protected area, a patio often stays permit-light if it is truly ground-level, but any roof structure becomes a structural project with its own requirements for post footings and load paths. If you are considering a patio cover or enclosure, plan support post locations before you build the patio base so you do not have to core-drill or retrofit later.
Do I always need a permit for do it yourself decks and patios, even if it is small?
For decks, confirm your elevation, because many local rules trigger guardrails and sometimes permitting based on height above grade. For patios, check if you are within setback distances, near a fence line, or in an HOA. Even if the surface does not need a permit, the moment you add stairs, retaining elements, or a roof/cover, the permitting scope may expand.
What are the biggest “DIY traps” that cause decks to fail faster than expected?
Do not skip footings or the post connection details just because you are building “only” a small deck. A common failure is shallow or mislocated footings that heave or tilt, causing deck wobble and cracked boards. If you cannot measure and place posts precisely, prioritize a patio where your biggest structural work is compacted base prep rather than frost-depth construction.
How do I know whether my site work is good enough for do it yourself decks and patios?
Base prep is the priority for both, but it shows up differently. For patios, poor compaction or wrong sand layers leads to settling and uneven pavers. For decks, poor grade under the frame can lead to water pooling near footings, accelerating rot at ledgers and weakening soil around supports. If you see standing water after rain, fix drainage first, regardless of deck or patio choice.
What are practical steps to avoid uneven pavers or a wavy patio surface?
For pavers, aim for the right drainage grade before you lay any bedding sand. Then use a plate compactor for the base in lifts, and verify level with a straightedge after the bedding sand is in place. A helpful check is to do a quick “dry lay” of a small section of pavers so you can confirm joint width and pattern alignment before you commit to the full field.
What should I pay attention to at the house connection for a deck, and at the house edge for a patio?
If your deck is attached to the house, plan a ledger connection that allows proper flashing and prevents water from entering behind the ledger. Water management at that connection is one of the most common causes of premature wood deterioration. For patios, ensure the slope goes away from the foundation and add edging so the perimeter does not spread and create low spots where water collects.
What should I do if I discover underground utilities or wiring during excavation?
Yes, but do not treat it as a cosmetic fix. If you suspect utilities, stop and verify marking accuracy after you call 811, and re-check the location with exposed test holes if needed. For water and frost protection, even a patio can be impacted if you accidentally create a trench that redirects water to the foundation, so drainage planning matters as much as utility avoidance.
Is it smart to phase the project, like doing base prep now and surface later, for do it yourself decks and patios?
If budget forces a phased approach, a great method is to build the well-prepped base first and keep it protected, then install the final paver surface later. For decks, phasing is riskier because you still need correct footing depth, framing alignment, and safety rail planning at the time you build. If you must phase, phase the surface material first, not the structural footings.
Is composite decking truly lower maintenance than pressure-treated boards for a DIY deck?
Composite reduces maintenance on the top surface, but it can still get hot in direct sun and can look different over time depending on the product line. Also, framing still typically needs pressure-treated lumber or steel, so you should budget for those structural components. If low maintenance is the goal, composite for deck boards can be worth it, but do not assume “no maintenance ever.”
What should I know before choosing poured concrete for do it yourself patios?
If you choose poured concrete for a patio, you need an intentional plan for control joints and curing. Cracks are expected, but where and how they crack is what you control. For freeze-thaw climates, proper joint layout and finishing timing are critical, so if you have never poured before, pavers are usually a safer DIY outcome.
Next Article
Covered Patio Plans DIY: Build Steps, Costs, Codes
DIY covered patio plans with steps, costs, permits, codes, and tips on posts, roofing, drainage, and longevity.