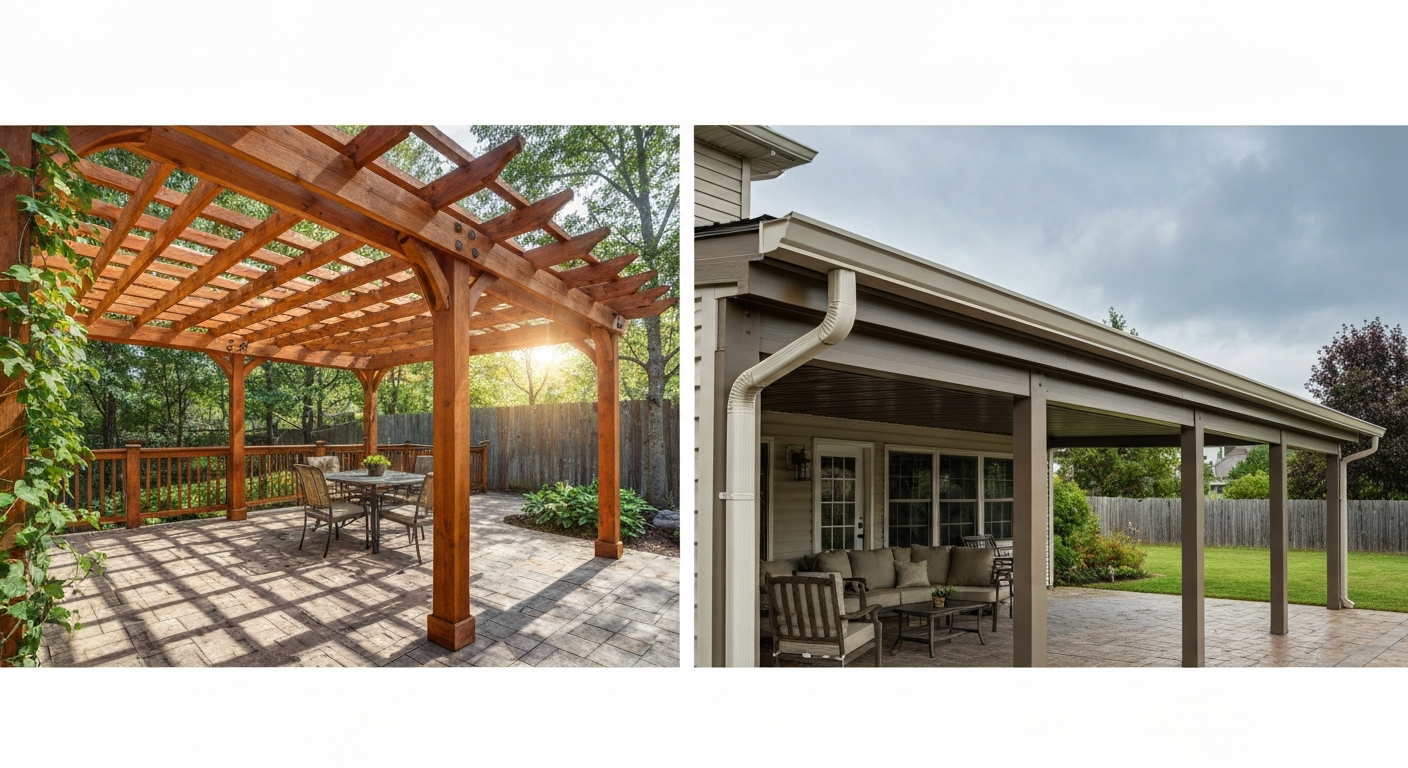
You can absolutely build a pergola on top of an existing patio, and for most homeowners it is the single most practical way to add shade, structure, and visual weight to a plain concrete or paver surface without tearing anything out. The key questions are whether your slab or base can handle the post loads, how you anchor the posts, whether your local building department requires a permit (almost always yes if it is attached to the house), and whether a pergola actually gives you what you want or whether a solid patio cover, a louvered roof, or an awning would serve you better. This guide works through all of that.
Pergola on Top of Patio: Costs, Build Tips & Comparisons

Miles Hart
8 Aug 2026
Who this guide is for and what you will decide
If you have a patio and you are trying to figure out what kind of overhead structure belongs on it, you are in the right place. This article is written for homeowners who are weighing a pergola against a patio cover, a louvered roof, an awning, or just leaving the patio open. By the time you finish reading, you will know the difference between those options, have a realistic sense of what each costs, understand what is involved in anchoring a pergola to an existing patio slab, know what your building department will likely want from you, and have a checklist to run through before you buy anything or hire anyone. For a focused comparison, see our guide on the difference between pergola and patio cover.
What is a pergola?
A pergola is an outdoor structure built from vertical posts that support an open or slatted overhead framework. The defining characteristic is that the roof is not solid: it lets light, air, and to varying degrees rain pass through. The overhead portion is usually made from parallel rafters, crossbeams, or lattice, and the openings between them provide dappled shade rather than full shelter. That distinction matters more than you might think when you are comparing options.
Pergolas come in several common forms. A freestanding pergola stands entirely on its own posts with no connection to the house. An attached pergola, sometimes called a shade sail structure or a lean-to pergola, connects to the house at one end via a ledger board and needs only two or three ground posts at the outer edge. A kit pergola is a pre-engineered system (typically aluminum or cedar) that arrives flat-packed with hardware included. A louvered pergola replaces fixed slats with motorized, adjustable louvers that rotate to block sun or rain on demand, which puts it in a category of its own when it comes to cost and permitting.
What is a patio cover or covered patio?
A patio cover is a roofed structure that sits over a patio and provides actual weather protection. The roof material is solid or nearly solid: corrugated polycarbonate panels, solid aluminum, wood decking, or a full shingle or standing-seam metal roof. Because rain cannot pass through, a patio cover turns your patio into a usable outdoor room in wet weather, which a standard pergola simply cannot do. The trade-off is that a solid roof blocks more light, costs more to permit and engineer (especially when attached to the house), and can feel heavier and more enclosed.
The term "covered patio" is often used interchangeably with "patio cover," and retailers including Home Depot market pergolas, patio covers, and pavilions as separate product lines while acknowledging that the terminology bleeds together in common use. For clarity throughout this article: pergola means open or slatted overhead structure; patio cover means a structure with a solid or semi-solid roof; and covered patio means the patio area itself once it sits beneath a patio cover.
Pergola vs patio cover: how they actually compare
The right choice depends on what bothers you most about your current patio. If the problem is harsh afternoon sun but you still want an open, airy feel, a pergola usually wins. If the problem is that you cannot use the patio at all when it drizzles or when Texas sun is at full intensity, a solid patio cover or louvered system is more honest about what you actually need.
| Feature | Standard Pergola | Solid Patio Cover | Louvered Pergola |
|---|---|---|---|
| Rain protection | None (open slats) | Full (solid roof) | Adjustable (closes to shed rain) |
| Shade level | Partial, dappled | Full, constant | Fully adjustable |
| Light penetration | High | Low to none | Fully adjustable |
| Typical installed cost (national avg.) | $1,900–$6,500 | $3,000–$15,000+ | $8,000–$30,000+ |
| Permit likelihood (attached) | Usually required | Almost always required | Always required |
| Engineering/PE stamp needed | Often not (freestanding) | Usually yes (attached) | Yes (structural + electrical) |
| DIY-friendly | Yes (kit systems) | Moderate (depends on roof type) | No (manufacturer/dealer install) |
| Maintenance | Moderate (wood) to low (aluminum) | Low to moderate | Low (aluminum frames) |
| Home value impact | Moderate positive | Moderate to strong positive | Strong positive |
Cost ranges above are national averages drawn from Fixr and HomeAdvisor/Angi data; your real number will vary with size, material, site complexity, and your region. A 12x16 cedar pergola kit installed by a local contractor in the Midwest might land at $4,000–$6,000 all-in. A louvered aluminum system from a dealer network like StruXure or Equinox over the same footprint commonly runs $15,000–$25,000 installed once you add electrical for the motors. Always get at least two local quotes before committing.
Pergola pros and best-use scenarios
- Open, airy aesthetic that does not make a small patio feel enclosed
- Lower cost entry point vs. engineered patio covers
- Wide material and style range: pressure-treated pine, cedar, aluminum, vinyl
- Kit systems make DIY realistic for homeowners with basic carpentry skills
- Climbing plants (wisteria, jasmine, grape) integrate naturally for added shade over time
- Freestanding versions rarely need a permit in many jurisdictions (confirm locally)
- Works well when you want visual definition without committing to a full room enclosure
Pergola cons to plan around
- Provides no meaningful rain protection in its standard form
- Wood versions require sealing or staining every 2–3 years
- Lateral stability requires bracing, moment post bases, or attachment to the house
- An attached pergola usually triggers a building permit
- Adding shade fabric, polycarbonate panels, or a solid roof retroactively changes the structure's load and may require a permit amendment
Patio cover pros and best-use scenarios
- Genuine all-weather protection turns a patio into a usable room year-round
- Solid aluminum or polycarbonate covers are low-maintenance and long-lasting
- Better return on investment when the covered space is used frequently
- Integrates cleanly with outdoor kitchens, ceiling fans, heaters, and lighting
- Polycarbonate panels retain some natural light while blocking rain
Patio cover cons to plan around
- Higher cost, especially for engineered attached systems
- Attached covers almost always require a permit, structural drawings, and inspections
- Solid roofs can darken the adjacent interior if they block window light
- Flashing and drainage at the house connection are critical; done wrong, they cause water intrusion
- Less design flexibility than a pergola if you later want to convert or remove the structure
Other covered outdoor options worth knowing
A pergola and a patio cover are not the only options. Depending on your budget, your lot, and how you use your outdoor space, one of these alternatives might fit better.
Roofed porch
A roofed porch is a permanent, covered outdoor living area that is typically part of the original house structure or added as a major renovation. It has a full roof tied into the home's roofline, finished flooring, and in many cases screened or glass walls. It offers the most weather protection of any outdoor option and adds the most square footage to the functional home, but it also has the highest cost (commonly $15,000–$50,000+) and the most complex permitting process.
Retractable awning
A retractable awning mounts to the house wall and extends over the patio on demand. It provides good shade and limited rain protection when extended, retracts out of the way when not needed, and generally does not require a building permit (though check locally). Installed cost typically runs $1,500–$4,500 for a motorized version. The trade-off is shorter lifespan on the fabric (5–10 years), vulnerability to high winds, and the fact that it adds nothing structural or visual to the patio when retracted.
Louvered roof system
A louvered roof is essentially a premium pergola with motorized aluminum slats that rotate from fully open to fully closed. Closed, it sheds rain like a solid roof. Open, it feels like a pergola. Brands like StruXure publish ICC Evaluation Service Reports (ESRs) for some models, which simplifies permit submittal. Motorized systems require an electrical permit and must comply with NEC 2023 requirements for outdoor circuits and GFCI protection. Installed cost for a quality louvered system typically runs $8,000–$30,000 or more depending on size and features.
Gazebo
A gazebo is a freestanding roofed structure, often octagonal or round, with open or screened sides. It is typically placed away from the house as a destination point in the yard rather than over an existing patio. Landscape industry glossaries (including Landscaping Network) distinguish gazebos from pergolas specifically on the basis that gazebos have solid roofs and are fully freestanding. See Landscaping Network, Garden Structure Definitions (pergola, patio cover, gazebo) for industry glossary distinctions that define pergolas, patio covers, and gazebos Landscaping Network — Garden Structure Definitions (pergola, patio cover, gazebo). Installed cost ranges widely from $3,000 for a basic kit to $15,000+ for a custom-built structure.
Can a pergola be built on an existing patio?
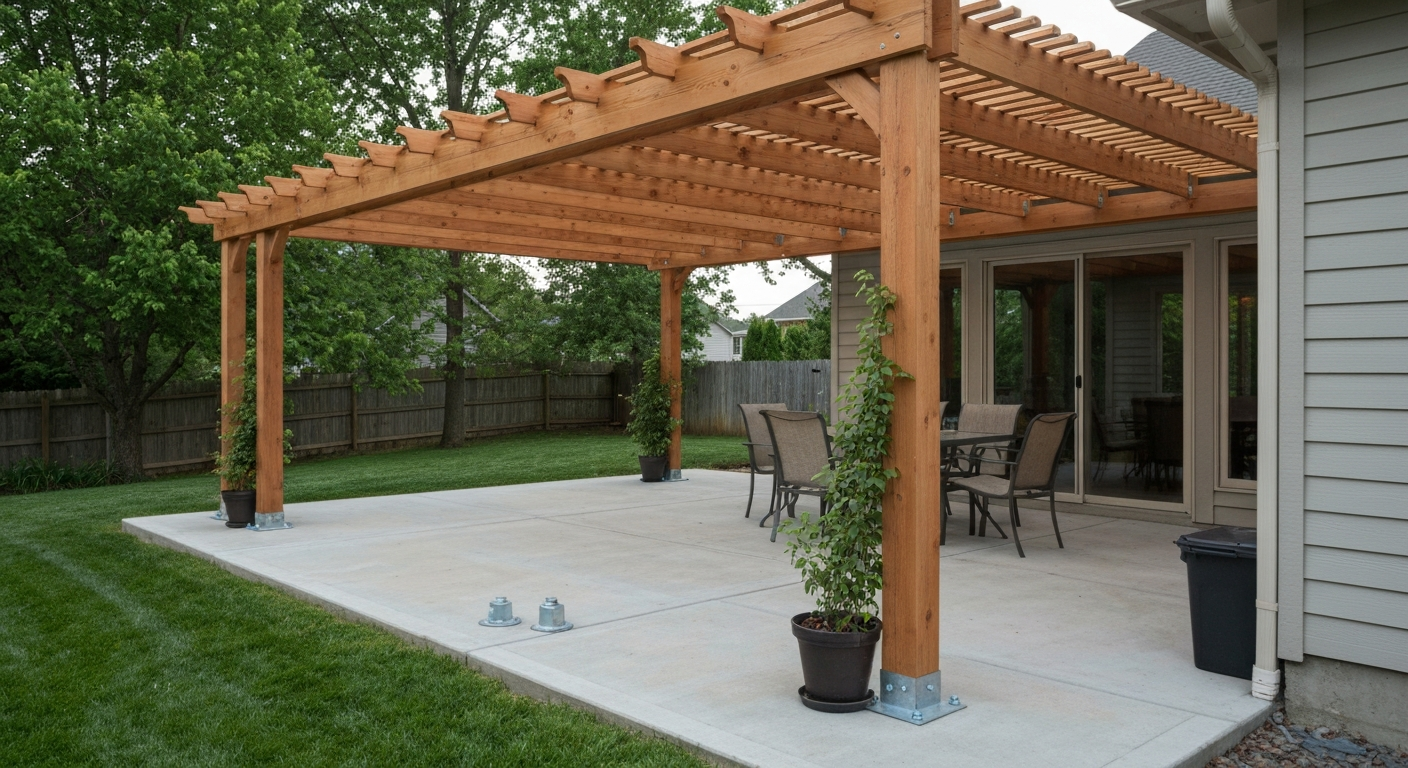
Yes, in most cases, but the honest answer requires a few qualifications. Building a pergola on top of an existing concrete patio or paver surface is one of the most common retrofit projects in residential landscaping, and it works well when the approach to post anchoring, load distribution, and drainage is handled correctly. Where homeowners run into trouble is assuming the existing slab is automatically sufficient or skipping the anchoring details.
Structural support and post loads
A pergola transfers its dead load (the weight of the structure itself) and live loads (wind, accumulated snow in cold climates, climbing plants, any shade fabric or panels) down through its posts into the ground. The critical question is whether your existing slab can transfer those loads or whether you need new isolated footings. The 2024 International Residential Code, Chapter 4: Foundations specifies minimum footing widths and thicknesses and frost-protection requirements, including that footings extend below the local frost line or be insulated to code 2024 International Residential Code — Chapter 4: Foundations. A typical residential concrete patio slab is 3.5–4 inches thick and is not designed as a structural foundation. For a lightweight aluminum pergola kit with modest wind exposure, post anchoring into an existing slab using properly specified adhesive anchors is often acceptable. For heavier wood pergolas, attached structures, or sites with high wind or snow loads, engineers and many building departments will require new isolated footings dug below the frost line, even if that means cutting through the existing slab.
Anchoring options for an existing slab
There are three practical ways to anchor pergola posts to an existing concrete patio. Each has its place depending on load levels and site conditions.
- Adhesive (chemical) anchors drilled into the existing slab: Products like Hilti HIT-HY or SET-3G systems allow you to core-drill or hammer-drill holes, clean them to manufacturer specification (including specific roughening procedures for diamond-cored holes), inject adhesive, and set threaded rod that ties to a post base. Hilti's technical documentation is explicit that hole cleaning and embedment depth must be followed precisely for the rated load to apply. This method works for lighter loads and must be verified against the required uplift and lateral capacities by an engineer or the manufacturer's load tables.
- New isolated footings poured adjacent to or through the existing slab: For heavier pergolas, frost-climate installations, or any attached structure, this is often the right call. IRC Chapter 4 requires footings to extend below the frost line (depth varies by region, from 12 inches in Phoenix to 42–48 inches in northern states) or to be insulated to code. The City of Phoenix's residential patio cover guideline, for example, specifies minimum footing embedment of 12 inches below undisturbed ground as a baseline. You core-cut through the existing slab, dig to the required depth, pour a new footing, and set a post base in wet concrete.
- Retrofit moment post bases (such as Simpson Strong-Tie MPBZ): Standard post bases provide vertical and shear resistance but do not resist rotation, which matters for freestanding pergolas that rely on post rigidity rather than triangulated bracing or a tie-in to the house. Simpson's technical guidance notes that standard post bases are not moment-resistant and recommends moment post bases or supplemental bracing for unbraced freestanding installations. MPBZ-style bases can be used with adhesive anchors into existing slabs but still require proper embedment and load verification.
Load considerations: wind, snow, and added features
ASCE 7 is the engineering standard used to determine wind and snow loads for structures like pergolas and patio covers. Your designer or engineer will reference ASCE 7 load maps for your specific location to size posts, beams, and connections. In practice, this matters most if you are in a high-wind zone (coastal Southeast, Plains states), a high-snow zone (Northeast, Mountain West), or if you plan to add anything to the pergola after installation: shade fabric, polycarbonate roofing panels, climbing plants with significant mass, or a heater. Each addition increases dead and live loads. If a manufacturer's span table was used to design a bare pergola and you later add a solid roof, the original calculations may no longer be valid.
Drainage: where most patio pergolas go wrong
Existing patios are sloped for drainage, typically 1/8 to 1/4 inch per foot away from the house. When you anchor posts and pour new footings in or adjacent to the slab, you can inadvertently dam that drainage path or create low spots where water pools around post bases. Post bases should sit on small concrete pads that are at or slightly above the surrounding slab grade, and the area around the footing cutout should be patched and sealed. For attached pergolas that connect to the house, proper flashing at the ledger connection is non-negotiable. The IRC and Florida Residential Code both require membrane flashings at roof-to-wall intersections, and manufacturer flashing details must be followed to prevent moisture intrusion, which is especially critical if your patio sits adjacent to a foundation or basement.
Site assessment checklist before you add a pergola to a patio
Walk through these items before you purchase anything or hire anyone. Surprises found here are much cheaper than surprises found mid-project.
Surface and slab condition
- Confirm slab thickness: chip a small edge or check original construction records; most residential patios are 3.5–4 inches, which limits adhesive anchor embedment depth
- Check for existing cracks, heaving, or settled sections; significant structural issues in the slab should be addressed before adding post loads
- Identify existing control joints and avoid anchoring directly into them
- For paver patios: determine whether pavers sit on a sand/gravel base or a concrete sub-base, as posts anchored only into sand are not structurally reliable and will require new footings
Soil and frost conditions
- Identify your local frost depth (available from your building department or NOAA frost depth maps); footings in frost-prone areas must extend below this depth
- Check for expansive soils (clay-heavy soils that swell when wet); these may require deeper or wider footings than IRC minimums
- Look for signs of soil erosion or settlement at the perimeter of the existing slab
- Confirm the soil type near the patio edge if new footings will be poured outside the slab boundary
Slope and drainage
- Measure the existing patio slope with a 4-foot level; confirm water drains away from the house
- Identify where water currently exits the patio and ensure post placement does not block that path
- Plan footing patches to match or slightly exceed surrounding grade to prevent pooling at post bases
- For attached pergolas: map the house wall flashing and gutter locations to ensure the ledger attachment does not interfere with existing drainage
Utilities
- Call 811 (the national Dig Safe line) before any footing excavation, even shallow cuts through an existing slab; underground electric, gas, and irrigation lines are common near patios
- Identify any in-slab conduit or radiant heating tubes before core-drilling anchor holes
- Note the location of exterior outlets and hose bibs; pergola posts should not block access to service points
- If you plan to add lighting, ceiling fans, or a motorized louvered system, identify the nearest electrical panel capacity and plan for a licensed electrician and electrical permit
Permits, inspections, and local codes: what to check and bring
This is the section most homeowners skip and later regret. Permit requirements for pergolas and patio covers vary significantly by jurisdiction, but the general rule is: if it is attached to the house, expect a permit. If it is freestanding but above a certain size threshold (commonly 200 square feet in many jurisdictions), also expect a permit. IRC Section R105 (Permits Required) is the model code provision that most local building departments use as their basis for requiring permits when constructing, enlarging, or altering a structure.
Common permit triggers
- Any pergola or patio cover attached to the house (ledger connection to a wall or roof)
- Freestanding structures exceeding the jurisdiction's exempt-structure size threshold (varies; often 120–200 sq ft)
- Any structure in a regulated setback, flood zone, or HOA-controlled area
- Any structure that includes electrical work (lighting, fans, motorized louvers, outdoor outlets)
- Adding a solid or semi-solid roof to an existing permitted pergola (this alters the original structure and typically requires a new or amended permit)
- Structures in coastal or high-wind zones that require engineered wind-resistance details
What your building department will typically want
The City of Phoenix's residential patio cover guideline (a good representative example) requires a plot plan showing the structure's location on the lot with setback dimensions, a cross-section drawing showing post size, beam size, rafter spacing, and roof framing, and a foundation plan showing footing dimensions and embedment depth. Los Angeles (LADBS) publishes information bulletins specifically for attached patio covers and requires plan submittal with structural details for permitted work. While your jurisdiction is not Phoenix or LA, these represent what most mid-to-large city building departments will want to see.
Inspection points to confirm with local authorities
- Footing inspection (before pouring concrete): inspector confirms hole depth, diameter, and reinforcement placement
- Framing inspection (before any cladding or roofing): inspector checks post connections, beam-to-post hardware, ledger attachment (for attached structures), and joist hangers
- Electrical rough-in inspection (if applicable): licensed electrician's work inspected before walls or ceilings are closed
- Final inspection: overall structural completion, electrical final (if applicable), and any required drainage or flashing details
What to bring to your building department appointment
- A to-scale plot plan of your property showing the house footprint, existing patio, proposed structure location, and all setback distances to property lines and easements
- A dimensioned drawing of the proposed structure (plan view and at least one cross-section) showing post sizes, beam sizes, rafter spacing, and overall height
- Foundation/footing detail showing depth, diameter, and any reinforcement
- Manufacturer's installation instructions and span tables if using a kit system (some jurisdictions accept these in lieu of custom engineering)
- Manufacturer's ICC Evaluation Service Report (ESR) if your product has one (louvered systems and some kit pergolas carry ESRs, which can expedite review)
- PE-stamped structural calculations if required by the jurisdiction or if your structure exceeds standard kit parameters
- Proof of HOA approval if applicable (some building departments require this before issuing a permit)
- Your property's legal description or APN (Assessor's Parcel Number) for the permit application
Zoning, setbacks, and load minimums to verify
- Confirm your zoning district's minimum setback for accessory structures (commonly 3–5 feet from side and rear property lines, but this varies widely)
- Check whether your lot has any recorded easements that overlay the proposed pergola location
- Ask the building department for the design wind speed and ground snow load for your specific address; these feed into ASCE 7 load calculations and must match what any engineer or manufacturer used to size the structure
- Ask whether your jurisdiction requires a PE-stamped structural letter for attached structures or structures above a certain size
- Confirm whether your jurisdiction's electrical inspector uses NEC 2023 or an earlier edition; this affects GFCI requirements for any outdoor circuits added with the project
Materials, design choices, and waterproofing
The material you choose for a pergola on top of a patio affects cost, maintenance, lifespan, and what you can do with the structure later. Here is a practical summary of the main options.
| Material | Typical Lifespan | Maintenance | DIY-Friendly | Best For |
|---|---|---|---|---|
| Pressure-treated pine | 15–25 years | Seal/stain every 2–3 years | Yes | Budget builds, paint-grade finish |
| Western red cedar | 20–30 years | Seal every 2–3 years | Yes | Natural look, good rot resistance |
| Redwood | 25–30+ years | Minimal if left natural | Yes | Premium natural wood, West Coast supply |
| Aluminum (powder-coated) | 30–50+ years | Very low (rinse occasionally) | Moderate (kit systems) | Low-maintenance, coastal climates |
| Vinyl/PVC | 20–30 years | Very low | Yes (kit systems) | No-paint look, humid climates |
| Steel (galvanized or powder-coated) | 30–50 years | Low (watch for scratches) | No (welded frames) | Modern industrial look, high load spans |
For waterproofing and shade, the most common retrofit additions to a pergola are polycarbonate roofing panels (which let diffused light through while shedding rain), shade sail cloth stretched across the open bays (shade only, minimal rain protection), outdoor fabric canopy panels that hang from the rafters, and full solid-roof conversion using corrugated metal or plywood sheathing with roofing. Be aware that adding a solid roof or waterproof panel system to an existing pergola changes the load on every connection in the structure and will almost certainly trigger a permit amendment in jurisdictions that permitted the original pergola. Discuss this with your building department before adding anything.
DIY vs hiring a pro
A freestanding aluminum or cedar kit pergola over an existing concrete patio is one of the more DIY-accessible outdoor projects. Most manufacturers publish clear installation instructions, the post bases and hardware are pre-engineered, and a two-person team with basic carpentry tools can complete a 10x12 or 12x16 kit in a long weekend. The skill requirements go up significantly for an attached pergola (ledger flashing is a moisture management detail that homeowners consistently underestimate), for any project requiring new footings in hard clay or rocky soil, and for anything involving electrical.
Hire a licensed contractor for: attached structures where the ledger connects to the house; any project requiring engineered footings or PE-stamped drawings; louvered or motorized systems (manufacturer dealer networks handle permitting and installation as part of the product); and all electrical work. NEC 2023 requirements for outdoor circuits and GFCI protection on 120V and 240V outdoor receptacles are not optional, and unlicensed electrical work voids insurance coverage and creates real safety hazards.
Typical timelines: a DIY kit pergola installs in 1–3 days. A contractor-built wood pergola with footings typically takes 3–7 days of active work spread over 2–3 weeks (waiting on permit, concrete cure time). A louvered system installation by a dealer typically takes 1–3 days of installation once the permit is in hand, but permit turnaround can add 2–8 weeks depending on your jurisdiction.
Maintenance, lifespan, and warranties
Wood pergolas need the most attention: plan on cleaning and reapplying a UV-blocking sealant or semi-transparent stain every two to three years, and inspect post bases annually for moisture accumulation or rot at the base. Aluminum kit and louvered systems are largely maintenance-free beyond occasional washing and a periodic check of hardware torque. Most reputable aluminum pergola manufacturers offer structural warranties of 10–25 years on the frame and 5–10 years on the powder-coat finish. Louvered system manufacturers (Equinox, StruXure, Hansø) typically offer similar frame warranties and separate motor/electronics warranties; read the fine print carefully and confirm that the dealer honor the manufacturer warranty directly.
Home value and ROI
Outdoor living investments generally return value, but the return is not uniform. A well-built, permitted pergola over a patio adds perceived value and can improve a home's marketability, especially in warm-climate markets where outdoor entertaining space is a priority. A louvered pergola or fully covered patio that is permitted and inspected is harder for an appraiser to discount because it genuinely extends the usable square footage of the outdoor space year-round. Unpermitted structures, however, often have to be disclosed in the sale and can complicate or reduce a transaction. The clearest financial advice here: whatever you build, pull the permit. The cost of the permit is modest compared to the complication of a flagged structure at resale.
Decision checklist and next steps
Use these questions to narrow down your choice before you start gathering quotes.
- Do you need rain protection or just shade? If rain protection matters, a pergola alone will not solve the problem. Look at louvered systems, solid patio covers, or a combination of a pergola with retractable shade/rain panels.
- Is your existing patio a concrete slab, a paver surface on sand, or something else? Paver-on-sand surfaces almost always require new isolated footings rather than slab anchoring.
- Is the structure attached to the house or freestanding? Attached structures carry more permitting complexity and moisture risk at the connection point.
- What is your frost depth? If you are in a cold climate, plan for footings at or below frost line regardless of what the slab looks like.
- What loads do you plan to add beyond the basic structure? Fans, heaters, shade fabric, a polycarbonate roof, climbing plants? Size the structure for its final intended use, not just its opening-day weight.
- What is your realistic budget? If you are under $5,000, a wood or aluminum kit pergola is your lane. If you are willing to spend $10,000–$30,000, louvered systems and engineered solid covers become options.
- Are you comfortable with permits and contractor coordination, or do you prefer a turnkey solution? Louvered system dealers handle permitting as part of the sale; standard kit pergolas put the permit work on you.
- Have you walked through the site assessment checklist above and confirmed that your slab, drainage, and utilities are compatible with the structure you want?
If you are still working through the difference between a pergola and a patio cover and want a deeper side-by-side comparison, the related topics on pergola vs covered patio and patio cover vs pergola on this site go further into those distinctions. If cost is your primary decision driver, the cost of pergola vs patio cover topic breaks down the numbers in more detail. For a detailed breakdown, see the cost of pergola vs patio cover. For a clear side-by-side comparison of features, trade-offs, and costs, see the pergola vs covered patio guide. And if the structural buildability question is your main concern, can a pergola be built on a patio covers the anchoring and foundation specifics at greater length.
FAQ
What are the essential topic areas the article must cover to be accurate and useful for homeowners comparing a "pergola on top of patio" to other covered‑outdoor options?
Cover clear definitions (pergola, patio cover/covered patio, pavilion, gazebo), direct comparisons (function, weather protection, aesthetics, typical costs, permit likelihood), whether a pergola can be added to an existing patio (anchoring options, slab/footing issues, load and drainage considerations), realistic cost ranges and ROI notes, materials and design choices (wood, aluminum, louvered, fabric, solid roofs), waterproofing/flashings and shade options, permit/inspection and code triggers, NEC/electrical for powered systems, manufacturer and anchor guidance, DIY vs pro guidance (timelines, tools, skill level), maintenance/lifespan/warranties, a short decision checklist and next steps, and suggested internal links (e.g., Patio vs Deck Comparison). Avoid unsupported claims and flag regional variability.
Which model codes and national standards should be cited for foundations, footings, permits and structural loads?
Cite the International Residential Code (IRC) — Chapter 1 (permits/administration, R105) and Chapter 4 (foundations/footings/frost protection) for permit triggers and footing minimums. Cite ASCE 7 for wind and snow load criteria used to size beams, rafters and louvered systems and to determine when a PE‑stamped calculation is required. For roof/house intersection and flashing guidance cite the applicable residential roof‑assembly chapter of the local adopted code (e.g., Florida Residential Code Chapter 9 or equivalent). These are the authoritative references for AHJs and engineers.
What city/municipal resources and examples are useful to demonstrate typical permit submittal requirements?
Use municipal guidance bulletins and residential patio‑cover handbooks as examples of typical submittal checklists and footing/embedding expectations. Useful examples: Los Angeles Department of Building and Safety homeowner bulletins (LADBS) and the City of Phoenix 'Residential Patio Covers' guideline (shows plot plan, cross‑section, roof framing and footing embedment). Recommend readers check their local building department website for specific forms, plan sheet requirements and valuation thresholds.
Which manufacturer and technical sources should be referenced for anchoring, post bases and anchors into existing slabs?
Reference Simpson Strong‑Tie technical catalogs for post bases, moment post bases (MPBZ) guidance and allowable connector loads. Reference Hilti (or equivalent) technical guidance for adhesive/chemical anchors, hole cleaning, embedment and installation workflow when anchoring into existing concrete slabs. Note that manufacturer load tables and connector limits must be matched to the project loads and local code requirements.
What engineering and retrofit anchoring options should be described (and what must readers be cautioned about)?
Describe three common retrofit anchoring options: 1) chemical/adhesive anchors to bolt post‑bases into existing slab (requires correct hole prep, embedment depth, engineer verification for uplift/lateral capacities); 2) pour new isolated footings adjacent to the slab sized per code/engineer (recommended for frost areas or higher loads); 3) use of moment post bases or braced/post‑bracing to resist lateral/rotational loads. Caution readers that allowable capacities depend on slab thickness, reinforcement, concrete condition, frost depth and local wind loads — an engineer or the product manufacturer must verify suitability and anchor sizing.
What electrical and powered‑system considerations and references should be included?
Cite the NEC (2023) guidance for outdoor GFCI requirements and wet‑location rules; note that motorized louvers, powered lighting, heaters and outlets require electrical permits, licensed electricians and compliance with NEC GFCI and wiring practices. Recommend checking local electrical permit/inspection requirements and including manufacturer electrical installation instructions.
Next Article
Cost of Pergola vs Patio Cover: Complete Homeowner Cost Guide
Compare pergola vs patio cover costs: material & labor ranges, per‑sq‑ft estimates, DIY vs pro, permits & ROI.