Both a Patio Roof Riser and a SkyLift are branded hardware systems designed to elevate an attached patio cover above a house's existing roof surface, but they work differently, suit different roof types, and carry different costs and installation complexity. If you need to raise your patio roof to gain headroom or add pitch for better drainage, either system can work, but choosing the wrong one for your roof type or skipping proper flashing will cause leaks and possibly void your homeowner's insurance. The short version: SkyLift is engineered for direct roof penetrations with pipe-jack flashing and comes with load-rated documentation for permits; Patio Roof Riser focuses on beam-mount hardware at the exterior wall and suits composition shingle and metal roofing best. Which one fits your project depends on your existing roof material, how much height you need, your budget, and whether you're pulling permits.
Patio Roof Riser vs Skylift: Cost, Drainage, and Fit Guide

What each system actually is
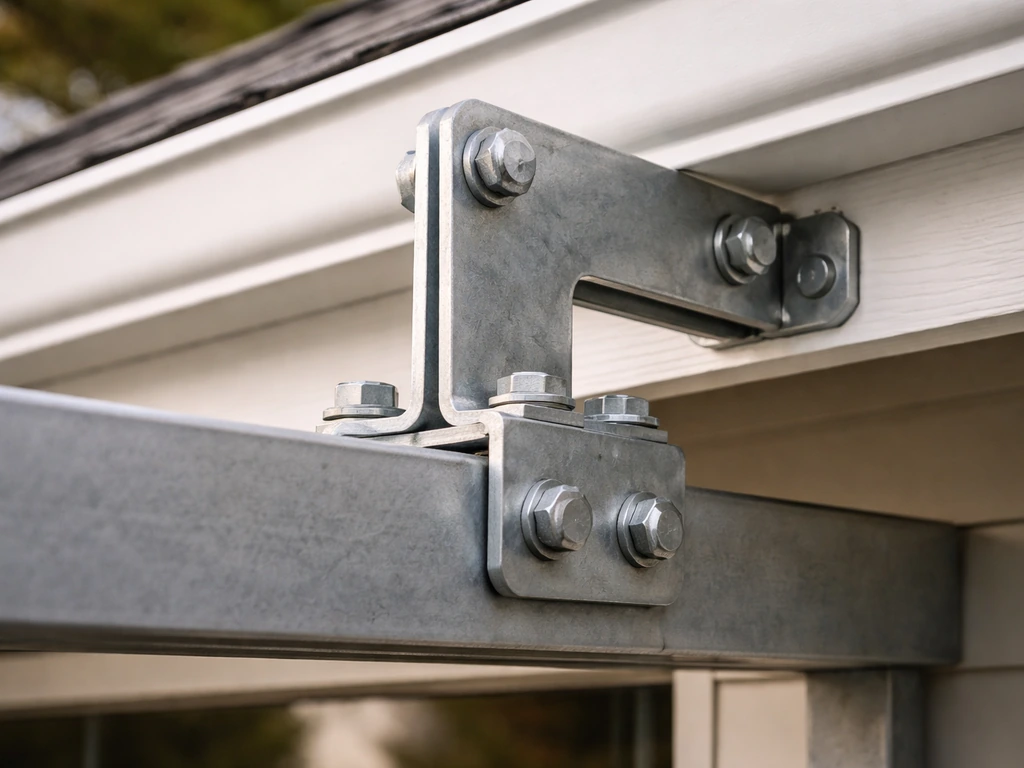
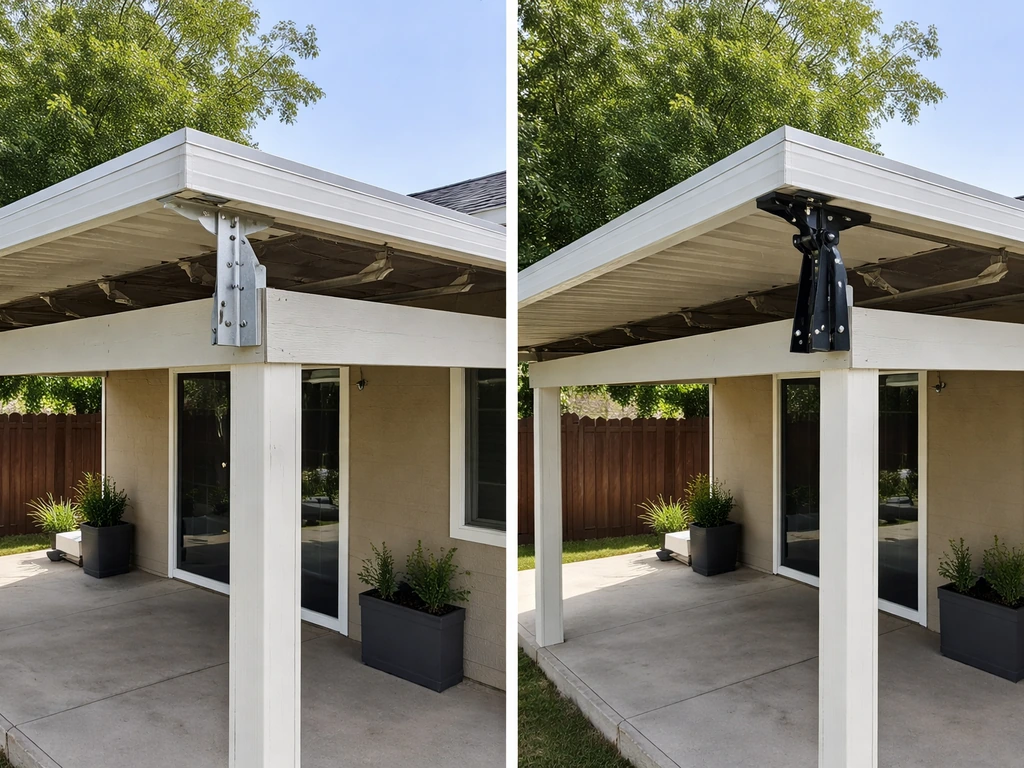
Patio Roof Riser is a branded hardware product line built around mounting brackets that connect your patio cover's beam to the house roof or wall. The flagship product for most attached patio covers is the LO-PRO beam-mount style, which attaches directly to the beam and lets you raise the attachment point above the existing roofline to add clearance or pitch. Every kit comes with all required hardware for basic installation, and the LO-PRO is sold at around $184.77 for the hardware alone. Recommended spacing is 4 feet on center. The system is designed to keep the roof tied into existing framing while creating height and slope adjustments at the attachment point rather than through structural surgery on the house.
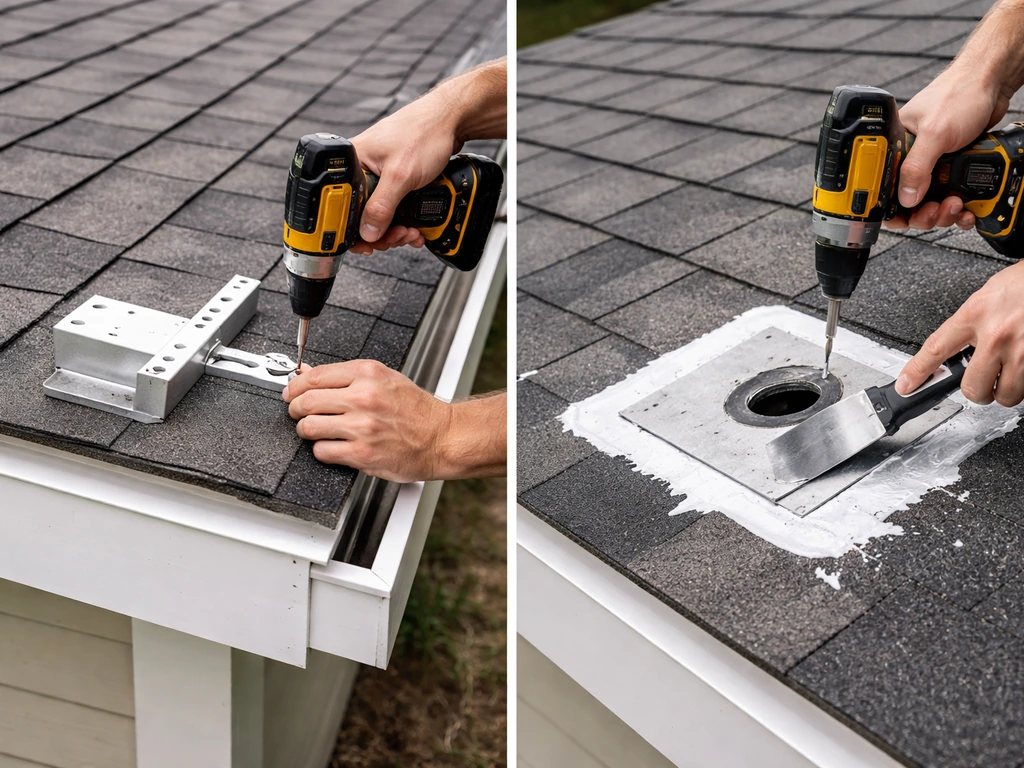
SkyLift is also a branded steel bracket and riser system, but its approach is different: the brackets penetrate the surface of the home's main roof so the patio cover rises well above it. Each SkyLift kit includes a one-piece base and riser, a detachable saddle, and specified fasteners. The sealing method is a standard pipe-jack waterproof flashing (SkyLift recommends their "Ultimate Flashing" silicone option or a standard vent flashing). SkyLift has a published maximum load limit of 1,750 lbs per riser and includes a Technical Evaluation Report (TER) with uplift and down-load values by model and configuration. That engineering documentation matters a lot if your building department wants stamped specs.
The key distinction: Patio Roof Riser works primarily at the exterior wall or beam connection point and avoids cutting through your roof surface in most configurations. SkyLift requires cutting access holes through your roofing material and sealing those penetrations correctly. Both systems can add height and pitch, but the penetration difference changes the DIY risk profile significantly.
How they change height, slope, and drainage
Raising your patio roof isn't just about clearance. The moment you change the attachment height, you also change the pitch, and pitch determines where rainwater goes. The industry standard minimum for low-slope roofing systems is 1/4 inch per foot (roughly a 1/4:12 slope) to achieve positive drainage and prevent ponding. A Roofing Contractor magazine drainage guide notes that positive roof slope is typically required around 1/4 inch per foot to 1/2 inch per foot depending on the roof system. Go below that and water will sit on the surface, accelerating material breakdown and increasing leak risk. Some codes require up to 1/2 inch per foot depending on the roofing system you're using.
Patio Roof Riser's post-mount style is specifically described in the brand's FAQ as allowing greater pitch for water runoff while maintaining headroom. The LO-PRO style keeps the profile lower but still creates a defined slope change at the beam. The tradeoff: more pitch helps drainage but reduces the headroom gain you get from the height increase. You have to decide which matters more. Because the hardware mounts at the beam rather than penetrating mid-roof, the drainage path from the patio cover can be directed away from the house more cleanly in many configurations.
SkyLift raises the entire attachment point above the home's roof surface by creating a post-like riser that your patio cover beam or rafter sits on. This approach can create a dramatic height change and lets you dial in pitch by selecting riser height. But because the risers penetrate the home's roof deck, water management at those penetrations is critical. If the pipe-jack flashing isn't lapped and sealed correctly, you've just created a funnel for water into your roof structure. SkyLift's installation instructions are explicit: do not leave penetrations without proper sealing and security. This isn't a suggestion; it's the single biggest failure point in the entire system.
Either system also shifts the structural load path. When you raise the patio cover attachment point, the new connection transfers lateral and vertical loads differently than the original ledger or wall connection did. This matters for framing sizing, anchor bolt selection, and how the existing roof structure handles the new geometry. If your existing patio cover framing is already undersized, adding height makes the lever arm longer and the loads worse. Check your framing before you order hardware.
Roof material compatibility: not all roofs work with both systems
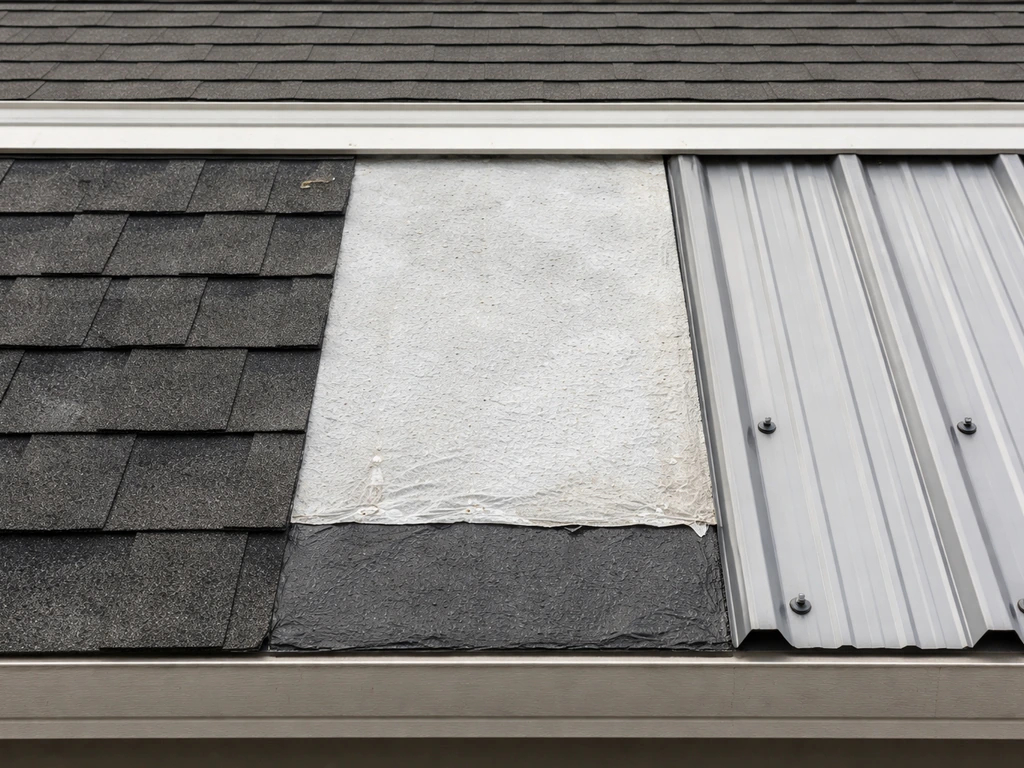
Patio Roof Riser is straightforward on this: composition shingles and metal roofing are the primary use cases. If you are planning patio ceilings, start by choosing the right compatible roofing materials for your patio cover system patio ceilings what materials. Corrugated metal roofs generally won't work without modification and additional flashing. Concrete or tile roofs are described as the brand's "arch nemesis" because you'd have to remove tiles and add custom flashing. If you have a tile or concrete roof, Patio Roof Riser will require significantly more labor and materials beyond the base kit.
SkyLift's penetration-based approach has similar compatibility concerns. Cutting a clean, sealed penetration through composition shingles is relatively manageable with standard pipe-jack flashing. Doing the same through tile, slate, or thick concrete roofing is much more involved and risks cracking surrounding material. Metal roofing with exposed fastener panels adds sealing complexity. If you have a tile or slate roof, get a roofer involved regardless of which system you're using.
Cost comparison: hardware, labor, and long-term upkeep
| Cost Factor | Patio Roof Riser | SkyLift |
|---|---|---|
| Hardware (per unit, basic kit) | ~$184.77 (LO-PRO) | Varies by riser height; bundled with saddle, fasteners, and flashing kit |
| Roof penetration work | Minimal to none in most configs | Required; adds pipe-jack flashing material and labor |
| Flashing and sealing materials | Lower; primarily at beam/wall | Higher; each riser penetration needs proper flashing |
| Labor (DIY-friendly?) | More accessible for experienced DIYers | Higher skill requirement; roof penetrations increase risk |
| Permit/engineering docs | Check locally; less common to require TER | TER available; permits more likely required due to roof penetrations |
| Total installed cost (typical range) | Part of broader patio roof project: $4,800–$15,000 | Similar range; penetration and framing work adds to labor cost |
| Long-term maintenance | Inspect beam connections annually | Inspect flashing at each penetration annually; reseal as needed |
The hardware cost alone doesn't tell the real story. Adding a roof over a patio typically runs $4,800 to $15,000 depending on materials, roof design, region, and labor rates. The riser hardware itself is a fraction of that. What drives cost is framing rework, roofing modifications, flashing, and any structural changes the new geometry requires. Labor in northern states can run 5% to 20% lower in the off-season, so if you're planning ahead, scheduling installation in late fall or winter can save real money. SkyLift's penetrations add a roofing labor line item that Patio Roof Riser typically avoids, which is why SkyLift projects tend to cost slightly more in total labor even if the hardware prices are comparable.
Long-term upkeep for both systems is mostly about flashing integrity. For SkyLift, each riser penetration is a potential leak point that needs annual inspection and occasional resealing, particularly after severe weather. Patio Roof Riser's beam-mount connections need annual checks for fastener tightness and any signs of water intrusion at the wall connection. Neither system is high-maintenance once correctly installed, but SkyLift has more sealing surfaces to monitor over time.
DIY vs. pro installation: where each system gets risky
Patio Roof Riser is the more DIY-accessible option if you're comfortable with basic carpentry and you have a compatible roof type. The kit includes all required hardware for basic installation, the LO-PRO spacing of 4 feet on center is a clear, manageable layout, and you're not cutting holes in your roof. That said, "DIY-accessible" doesn't mean permit-free. Depending on your jurisdiction, any structural attachment to the house that changes a load path may require a building permit and inspection. Check with your local building department before you start.
SkyLift is a different story. Making access holes through your roof, threading risers through the roof deck, and sealing each penetration with pipe-jack flashing requires genuine roofing skill. SkyLift's own installation instructions tell you to check with local building departments to confirm applicable codes, and the product comes with a Technical Evaluation Report specifically because permit applications often require stamped engineering documentation. If you get the sealing wrong on even one penetration, you're looking at a slow leak that can do serious damage before you notice it. I'd call SkyLift a pro-or-very-experienced-DIYer installation, especially on anything other than simple composition shingle roofing.
Both systems become pro territory when: your existing framing is questionable, your roof is tile or concrete, you're in a high-wind or snow-load zone, or your jurisdiction requires stamped plans for patio cover structures. In those cases, the cost of a contractor and permit is far cheaper than fixing structural failures or failed inspections after the fact.
What this does for curb appeal and home value
Covered patios consistently add usable square footage and can improve perceived home value, but the quality of the execution matters as much as the presence of the structure. A raised patio cover that's properly integrated with the roofline and correctly flashed looks intentional and built-in. One that's obviously tacked on with visible mismatches, exposed hardware, or water stains around penetrations looks like a liability to buyers.
SkyLift's approach, when done well, creates a clean transition where the patio cover appears to rise naturally from the main roof, which tends to look more custom and integrated. Patio Roof Riser's beam-mount system can also look clean and intentional, particularly the LO-PRO style, but the visual result depends heavily on how the beam and roofing materials are finished. In both cases, the roofing material you choose for the patio cover itself (matching or complementary to the home) and how well the flashing is executed matter far more for curb appeal than which riser brand you used. This connects directly to the broader patio ceiling material decision, since the visible underside finish of the cover is what most people see from the yard.
Which system fits your situation

Here's a practical decision framework based on the most common scenarios:
| Your Situation | Better Fit | Key Reason |
|---|---|---|
| Composition shingle roof, moderate height gain needed, DIY-capable | Patio Roof Riser (LO-PRO) | No roof penetrations, accessible install, lower total cost |
| Composition shingle roof, large height gain or steep pitch needed | SkyLift or Patio Roof Riser post-mount | SkyLift handles large rises cleanly; post-mount PRR adds pitch |
| Metal roof (standing seam or corrugated) | Patio Roof Riser with caution, or pro assessment | Corrugated metal needs modification; standing seam adds flashing complexity for SkyLift |
| Tile or concrete roof | Pro assessment required for either system | Both require significant modification; PRR FAQ calls it 'arch nemesis' |
| Permit required, need engineering docs | SkyLift | TER documentation available; engineered load specs for code officials |
| Tight budget, smaller project | Patio Roof Riser LO-PRO | Lower hardware cost (~$184.77/unit) and less roofing labor |
| Maximum height gain, custom-look integration | SkyLift | Elevates well above roof surface for dramatic clearance increase |
If your primary goal is gaining a few inches of clearance and better drainage pitch on a standard shingle roof without touching the roof surface, Patio Roof Riser is the simpler, cheaper path. If you need significant height, you have a code official asking for engineering documentation, or your project scope justifies the additional penetration work, SkyLift is the more capable system. Neither is universally better. It really comes down to your specific roof, how much height you need, and what your building department requires. Angi notes that patio cover installation costs can vary by region, material choices, and blank" rel="noopener noreferrer">local building code requirements. If you're wondering how high is a patio table, the same kind of clearance planning applies when you measure what height your patio cover and seating will need. Getting the pitch right is non-negotiable either way: maintain at least 1/4 inch per foot of slope and plan your drainage path before you finalize riser placement. If you are wondering what the proper pitch for a patio cover should be, the key guideline is maintaining at least 1/4 inch per foot of slope and planning drainage before final placement.
Common mistakes and how to avoid them
- Ignoring slope requirements: Many people focus entirely on headroom and forget that raising the attachment point changes the slope. Measure from your proposed attachment height to the outer edge of the cover and calculate the resulting pitch before you order anything. Aim for at least 1/4 inch per foot; anything less risks ponding.
- Wrong roof type for the system: Using Patio Roof Riser on a corrugated metal or tile roof without accounting for the required modifications is one of the most common planning mistakes. Confirm your roof type against the system's compatibility guidelines first.
- Skipping or rushing flashing: For SkyLift, every penetration needs proper pipe-jack flashing lapped and sealed per manufacturer instructions. Cutting corners here is how slow leaks start. Use the correct flashing product for your roof material and lap it correctly over shingles or under metal panels.
- Underestimating structural impact: Raising the attachment point changes the load path. If your existing rafters or beams are undersized, the new geometry makes that problem worse, not better. Inspect your existing framing condition and sizing before adding height.
- Spacing hardware incorrectly: Patio Roof Riser LO-PRO is recommended at 4 feet on center. Spacing risers too far apart puts excessive load on each connection point. Follow the manufacturer's spacing guidance and cross-check with local span tables for your beam size.
- Skipping the permit conversation: Both systems may require permits depending on your jurisdiction, especially because they involve structural attachments to the house. Check with your local building department before breaking ground. Getting caught with an unpermitted structure attached to your roof is expensive to resolve.
- Not accounting for drainage path changes: Raising the cover changes where water lands when it leaves the patio roof edge. Make sure the runoff path doesn't direct water toward a foundation, a neighbor's property, or a location that causes erosion. Plan gutters or drip edges at the design stage, not as an afterthought.
- Mismatched fasteners or hardware substitution: Both systems specify fastener types and sizes for a reason. Substituting random lag bolts or screws can reduce shear and pullout capacity. Use what the instructions specify.
Before you call anyone: what to measure and inspect
Before you contact a supplier or contractor, gather this information so you can get an accurate quote and avoid back-and-forth:
- Current attachment height: measure from the ground to where the existing ledger or beam connects to the house, and where you want it to end up
- Existing roof material type: composition shingle, metal (and which profile), tile, or other
- Patio cover span: the distance from the house to the outer post or beam, which determines your required slope drop over that distance
- Existing framing condition: look for rot, insect damage, or undersized lumber at the current attachment point
- Rafter and beam sizes currently in use: you may need to upsize if height gain increases spans
- Local building department requirements: ask specifically whether a patio cover structural attachment requires a permit, and if so whether engineered drawings are required
- Roof pitch of the main house roof: this affects how a SkyLift penetration is flashed and whether the riser height needs to account for roof slope
- Photos of the current attachment point and roof surface from multiple angles: any contractor or supplier you contact will want these
When you talk to an installer, ask specifically: which riser system they've installed before, how they handle flashing on your roof material type, whether they pull permits and coordinate inspections, and what warranty they provide on the waterproofing work. The railing height on your patio cover and the pitch of the cover itself also feed into the overall design, so it's worth having those numbers ready when you're talking through options with a contractor. For railing height, follow local code requirements and use the same design measurements so the patio cover pitch and drainage plan stay consistent with the guard height railing height on your patio cover.
FAQ
Can I switch from Patio Roof Riser to SkyLift after I already started the project planning (or ordering)?
Usually not without redesign. Patio Roof Riser is built around beam or exterior-wall mounting, while SkyLift requires roof-deck penetrations and a separate flashing and load path plan. If you change systems midstream, re-check framing sizing, drainage direction, permit requirements, and whether your roof surface can be cleanly cut and resealed (especially near penetrations like vents or skylights).
How do I know my patio cover pitch will still meet drainage needs after using a riser?
Don’t rely on the kit height alone, calculate slope from your final beam elevation to the water discharge side. Confirm your target drainage is at least 1/4 inch per foot (and higher if required by your roofing system or local code). If the computed pitch comes out marginal, you may need to adjust riser placement, overall cover design, or run a different roof surface. Also plan a clear path away from the house, gutters, or siding transitions.
What happens if the patio cover drains toward the house instead of away from it?
Even with correct flashing, water can still track back to fascia, stucco, or the main roof edge and cause staining or hidden moisture. Before you finalize riser positions, map where each downpour will flow from the raised cover, then verify it won’t spill onto wall joints, near doors, or into roof valleys. If needed, adjust slope direction or add a designed gutter/drainage detail rather than hoping the pitch alone solves it.
Do I need engineering or stamped plans for both systems, or only SkyLift?
It depends on your jurisdiction and the scale of the change. SkyLift commonly triggers permitting because of roof penetrations and the provided Technical Evaluation Report, but Patio Roof Riser can also require stamped documentation if it changes structural load paths or guardrail or wind-uplift requirements. The safest approach is to ask your building department what triggers stamped plans, then provide the appropriate documentation from the product paperwork.
Can I use these systems on a roof with skylights, roof vents, or other existing penetrations nearby?
Be careful with spacing. Roof penetrations affect where you can place risers and how you can flash around multiple nearby openings without creating overlapping water pathways. Typically you need a roofer’s plan for sequencing flashing lapping order, maintaining clearance from vents and skylights, and ensuring you are not cutting into framing members that are required for support.
Will my homeowner’s insurance automatically be voided if something leaks after installation?
Insurance isn’t usually a simple automatic void, but denied claims are common when workmanship or code compliance is in question, especially for water intrusion caused by preventable flashing failures. To protect yourself, require written documentation of waterproofing work (materials used, flashing method, and inspection sign-off if applicable) and keep photos showing installation steps. If permits are required, skipping them increases the risk of claim denial.
How often should I inspect flashing for each system?
Plan for at least an annual look-over for both. For SkyLift, focus on every pipe-jack penetration for signs of lifted sealant, cracked caulk, corrosion around fasteners, and any water staining on adjacent ceiling surfaces after storms. For Patio Roof Riser, inspect beam-to-wall connections and any transitions where water could enter, then re-check fastener tightness after seasonal expansion and contraction.
What are common installation mistakes that lead to leaks, especially with SkyLift?
The most frequent failure mode is incorrect flashing integration, such as not achieving the proper lapping order, leaving a gap under the flashing collar, or using sealants in the wrong places. Another common issue is missing or under-driving fasteners at the correct location and torque, or rushing roof cuts through dense materials where cracking occurs. For SkyLift, treat each penetration as a critical waterproofing task, not a routine hole-and-flash step.
Can either system work on concrete or tile roofs without major rework?
If the roof is truly concrete or tile, assume major rework risk. Patio Roof Riser is typically not a straightforward fit on tile or concrete because you generally cannot rely on basic mounting and standard shingle-style sealing. SkyLift can be more complex too because clean, durable penetrations and flashing are much harder. In these situations, involve a roofer early, ask how they will flash around tiles or masonry without cracking, and confirm whether additional underlayment and back-plate detailing are required.
Does the recommended 4 feet on center spacing for Patio Roof Riser matter for structural safety?
Yes, it’s part of how the kit maintains intended load transfer and spacing for the raised beam support. Don’t assume you can stretch the spacing to reduce cost. If your patio cover framing, spans, or load conditions differ from typical configurations, you may need engineered adjustments to spacing, beam size, or anchor detail to stay within allowable loads.
How do I estimate the real total cost before buying hardware?
Budget beyond the hardware by line item: roofing modifications (cuts or avoided cuts), flashing materials and underlayment, possible framing reinforcement, permit and engineering fees if required, and cleanup. A common mistake is using only the riser kit price and ignoring labor for waterproofing and structural adjustments. Get a quote that breaks out flashing labor separately so you can compare bids fairly.
Is DIY practical for both systems, or only one?
Patio Roof Riser is often more DIY-accessible because it typically avoids cutting the main roof surface, but you still may need a permit if load paths change. SkyLift is generally a pro-or-very-experienced-DIYer job because roof penetrations and flashing quality are critical. Even if you DIY, consider having a roofer verify flashing details and watertightness before you close up surfaces.
What details should I provide to an installer to get an accurate quote?
Share roof type and age, photos of the roof and the area where the patio cover will connect, the target headroom increase, your desired drainage direction, and the measured patio cover span and rafter or joist layout. Also tell them whether you have tile, slate, metal, or thick roofing, and whether you need a permit or stamped plan. Having railing height and any safety constraints ready helps the contractor align overall cover geometry and guard height with the drainage and slope plan.
My Lawn Is Higher Than My Patio: Fix Drainage and Grades
Fix yard grading where lawn sits higher than patio to stop pooling, runoff, and trip hazards with DIY or pro options.