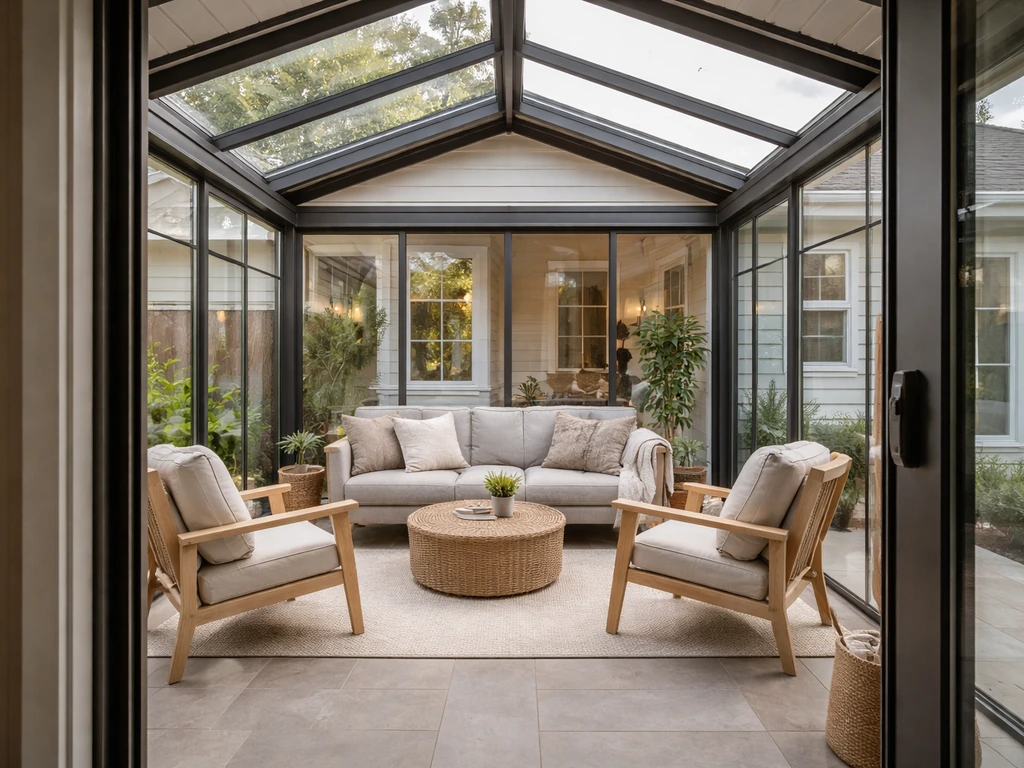
Enclosing a patio into a room means adding walls, a roof (or tying into your existing one), and some form of glazing or screening so the space becomes weather-protected and livable. Depending on how far you go, you end up with either a three-season room (comfortable spring through fall, unheated in winter) or a true year-round addition with insulation, HVAC, and full weatherproofing. Most homeowners with a concrete slab patio can do this for somewhere between $8,000 and $50,000+ depending on size, materials, and finish level. The right approach depends on your climate, how you plan to use the space, and whether your existing structure can support the new build.
How to Enclose a Patio Into a Room: Step-by-Step Guide

Miles Hart
6 May 2026
Three-season room or year-round space: figure this out first
This is the most important decision you'll make before anything else, because it affects your budget, your permitting path, and every material choice that follows. A three-season room is essentially a screened or glazed enclosure that keeps bugs, wind, and rain out but isn't insulated or conditioned. You can use it comfortably from April through October in most U.S. climates. A year-round room is a full addition: insulated walls, insulated glass, a conditioned roof assembly, and connection to your home's heating and cooling system. It's significantly more expensive and requires more permitting, but it adds more livable square footage and more home value.
A few questions help you decide. Do you want to use the space in January? If yes, you need the year-round route. Is your patio in a climate with mild winters, like the Gulf Coast, Southern California, or the Pacific Northwest? A three-season room might work nine or ten months a year. Do you have an existing covered patio roof, or are you starting from an open slab? If you already have a patio cover or pergola, converting that to a screened or glazed enclosure is dramatically simpler than building a new roof structure from scratch. And what's your budget? A three-season screen enclosure can run $8,000 to $18,000. A fully conditioned glass sunroom addition starts around $25,000 and can push past $80,000 for larger spaces with premium materials.
Pick your enclosure system: screens, clear panels, polycarbonate, or insulated glass
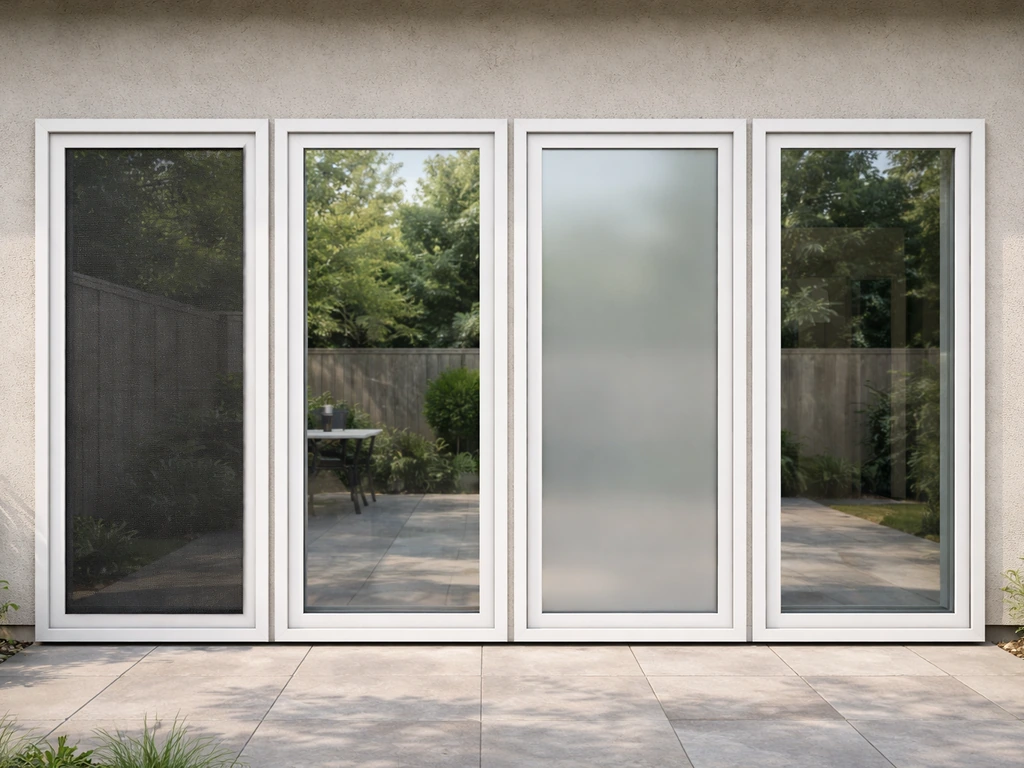
This is where most homeowners get overwhelmed, because there are genuinely four distinct systems with very different performance levels and price points. Here's how they compare honestly.
| System | Best For | Typical Cost (Materials + Install) | Insulation Value | Trade-offs |
|---|---|---|---|---|
| Aluminum screen panels | Bug-free outdoor living, ventilation, mild climates | $8,000–$15,000 for typical patio | None (uninsulated) | No weather protection from cold or hard rain; limited privacy |
| Clear vinyl/polycarbonate panels | Wind and rain protection, mild winters, budget builds | $10,000–$20,000 | Low to moderate (R-2 to R-4 depending on thickness) | Can yellow/haze over time; condensation in cold climates; less attractive |
| Single-pane glass windows and doors | Three-season rooms, moderate climates, tighter look | $15,000–$28,000 | Low (R-1 to R-2) | Not suitable for cold climates without supplemental heat; condensation risk |
| Insulated double or triple-pane glass (IGU) | Year-round rooms, cold climates, maximum comfort | $25,000–$70,000+ | High (R-3 to R-6+ depending on glass spec) | Highest cost; requires full framing, HVAC tie-in, and permits in most jurisdictions |
Polycarbonate panels sit in an interesting middle ground. They're lightweight, shatter-resistant, and come in twin-wall or triple-wall profiles that actually provide decent insulation (twin-wall is around R-1.5, triple-wall around R-2.5). They're a popular choice for patio roofs and side enclosures in moderate climates and cost significantly less than glass. The downside is appearance: polycarbonate looks more like a greenhouse than a sunroom, and it can degrade with UV exposure over 10 to 15 years. If aesthetics matter to you, budget for tempered or laminated glass.
For a year-round room, you want low-E double-pane insulated glass units (IGUs) as a minimum. Low-E coating reflects infrared heat back inside in winter and blocks solar heat gain in summer. In cold climates (Zone 5 and above), triple-pane glass with argon fill is worth the premium. The U-factor on your glass should ideally be 0.30 or below for year-round comfort.
Plan the structure: roof tie-in, walls, doors, and openings
The slab and foundation

Most existing concrete patios are 3.5 to 4 inches thick, which is enough to support walls and a lightweight enclosure but may not be sufficient for a full room addition with heavy glass walls or a tiled floor. Before you frame anything, have your slab checked for cracks, settlement, and proper drainage slope. A slab that drains away from the house is fine for outdoor use but can become a water management problem once you enclose it. If you’re starting with a concrete slab patio, you’ll want to confirm it can support the framing and any drainage changes before planning a sunroom build. You may need to fill and level low spots, add a drain, or in some cases pour a thickened slab edge to anchor wall framing. If your patio was poured without footings, your local building department may require perimeter footings before issuing a permit for an enclosed room.
Roof options
You have three main paths for the roof. First, if your patio already has a solid cover (attached shed roof, gable roof, or pergola with roofing), you may only need to add walls and glazing underneath it. This is the lowest-cost scenario. Second, you can tie a new lean-to roof into the existing house wall by flashing into the wall sheathing and running a ledger board connected to the house structure. This requires careful flashing work to prevent water intrusion and may require an engineer if you're spanning more than 12 to 14 feet. Third, for a true addition that matches the house, you extend the existing roofline over the new space. This is the most expensive and structurally complex option but looks best from the street.
Roof load is where people underestimate the engineering. Polycarbonate and screen panels are light and don't add much load. Glass roofing panels or heavy tile over a new roof structure do. If you're adding a glass roof (popular for sunrooms), the framing needs to be engineered for the dead load of the glass plus your local snow load. In snow country, a glass roof needs a pitch of at least 3:12 to shed snow, and many installers recommend 5:12 or steeper.
Walls, doors, and openings
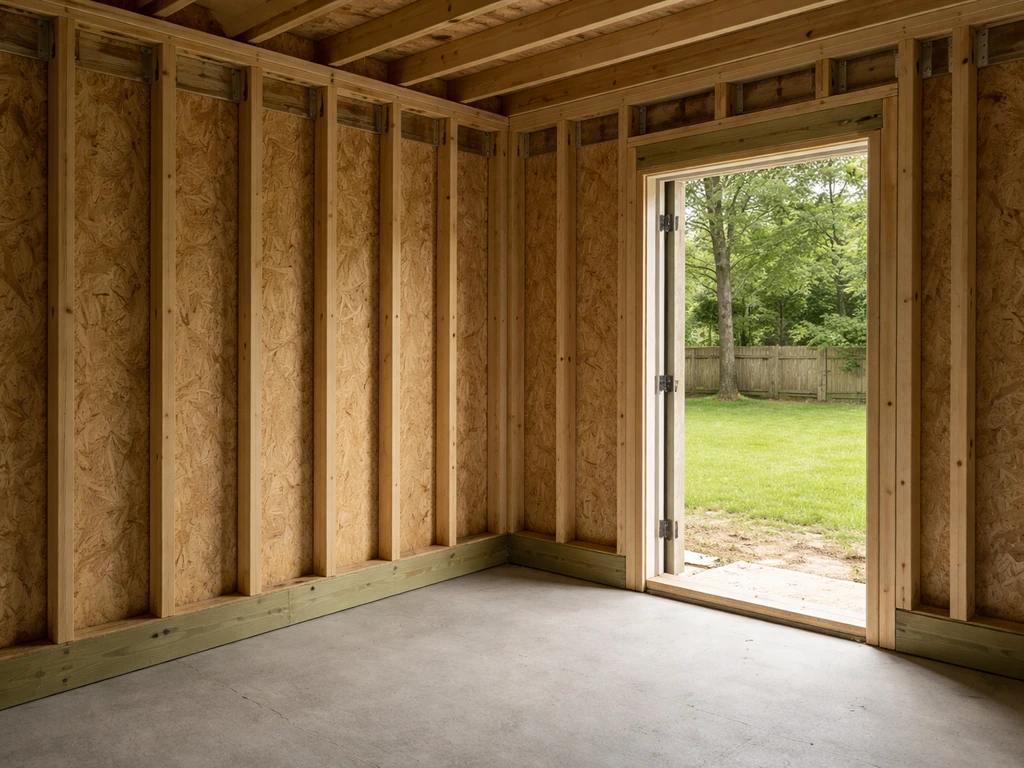
The framing for enclosure walls is typically pressure-treated lumber or aluminum extrusion, depending on the system you choose. Pre-engineered aluminum sunroom systems (sold by brands like Patio Enclosures, Four Seasons, or Sunroom Designs) come with their own extrusion framing that snaps together and accepts standard glass or screen panels. These systems are faster to install and work well for DIY or contractor builds. Stick-frame construction using wood framing is more flexible for custom sizes and integrates more naturally with your home's existing structure, but it requires more skill to weatherproof correctly.
Plan at least one operable door to the exterior (required by code for egress in most jurisdictions if the space is classified as a room) and think carefully about how the new space connects to the house interior. Many homeowners remove the existing sliding or French doors between the house and patio to open the two spaces together. That works well but also means your home's HVAC is now trying to condition the new space whether you want it to or not, which can be a problem if the enclosure isn't insulated to match the rest of the house.
Weatherproofing and comfort: insulation, ventilation, and condensation
This is where three-season rooms and year-round rooms diverge completely. A three-season screen room needs almost no insulation but does need good ventilation to prevent it from turning into an oven in summer. Operable screens on multiple walls, a ceiling fan, and a shaded roof go a long way. If you're adding solid polycarbonate or glass panels instead of screens, you need to plan for ventilation openings or operable windows, because a glazed enclosure with no airflow will hit 120 degrees on a July afternoon.
For a year-round room, treat it like any other room addition. Walls need a minimum of R-13 (batts in 2x4 framing) up to R-21 (batts in 2x6 framing) depending on your climate zone. The roof assembly should hit R-38 to R-49 in cold climates. If you're using a glass roof, the glass itself won't reach those values, so you compensate with higher-performing glazing and accept some heat loss. A mini-split heat pump is by far the most practical HVAC solution for an enclosed patio room: it handles both heating and cooling, doesn't require ductwork, and can be installed without touching your home's existing HVAC system. A single 9,000 BTU to 12,000 BTU unit handles most patio rooms under 300 square feet.
Condensation is the sneaky problem nobody talks about enough. When warm interior air hits cold glass, you get condensation on the inside of the windows. ASHRAE notes that low-e coatings are applied to internal protected glazing surfaces, and that in colder climates or with higher indoor humidity, some approaches can increase the risk of blank" rel="noopener noreferrer">moisture condensation on glass surfaces. This is mostly a function of indoor humidity and glass surface temperature. Low-E double-pane glass dramatically reduces this because the interior glass surface stays warmer. If you're using single-pane glass or polycarbonate in a space you're trying to heat in winter, expect condensation pooling at the bottom of panels, running down walls, and potentially damaging your framing over time. Vapor barriers in walls, proper air sealing at all joints, and a dehumidifier in transitional seasons go a long way toward managing this.
Budget reality and what drives the cost up
Here are realistic cost ranges for the most common project types, assuming an average patio size of 200 to 300 square feet and U.S. labor rates in 2025 and 2026.
| Project Type | DIY Material Cost | Contractor Total (Installed) | Key Cost Drivers |
|---|---|---|---|
| Screen enclosure (aluminum frame + screen panels) | $3,500–$7,000 | $8,000–$18,000 | Perimeter linear footage, roof framing needed, door count |
| Three-season room with polycarbonate walls and roof | $5,000–$12,000 | $12,000–$25,000 | Roof span, polycarbonate grade, foundation work |
| Three-season sunroom (pre-engineered aluminum + single-pane glass) | $8,000–$15,000 (kit) | $18,000–$35,000 | Kit brand, glass upgrades, electrical, flooring |
| Year-round sunroom addition (insulated glass, conditioned) | $15,000–$30,000 (materials only) | $30,000–$75,000+ | Glass spec, insulation, HVAC, permits, structural work, finish level |
| Full room addition (matches house, stick-framed) | Not typically DIY | $50,000–$120,000+ | Foundation, roofline extension, electrical, HVAC, finishes |
The biggest cost drivers beyond size are: whether you need new roof structure (adds $5,000 to $15,000 for framing and roofing), foundation work like footings or slab repair (adds $2,000 to $10,000), electrical (lighting, outlets, mini-split circuit typically adds $1,500 to $4,000), and finish level (tile floor vs painted concrete, drywall vs exposed framing). Permits and engineering can add $500 to $3,000 depending on your municipality.
What you can realistically DIY
Screen enclosures are the most DIY-friendly option. Pre-cut aluminum extrusion kits are designed for homeowner installation, and dozens of YouTube walkthroughs show the process clearly. If your patio already has a solid roof, a competent DIYer with basic carpentry skills can install a screen enclosure in a long weekend. Pre-engineered sunroom kits (like those from Four Seasons or Sunroom Connection) are also designed for DIY but are more complex: you're working with heavier glass panels, and installation mistakes cause leaks and structural issues that are expensive to fix. For year-round rooms with insulated walls, electrical, and HVAC, most homeowners should hire a contractor for the structural and mechanical work even if they handle demo and finish work themselves.
Permits, codes, and building this safely
Almost every enclosed patio project requires a permit if it's going to be classified as a room or habitable space. The threshold varies by municipality, but as a rule of thumb: if you're adding a roof structure, insulated walls, electrical, or HVAC, expect to pull a permit. Screen enclosures in many jurisdictions can be permitted under a simpler "accessory structure" category with fewer requirements, but you still need to check. Skipping the permit is a real risk: unpermitted additions can cause problems when you sell, may not be covered by homeowner's insurance, and in some cases require demolition if discovered during a sale inspection.
When you go to your building department (most now have online portals), you'll typically need a site plan showing the patio location relative to property lines (setbacks matter: most residential zones require 5 to 10 feet from side and rear property lines), a floor plan of the new space, wall and roof cross-section details showing insulation and framing, and for larger projects, a structural engineer's stamp. If you're using a pre-engineered kit system, the manufacturer often provides stamped drawings that your building department will accept, which saves money on engineering fees.
Inspections typically happen at three stages: foundation/slab (before framing), rough framing and rough electrical (before walls are closed), and final (when everything is complete). Plan your project timeline around these inspection windows, which can take one to two weeks each in busy building departments.
One thing worth knowing: if your enclosure will be connected to the main house and share HVAC, it typically needs to meet the same energy code requirements as the rest of the house. In cold climates, that means insulated walls, specific window U-factor requirements, and sometimes a Manual J load calculation to prove your HVAC system can handle the added square footage. If you're keeping the space separate (its own mini-split, closed off from the house), the requirements are often less strict.
How this compares to other outdoor conversions
It's worth saying explicitly: enclosing a patio into a room is not the only path, and it's not always the best one. If your patio is a simple concrete slab with no existing cover, you're essentially building a room addition from scratch that happens to start with a concrete floor. In that case, comparing the cost and value of a sunroom addition versus a full room addition (bump-out) versus a conservatory is worth doing before you commit. A conservatory is a greenhouse-style enclosure, and the best approach depends on your glazing, ventilation, and how the structure ties into the patio and house. If you already have a covered patio or a concrete slab patio that ties into the house well, enclosing it is usually the most cost-effective path to added livable space.
Home value impact is real but varies. A well-finished sunroom addition returns roughly 50 to 70 cents on the dollar at resale on average, which is lower than kitchen or bathroom renovations but meaningful for livability. A screen enclosure adds less to appraised value but costs far less to build. The highest returns tend to come from year-round conditioned rooms that are counted as finished square footage on the appraisal, which requires meeting all code requirements for ceiling height, insulation, and HVAC.
Your next steps: a practical checklist to get started today
Here's a realistic sequence to move from "thinking about it" to breaking ground. Most homeowners can complete steps one through four in a single weekend.
- Measure your patio: record the length, width, and height to any existing overhead structure. Note the distance from the patio edge to your property lines on all sides.
- Assess the existing slab: look for cracks wider than 1/4 inch, settlement or unlevel areas, and which direction it drains. Take photos.
- Decide three-season vs year-round: based on your climate (look up your IECC climate zone), how many months per year you want to use the space, and your budget ceiling.
- Research your local permit requirements: visit your municipality's building department website or call them. Ask specifically whether your project requires a permit, what drawings are needed, and what the setback requirements are for your zoning district.
- Get three quotes from contractors: ask each one to specify the enclosure system, framing material, glass spec (U-factor and SHGC), insulation R-values, and whether the quote includes permits and inspections.
- If DIYing a screen or polycarbonate enclosure, request quotes from two or three kit suppliers (like Patio Enclosures or local aluminum suppliers) with your measurements. Ask for a materials list and installation manual before committing.
- Plan your electrical: decide whether you want ceiling fans, lighting, outlets, and a mini-split circuit. Have an electrician walk the space and give you a rough quote before you frame walls.
- Set a realistic timeline: screen enclosure projects typically take two to four weeks from permit to completion. Pre-engineered sunroom kits take four to eight weeks. Full year-round additions with permitting and inspections realistically take three to six months from design to completion.
The materials checklist varies by system, but for any enclosed patio project you'll need: pressure-treated lumber or aluminum extrusion for framing, your chosen panel system (screen, polycarbonate, or glass), flashing and sealant for the roof-to-wall and wall-to-house connections, a threshold or transition strip at the interior door, and fasteners rated for exterior use. If you're insulating, add your insulation batts, vapor barrier, and whatever interior finish you're using (drywall, bead board, or exposed framing).
The biggest mistake people make is starting with the aesthetics and working backward. Start with climate, then code, then structure, then materials, then aesthetics. If you're planning this in Australia, the key is matching your enclosure design to local climate conditions, wind loads, and local permitting rules before you start building how to enclose a patio australia. Get the fundamentals right and the finished room will work well for decades. Rush through the planning stage and you'll be dealing with leaks, condensation, and comfort problems within a few winters.
FAQ
Will my enclosed patio be treated as a room or an accessory structure for permitting?
For most municipalities, the project is treated as “habitable” if it’s enclosed and you can heat or cool it like a room. In practice, ask your building department whether a screen enclosure counts as an accessory structure, while insulated, roof-tied, glass-heavy builds usually trigger the full room addition rules (energy, egress, ceiling height, and inspections). The classification also affects what kind of permit drawings you need (simple kit drawings versus stamped structural plans).
What’s the biggest reason winter comfort fails in enclosed patios?
If you plan to use the space in winter, plan for an air-tightness and thermal break strategy, not just “adding panels.” Use weatherstripping at doors, seal roof-to-wall and wall-to-slab joints, and consider an insulated curbing or thickened edge where the wall meets the slab to reduce cold bridging. Without that, you may get condensation on window corners and drafty spots even if your glass looks insulated.
If I use double-pane low-E windows, do I automatically have a year-round room?
Not always, but “insulated glass” does not automatically make the room year-round. You need insulated walls and an insulated roof assembly (or high-performance equivalent), plus a heating or cooling plan that matches the added load. Also confirm whether your glass type and glazing layout can handle your climate extremes, because solar gain in summer can overheat a lightly ventilated enclosure even when windows are low-E.
How do egress and door placement work for enclosed patio rooms?
Yes, egress rules can apply even if the space feels like a sunroom. Many jurisdictions require a means of escape from every habitable floor area, often satisfied by an exterior door. If your patio is being converted into a room and you lose access through the house, your plan may need a second operable door or an operable window sized for emergency egress, depending on local code.
Do I need ventilation if my patio is fully enclosed with glazing?
A polycarbonate or screen enclosure usually needs ventilation sizing, not just “some airflow.” In hot months, prioritize multiple operable panels or windows on opposite sides to create cross-ventilation, and include a ceiling fan if you want comfortable air movement. If you choose solid glazing, you may need intentional vents or operable sections so the enclosure does not become a heat trap, especially late afternoon.
Can a typical patio slab support walls and a sunroom floor, and what should I verify?
Your slab thickness can be enough for light framing, but the real issue is anchorage and water management. Check for cracks, settlement, and whether water currently drains away from the house. If you change the drainage pattern when you add walls or a threshold, you may need regrading, a perimeter drain, or a raised floor transition to prevent water from migrating into the structure.
What are the most common leak points on enclosed patio roofs?
Yes, especially where the new structure ties into the house roof or wall. Any roof-to-wall connection must be flashed correctly, with layered shingle-style or membrane-style details depending on your roof type. If you’re in a windy area, also consider wind uplift design, proper fastener patterns, and closures at every panel seam, because leaks often show up at the intersections first.
How do I size HVAC for an enclosed patio room so it doesn’t over- or under-condition?
Most homeowners use a mini-split because it’s simple to ductless and can be installed without modifying the house HVAC. However, sizing matters: a “typical” BTU range can be wrong if your enclosure has heavy glazing, high solar exposure, or poor insulation. The safest next step is a Manual J (or equivalent) load estimate for the new space so the indoor unit capacity, head placement, and outlet circuit are sized correctly.
How can I prevent condensation from damaging the framing and floors?
Expect condensation risk any time warm humid air meets a colder interior glass surface, and risk increases with single-pane glazing or in unheated transitional seasons. Use low-E double-pane as you planned, and also address humidity with controlled ventilation or a dehumidifier. For structural longevity, make sure bottom edges and window frames are detailed to handle water safely (drip management), not just “sealed and hope.”
Are pre-engineered sunroom kits always easier, and what should I double-check?
A kit system can reduce design work, but you still need to confirm compatibility with your site. Verify dimensions against your slab conditions, check that the kit includes structural reinforcement where needed, and confirm it comes with stamped drawings accepted by your building department. Also plan for how your threshold and door will align with the kit’s wall rails so you do not create gaps that leak air and water.
What finishing choices change the long-term comfort and durability of the enclosed patio?
Finishes drive more than appearance, they affect maintenance and heat gain. For example, tile floors and drywall look “room-like,” but they can complicate moisture control if the enclosure is only three-season. In a screen or lightly insulated enclosure, consider finishes designed to tolerate temperature swings and occasional condensation, and avoid materials that trap moisture against framing.
What are the real risks if I skip the permit for enclosing a patio?
Skipping the permit can create expensive surprises later. If the space is considered habitable, it can affect resale appraisal and may require bringing it up to code if discovered during sale inspections. Even if it’s not forced to be demolished, you might need retrofits like adding insulation, upgrading electrical, adding egress, or producing engineering documents.
Next Article
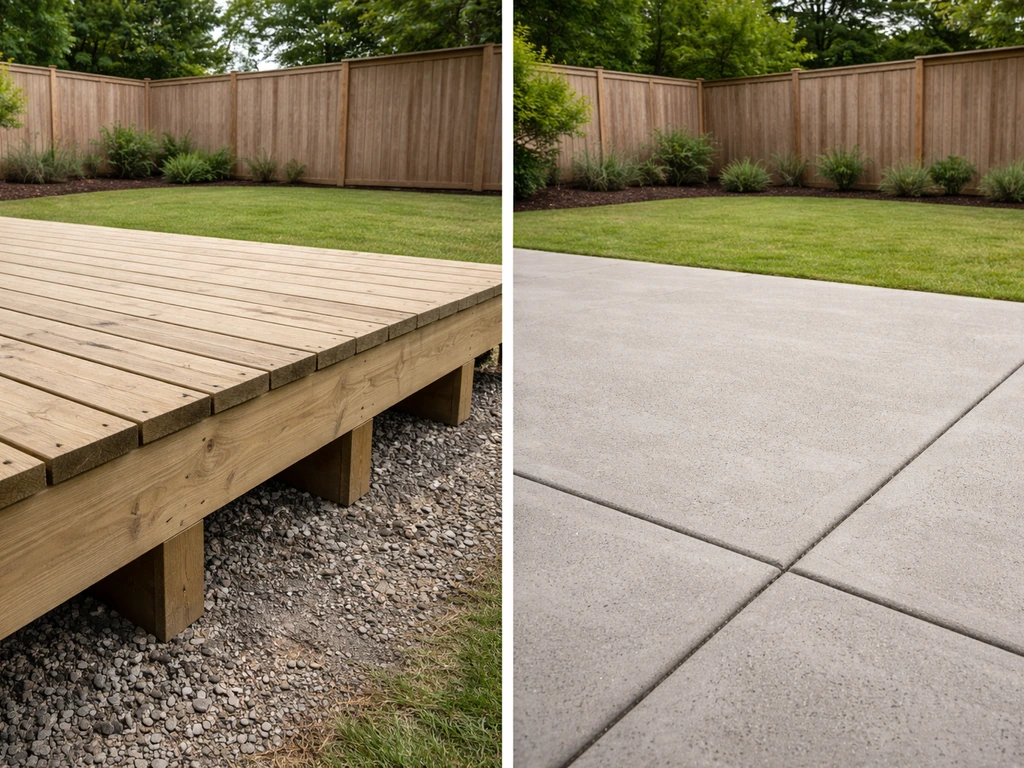
Ground Level Deck vs Patio: Costs, Durability, and Fit
Compare ground level deck vs patio on costs, build methods, durability, maintenance, and usability to pick the best fit.